
Use and Care Manual
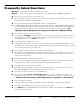
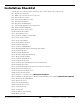

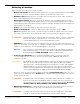
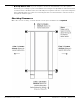
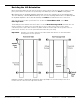
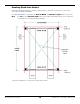
Table Of Contents
- HD-9 Manual
- Table of Contents
- Introduction
- Shipping Information
- Safety Considerations
- Components
- Specifications
- Frequently Asked Questions
- Installation Checklist
- Installation
- Being Safe
- Using Tools
- Planning for Electrical Work
- Selecting a Location
- Checking Clearances
- Deciding the Lift Orientation
- Creating Chalk Line Guides
- Unloading and Unpacking
- Moving the Posts into Position
- Installing the Crosstubes
- About Safety Locks
- Installing the Ladders and Top Cap
- Raising the Crosstubes
- Securing the Ladders
- Removing the Sheaves
- Installing the Runways
- Installing the First End of the Flex Tube
- Routing the Lifting Cables
- Working with Compression Fittings and Tubing
- Installing the Air Lines
- Installing the Return Line
- Hydraulic Fluid Contamination
- About Thread Sealants
- Installing the Hydraulic Hose
- Installing the Power Unit
- Filling the Hydraulic Fluid Reservoir
- Installing the Second End of the Flex Tube
- Installing the Pushbutton Air Valve
- Connecting the Return Line
- Connecting the Hydraulic Hose
- Contacting the Electrician
- Connecting the Power Source
- Installing a Power Disconnect Switch
- Installing a Thermal Disconnect Switch
- About Effective Embedment
- Anchoring the Posts
- Final Leveling
- Installing Accessories
- Lubricating the Lift
- Bleeding the Hydraulic Cylinder
- Test the Lift
- Final Checklist
- Outdoor usage
- Operation
- Maintenance
- Troubleshooting
- Wiring Diagrams
- Labels
- Parts Drawings
- Automotive Lift Institute (ALI) Store

HD-9 Series Four-Post Lifts 20 P/N 5900123 — Rev. M1 — March 2020
Unloading and Unpacking
Once the components are unloaded, they are your responsibility to move around. As the Lift includes a
number of heavy pieces, the closer you unload them to the installation location, the better off you are.
⚠ CAUTION Some Lift components are very heavy; if handled incorrectly, they can damage
materials like tile, sandstone, and brick. Try to handle the Lift components twice:
once when delivered and once when moved into position. You must have a Forklift
or Shop Crane to move them into position. Use care when moving them.
⚠ WARNING The Posts and Runways are delivered with stabilizing structures on each end. Be
very careful when removing these stabilizing structures; the Posts and Runways
can shift or even fall. If they fall on a person, they could cause serious injury.
Moving the Posts into Position
Use a Forklift or Shop Crane to move the Posts, one at a time, to the inside corners of the Chalk Line
Guides.
Important: Position the Power Post at your chosen location. Remember, the Power Post can only
go in two possible locations: the
Front Driver-Side
or the
Rear Passenger-Side
.
The other three Posts can go at any of the remaining Post locations. Refer to
Selecting the Lift Orientation for more information.
Do not stand up the Posts yet
; some of the following procedures are easier to complete if the
Posts are laying on the ground.