
Use and Care Manual


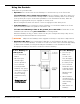
Table Of Contents
- HD-9 Manual
- Table of Contents
- Introduction
- Shipping Information
- Safety Considerations
- Components
- Specifications
- Frequently Asked Questions
- Installation Checklist
- Installation
- Being Safe
- Using Tools
- Planning for Electrical Work
- Selecting a Location
- Checking Clearances
- Deciding the Lift Orientation
- Creating Chalk Line Guides
- Unloading and Unpacking
- Moving the Posts into Position
- Installing the Crosstubes
- About Safety Locks
- Installing the Ladders and Top Cap
- Raising the Crosstubes
- Securing the Ladders
- Removing the Sheaves
- Installing the Runways
- Installing the First End of the Flex Tube
- Routing the Lifting Cables
- Working with Compression Fittings and Tubing
- Installing the Air Lines
- Installing the Return Line
- Hydraulic Fluid Contamination
- About Thread Sealants
- Installing the Hydraulic Hose
- Installing the Power Unit
- Filling the Hydraulic Fluid Reservoir
- Installing the Second End of the Flex Tube
- Installing the Pushbutton Air Valve
- Connecting the Return Line
- Connecting the Hydraulic Hose
- Contacting the Electrician
- Connecting the Power Source
- Installing a Power Disconnect Switch
- Installing a Thermal Disconnect Switch
- About Effective Embedment
- Anchoring the Posts
- Final Leveling
- Installing Accessories
- Lubricating the Lift
- Bleeding the Hydraulic Cylinder
- Test the Lift
- Final Checklist
- Outdoor usage
- Operation
- Maintenance
- Troubleshooting
- Wiring Diagrams
- Labels
- Parts Drawings
- Automotive Lift Institute (ALI) Store

HD-9 Series Four-Post Lifts 67 P/N 5900123 — Rev. M1 — March 2020
Final Checklist
Make sure these things have been done
before
putting the Lift into service:
• Review the Installation Checklist to make sure all steps have been performed.
• Make sure the Power Unit is getting power from the power source.
• Check the Hydraulic Fluid Reservoir on the Power Unit; it must be full of approved Hydraulic Fluid
or automatic transmission fluid.
You can damage the motor by running it without
enough fluid.
• Check the Hydraulic System for leaks.
• Make sure all four Posts are properly anchored, shimmed, level, and stable.
• Make sure all Cables are properly seated in their Sheaves.
• Make sure all Safety Locks are operating normally.
• Make sure the backup Slack Safety Locks are
not
engaged.
• Make sure a copy of the Installation and Operation Manual is left with the Lift.
• If it has not been done already, perform an Operational Test of the Lift with a typical Vehicle. Refer
to Test the Lift.
Outdoor usage
Your Lift is designed for indoor use, but if you decide to use it outside, here’s what you should know:
• You may void your warranty. Damages to the Motor or rusted components on the Lift caused
by outdoor elements are not covered by warranty.
• Cover the Lift. Use a canopy or something similar to block the Lift from the sun and any
precipitation, reducing the impact from it being outside.
• Protect the Power Unit.
This one is really important
. The Power Unit has an electric
motor, so if that motor gets wets, it is possible for someone to get electrocuted, a fire can start,
and most certainly the motor will short circuit and stop functioning. These things are not covered
by the warranty. Always keep the Power Unit and all wiring covered, clean, and dry.
• Increase the Maintenance. Placing your Lift outside subjects it to the outdoor elements like
wind, rain, dust, sunlight, snow, and other corrosive elements; you will need to double the
maintenance on your Lift to minimize the impact from it being outside. For example, if the
maintenance suggests doing something weekly, then do it 2-3 times a week.
• Increase the Replacement Parts. Everything on the Lift breaks down faster if the Lift is
outside, so be prepared to order replacement parts much sooner than with indoor Lifts.