
Full Product Manual
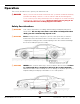
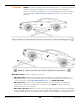
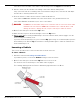


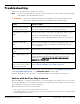
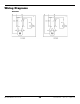
Table Of Contents
- MD-6XP Mid Rise Lift
- Table of Contents
- Introduction
- Shipping Information
- Safety Considerations
- Components
- Specifications
- Installation Checklist
- Installation
- Safety Rules
- Tools
- Select a Site
- Planning for Electrical Work (220 VAC only)
- Clearance Around the Lift
- Unloading and Unpacking
- Assemble the Portable Stand
- Attach the Power Unit to the Portable Stand
- Set up the Tow Cart
- Hydraulic Fluid Contamination
- About Thread Sealants
- Connect the Hydraulic Hoses
- Install the Lift Arms
- Connect the Power Unit
- Install a Thermal Disconnect Switch
- Fill the Hydraulic Fluid Reservoir
- Test the Lift
- Final Checklist Before Operation
- Operation
- Maintenance
- Troubleshooting
- Wiring Diagrams
- Labels
- Parts Diagrams
- Maintenance Log
- Maintenance Log
- Automotive Lift Institute (ALI) Store

MD-6XP Mid-Rise Scissor Lift 27 P/N 5900108 — Rev. F2 — April 2021
3.
Press and hold
the Lowering Handle on the Power Unit.
4. When the Lift is fully lowered, release the Lowering Handle.
5. Push the Lift Arms in towards the Frame.
This is so they are not in the way when the Vehicle is moved.
6. Carefully drive the Vehicle off the Lift.
Move the Lift
⚠ DANGER Do
not
move the Lift or perform any maintenance without first confirming that
electrical power has been disconnected and cannot be re-energized.
The following drawing shows the components used to move the Lift.
To move the Lift:
1. Make sure the Lift is fully lowered, then disconnect the Quick-Connect Fitting from the Long
Hydraulic Hose.
⚠ WARNING Do
not
attempt to connect or disconnect the Hydraulic Hoses while equipment is
loaded or while the Hydraulic System is under pressure.
2. Hook the Tow Pin into the Latch near the bottom the Frame.
3. Using a downward force, push the Tow Cart to raise the Lift
onto its rear wheels, and then carefully move the Lift to the
desired location.
Lubricate the Lift
The drawing to the right details the lubrication points on the Lift.