
Full Product Manual
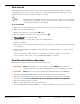
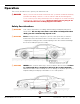
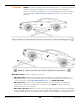
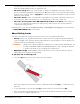
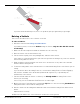
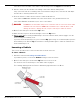


Table Of Contents
- MD-6XP Mid Rise Lift
- Table of Contents
- Introduction
- Shipping Information
- Safety Considerations
- Components
- Specifications
- Installation Checklist
- Installation
- Safety Rules
- Tools
- Select a Site
- Planning for Electrical Work (220 VAC only)
- Clearance Around the Lift
- Unloading and Unpacking
- Assemble the Portable Stand
- Attach the Power Unit to the Portable Stand
- Set up the Tow Cart
- Hydraulic Fluid Contamination
- About Thread Sealants
- Connect the Hydraulic Hoses
- Install the Lift Arms
- Connect the Power Unit
- Install a Thermal Disconnect Switch
- Fill the Hydraulic Fluid Reservoir
- Test the Lift
- Final Checklist Before Operation
- Operation
- Maintenance
- Troubleshooting
- Wiring Diagrams
- Labels
- Parts Diagrams
- Maintenance Log
- Maintenance Log
- Automotive Lift Institute (ALI) Store

MD-6XP Mid-Rise Scissor Lift 26 P/N 5900108 — Rev. F2 — April 2021
If the Lift becomes unstable or the Vehicle starts moving, release the Up Button immediately.
11. Check to make sure the Lift Arms are making solid contact with the Lifting Points.
If any of the Lift Pads are not making solid contact with the Lifting Points, lower the Lift and adjust
the Lift Pads so that they make better contact.
12. Rock the Vehicle to make sure the Vehicle is stable and balanced.
If the Vehicle is
not
stable and balanced, lower the Lift back to the ground and start over.
If the Vehicle
is
stable and balanced, it is safe to raise further.
⚠ DANGER Do
not
raise the Lift further until you are certain the Vehicle on the Lift is both stable
and balanced. If the Vehicle is
not
stable and balanced, it could fall, which could
damage the Vehicle, damage the Lift, or injure or kill anyone under the Vehicle.
13. On the Power Unit, press and hold the Up button.
14. When the Lift just passes the desired height, release the Up button.
15.
Press and hold
the Lowering Handle briefly to move the Lift back down, which engages it on the
most recently passed Safety Lock.
If you miss the desired Safety Lock, press and hold Up again and go for somewhat further past the
desired Safety Lock. Release Up, then hold the Lowering Handle again to lower the Platform onto
the desired Safety Lock.
Lowering a Vehicle
This section describes how to lower a Vehicle that is raised on the Lift.
To lower a Vehicle:
1. Check the items listed in Safety Considerations.
If you find any issues, resolve them
before
starting to lower the Vehicle.
2. On the Power Unit, press and hold the Up Button for a few seconds.
This moves the Lift off the Safety Lock on which it was engaged.
The following drawing shows the Release Cam disengaged from the Lock Block.