
Full Product Manual
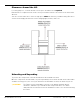
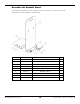
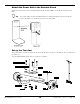
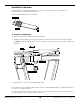
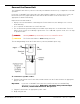
Table Of Contents
- MD-6XP Mid Rise Lift
- Table of Contents
- Introduction
- Shipping Information
- Safety Considerations
- Components
- Specifications
- Installation Checklist
- Installation
- Safety Rules
- Tools
- Select a Site
- Planning for Electrical Work (220 VAC only)
- Clearance Around the Lift
- Unloading and Unpacking
- Assemble the Portable Stand
- Attach the Power Unit to the Portable Stand
- Set up the Tow Cart
- Hydraulic Fluid Contamination
- About Thread Sealants
- Connect the Hydraulic Hoses
- Install the Lift Arms
- Connect the Power Unit
- Install a Thermal Disconnect Switch
- Fill the Hydraulic Fluid Reservoir
- Test the Lift
- Final Checklist Before Operation
- Operation
- Maintenance
- Troubleshooting
- Wiring Diagrams
- Labels
- Parts Diagrams
- Maintenance Log
- Maintenance Log
- Automotive Lift Institute (ALI) Store

MD-6XP Mid-Rise Scissor Lift 15 P/N 5900108 — Rev. F2 — April 2021
About Thread Sealants
The efficiency of your Lift’s Hydraulic system relies on secure connections, which help prevent leaks
and keep contaminants out. We recommend using a Liquid Thread Sealant (like Loctite™ 5452 or
similar PTFE Thread Sealant) to seal the Hydraulic components on your Lift.
Thread Sealant can be used with most Hydraulic Fittings, although you probably only need to use it
with NPT connectors.
To apply Thread Sealant:
1. Make sure the Fittings and connectors you are going to use are clean and dry.
If you are adding Thread Sealant to a Fitting or connector that has already been used with a
different sealant, use a wire brush to thoroughly remove the old sealant before adding more.
2. Apply a small amount of Thread Sealant to the first four threads of the Fitting.
⚠ WARNING Make sure to wear the proper protective equipment when handling Thread Sealant.
You only need a small amount because the sealant spreads to the other threads as it is tightened
into place.
If you put too much, the excess liquid will be pushed out when the Fitting is tightened; use a rag to
wipe the excess.
3. Tighten the Fitting into the connector; do
not
over tighten the Fitting.
4. Allow the manufacturer-recommended curing time before pressurizing the system.