
Full Product Manual
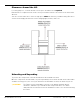
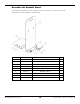
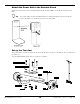
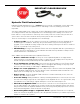
Table Of Contents
- MD-6XP Mid Rise Lift
- Table of Contents
- Introduction
- Shipping Information
- Safety Considerations
- Components
- Specifications
- Installation Checklist
- Installation
- Safety Rules
- Tools
- Select a Site
- Planning for Electrical Work (220 VAC only)
- Clearance Around the Lift
- Unloading and Unpacking
- Assemble the Portable Stand
- Attach the Power Unit to the Portable Stand
- Set up the Tow Cart
- Hydraulic Fluid Contamination
- About Thread Sealants
- Connect the Hydraulic Hoses
- Install the Lift Arms
- Connect the Power Unit
- Install a Thermal Disconnect Switch
- Fill the Hydraulic Fluid Reservoir
- Test the Lift
- Final Checklist Before Operation
- Operation
- Maintenance
- Troubleshooting
- Wiring Diagrams
- Labels
- Parts Diagrams
- Maintenance Log
- Maintenance Log
- Automotive Lift Institute (ALI) Store

MD-6XP Mid-Rise Scissor Lift 14 P/N 5900108 — Rev. F2 — April 2021
IMPORTANT! PLEASE READ NOW
Hydraulic Fluid Contamination
Hydraulic Fluid Contamination poses a
serious
issue for your Lift; contaminants such as water, dirt,
or other debris can get into the Hydraulic Hoses and Fittings on the Lift, making your new Lift
inoperable.
Your Lift is shipped with clean components; however, Bendpak strongly recommends that you take
secondary precaution and clean all Hydraulic Hoses and Fittings prior to making connections. It is
better and less costly to take these extra steps now so that you do not need to take your Lift out of
service later to fix issues that could have been prevented at the time of installation.
There are several ways to clean Hydraulic Hoses and Fittings:
• Compressed Air. Use an air compressor to blow out contaminants from each Hydraulic Hose
and Fitting prior to installation. Clean, dry air is preferred. Wear eye protection (safety glasses,
goggled, or face shield) when using compressed air for cleaning. Never point an air hose nozzle at
any part of your body or any other person.
• Fluid Flushing. As long as the Hydraulic Fluid is clean and compatible with the system fluid, you
can flush the Hoses and Fittings to create turbulent flow and remove particulates. Always ensure
that the fluid itself is contaminant-free.
Some additional steps that will keep the Hydraulic Fluid clean:
• Remove old thread seal tape. Some ports on the Hydraulic Cylinders are shipped with
temporary plugs secured with thread seal tape, so make sure to thoroughly remove any leftover
thread seal tape that may inadvertently enter the Hydraulic System.
• Use a liquid thread sealant only. Teflon paste-type thread sealant or Loctite™ 5452 thread
sealant is recommended for all NPT Fittings. Do not over tighten NPT Fittings or they may crack.
Never use thread seal tape on JIC Fittings or ORB O-Ring Fittings.
• Always use clean equipment. If you use a dirty bucket or funnel to transfer the Hydraulic Fluid
into the Hydraulic Fluid Reservoir, the more likely it is that contaminants will be introduced to the
Fluid. If you use cleaning rags, use a lint-free rag.
• Proper storage. Keep the Hydraulic Fluid sealed in its container until ready for use; store the
fluid in a dry, clean, and cool area.
• Cover the Fittings. During installation or when performing maintenance on the Lift, do not leave
the ends of the Fittings exposed; the same applies for the Hydraulic Hoses. As a general rule, keep
the Hydraulic Hoses and Fittings capped and kept in a clean area until ready for use.
• Filter the new Hydraulic Fluid. Just because it is new does not necessarily mean it is clean.
Use an offline filtration cart or kidney loop system to make sure the Hydraulic Fluid is clean before
being transferred into the Hydraulic Fluid Reservoir (even using a heavy duty nylon mesh screen is
better than trusting what is left at the bottom of the barrel).
• Avoid mixing different types of Hydraulic Fluid. If Hydraulic Fluid needs to be replaced,
make sure to flush the Hydraulic System of the old Hydraulic Fluid before you add the replacement
fluid; do not mix the two together.