
Full Product Manual
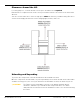
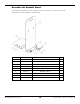
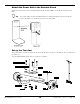
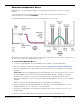
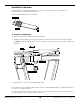
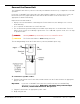
Table Of Contents
- MD-6XP Mid Rise Lift
- Table of Contents
- Introduction
- Shipping Information
- Safety Considerations
- Components
- Specifications
- Installation Checklist
- Installation
- Safety Rules
- Tools
- Select a Site
- Planning for Electrical Work (220 VAC only)
- Clearance Around the Lift
- Unloading and Unpacking
- Assemble the Portable Stand
- Attach the Power Unit to the Portable Stand
- Set up the Tow Cart
- Hydraulic Fluid Contamination
- About Thread Sealants
- Connect the Hydraulic Hoses
- Install the Lift Arms
- Connect the Power Unit
- Install a Thermal Disconnect Switch
- Fill the Hydraulic Fluid Reservoir
- Test the Lift
- Final Checklist Before Operation
- Operation
- Maintenance
- Troubleshooting
- Wiring Diagrams
- Labels
- Parts Diagrams
- Maintenance Log
- Maintenance Log
- Automotive Lift Institute (ALI) Store

MD-6XP Mid-Rise Scissor Lift 11 P/N 5900108 — Rev. F2 — April 2021
Clearance Around the Lift
For safety purposes, a certain amount of clear space around the Lift is
required
.
Extra distance is required on both ends so that you can drive Vehicles onto and off of the Lift in either
direction.
You also need to make sure to leave enough space
above
the Vehicles you will be raising. Be sure to
check for low-hanging obstructions such as hanging lights, beams, and so on.
Unloading and Unpacking
Try to have the components of the Lift unloaded near the installation location.
Once the components are unloaded, it is your responsibility to move them around. As the Lift includes
a number of heavy pieces, the closer you unload it to the installation location, the better off you are.
⚠ CAUTION The Frame is heavy; if handled incorrectly, it can damage materials like tile,
sandstone, and brick. Try to handle the Lift components twice: once when
delivered and once when moved to the installation location. Use care when moving
the Frame.