
Use and Care Manual
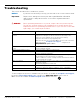


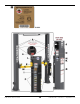

Table Of Contents
- Table of Contents
- Introduction
- Shipping Information
- Safety Considerations
- Components
- Specifications
- Installation Checklist
- Installation
- Reviewing the Safety Rules
- Gathering Your Tools
- Preparing for Electrical Work
- Reviewing the Installation Orientation
- Checking Clearances
- Selecting a Location
- Choosing a Wide or Narrow Configuration
- Installing the Safety Assemblies and Positioning the Safety Lock Cable
- Putting the Equalizing Cables into Position
- About Thread Sealants
- Identifying Hydraulic Fittings
- Routing the Hydraulic Hoses
- Creating Chalk Line Guides
- Anchoring the Posts
- Installing the Overhead Assembly and Safety Shutoff Bar
- Installing the Microswitch
- Completing the Equalizing Cables Installation
- Mounting the Power Unit
- Installing the Safety Lock Cable
- Connecting the Hydraulic Hoses
- Installing the Lift Arms
- Double Threaded Rod Installation
- Leveling
- Contact the Electrician
- Electrical Information
- Wiring the Microswitch
- Connecting the Power Unit
- Installing a Power Disconnect Switch
- Installing a Thermal Disconnect Switch
- Lubricating the Lift
- Review Final Checklist Before Operation
- Leave the Manual with the Owner/Operator
- Perform an Operational Test
- Operation
- Maintenance
- Troubleshooting
- Wiring Diagrams
- Labels
- Parts Drawings
- Automotive Lift Institute (ALI) Store
- Maintenance Log
- Maintenance Log

10AP Series Two-Post Lifts 73 P/N 5900265 — Rev. A10 — September 2023
Troubleshooting Lift Arm Lock Disengagement
⚠ WARNING Avoid excessive Shim heights! A new concrete cutout and steel reinforced pour are
recommended to correct out of level conditions in excess of 3°.
Some floors with excessive out of level conditions may require Shim heights that reach or exceed
.5 in. / 12.7 mm. When the Shim Height reaches this level, the Lift Arm Lock Pins may not function to
disengage the Lift Arms when completely lowered. To correct this condition, the Arm Lock Pins include
an M12 x 1.75 internal thread, approximately 12 mm deep. A mating M12 Hex Head Bolt with Lock
Washers, or a backing nut (not supplied) may be used to extend the contact point of the Arm Lock
Pins. Adjust the Bolt head position to disengage the Lock as required. Refer to the figure below.