
Use and Care Manual
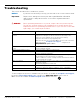
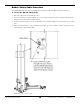

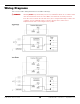


Table Of Contents
- Table of Contents
- Introduction
- Shipping Information
- Safety Considerations
- Components
- Specifications
- Installation Checklist
- Installation
- Reviewing the Safety Rules
- Gathering Your Tools
- Preparing for Electrical Work
- Reviewing the Installation Orientation
- Checking Clearances
- Selecting a Location
- Choosing a Wide or Narrow Configuration
- Installing the Safety Assemblies and Positioning the Safety Lock Cable
- Putting the Equalizing Cables into Position
- About Thread Sealants
- Identifying Hydraulic Fittings
- Routing the Hydraulic Hoses
- Creating Chalk Line Guides
- Anchoring the Posts
- Installing the Overhead Assembly and Safety Shutoff Bar
- Installing the Microswitch
- Completing the Equalizing Cables Installation
- Mounting the Power Unit
- Installing the Safety Lock Cable
- Connecting the Hydraulic Hoses
- Installing the Lift Arms
- Double Threaded Rod Installation
- Leveling
- Contact the Electrician
- Electrical Information
- Wiring the Microswitch
- Connecting the Power Unit
- Installing a Power Disconnect Switch
- Installing a Thermal Disconnect Switch
- Lubricating the Lift
- Review Final Checklist Before Operation
- Leave the Manual with the Owner/Operator
- Perform an Operational Test
- Operation
- Maintenance
- Troubleshooting
- Wiring Diagrams
- Labels
- Parts Drawings
- Automotive Lift Institute (ALI) Store
- Maintenance Log
- Maintenance Log

10AP Series Two-Post Lifts 71 P/N 5900265 — Rev. A10 — September 2023
Troubleshooting
This section describes how to troubleshoot your Lift.
NOTICE If your Lift is not functioning correctly, you must take it out of service until it is fixed.
Important: Replace worn, damaged or broken parts with original BendPak or BendPak
approved parts or with parts that meet or exceed the original manufacturer
specifications.
⚠ DANGER Before performing maintenance on your Lift, verify it is disconnected from power.
The Lift uses electrical energy; if your organization has Lockout/Tagout policies,
implement them before performing any maintenance. If you come into contact with
high voltage, you could be injured or killed.
Issue Action to Take
Lift becomes inoperative in a raised
position.
Verify there is sufficient Hydraulic Fluid in the reservoir.
Verify the Lift Carriages are above and clear of the Safety Locks.
Verify none of the Hydraulic Hoses are pinched or leaking.
Verify the Power Unit is being supplied power.
Make sure the Lift is not overloaded. Make sure the load on the Lift is
balanced. Contact
bendpak.com/support
. or by phone at
(800) 253-2363
, option 7 then 4.
Arms move erratically or squeak when
in use.
Move the Lift Arms up and down a few times to flush any residual air
from the Hydraulic System.
Offside Lift Head will not lower.
See broken Safety Cable procedure below.
Lift does not stay up.
Make sure to leave the Lift engaged on its Safety Locks.
Check for Hydraulic Fluid leaks.
Vehicle on Lift not level.
Make sure Lift is engaged on Safety Locks at the same height. Make
sure the Safety Locks in both Posts are engaged.
If either condition is not met, carefully lower the Vehicle back down to
the ground and raise it again.
Motor not running.
Check connection to power source; make sure it is plugged in and the
appropriate voltage.
Check wiring diagram on Power Unit.
Hydraulic Fluid is dirty.
Replace the dirty Hydraulic Fluid with clean, approved ATF fluids, such
as Dexron III, Dexron VI, Mercon V, Mercon LV, or comparable.
Lift makes odd noises.
Lubricate hinge points using white lithium grease.
Technical support and service is available from your dealer, on the Web at bendpak.com/support,
by email at support@bendpak.com, or by phone at (800) 253-2363, option 7 then 4.
Online chat is also available at www.bendpak.com click the chat icon.