
Use and Care Manual
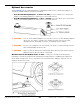
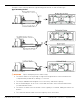
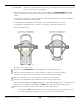


Table Of Contents
- Table of Contents
- Introduction
- Shipping Information
- Safety Considerations
- Components
- Specifications
- Installation Checklist
- Installation
- Reviewing the Safety Rules
- Gathering Your Tools
- Preparing for Electrical Work
- Reviewing the Installation Orientation
- Checking Clearances
- Selecting a Location
- Choosing a Wide or Narrow Configuration
- Installing the Safety Assemblies and Positioning the Safety Lock Cable
- Putting the Equalizing Cables into Position
- About Thread Sealants
- Identifying Hydraulic Fittings
- Routing the Hydraulic Hoses
- Creating Chalk Line Guides
- Anchoring the Posts
- Installing the Overhead Assembly and Safety Shutoff Bar
- Installing the Microswitch
- Completing the Equalizing Cables Installation
- Mounting the Power Unit
- Installing the Safety Lock Cable
- Connecting the Hydraulic Hoses
- Installing the Lift Arms
- Double Threaded Rod Installation
- Leveling
- Contact the Electrician
- Electrical Information
- Wiring the Microswitch
- Connecting the Power Unit
- Installing a Power Disconnect Switch
- Installing a Thermal Disconnect Switch
- Lubricating the Lift
- Review Final Checklist Before Operation
- Leave the Manual with the Owner/Operator
- Perform an Operational Test
- Operation
- Maintenance
- Troubleshooting
- Wiring Diagrams
- Labels
- Parts Drawings
- Automotive Lift Institute (ALI) Store
- Maintenance Log
- Maintenance Log

10AP Series Two-Post Lifts 67 P/N 5900265 — Rev. A10 — September 2023
Lowering a Vehicle
To lower a Vehicle off the Lift, first raise it a small amount to get it off its Safety Locks, then lower it.
To lower a Vehicle off the Lift:
Check under and around the Vehicle to make sure the area is clear of all obstructions.
If you find any obstructions, move them out of the way.
Press and hold the Up Button for a second or two to move the Lift off its Safety Locks.
Raise the Lift at least two inches to get clear of the Safety Locks.
Pull down and hold the Safety Lock Release Handle (on the Powerside Post above and to the right
of the Power Unit).
Push and hold the Lowering Handle (on the front of the Power Unit). The Lift begins lowering.
NOTICE Both the Safety Lock Release Handle and the Lowering Handle must be held down
at the same time to lower the Lift.
⚠ WARNING Do not override the Lift controls. For safety purposes, Lift controls are designed to
stop the Lift if released. Overriding the Lift controls could lead to damage to the Lift,
damage to the Vehicle on the Lift, injury, or in rare cases, death to persons near the
Lift.
⚠CAUTION Remain clear of the Lift as it comes down; obey the pinch point warning decals.
When the Lift is on the ground, release both Handles, then move all four Lift Arms to their full drive-
through positions to allow an unobstructed exit for the Vehicle.
Carefully drive the Vehicle out.