
Use and Care Manual

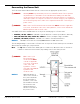


Table Of Contents
- Table of Contents
- Introduction
- Shipping Information
- Safety Considerations
- Components
- Specifications
- Installation Checklist
- Installation
- Reviewing the Safety Rules
- Gathering Your Tools
- Preparing for Electrical Work
- Reviewing the Installation Orientation
- Checking Clearances
- Selecting a Location
- Choosing a Wide or Narrow Configuration
- Installing the Safety Assemblies and Positioning the Safety Lock Cable
- Putting the Equalizing Cables into Position
- About Thread Sealants
- Identifying Hydraulic Fittings
- Routing the Hydraulic Hoses
- Creating Chalk Line Guides
- Anchoring the Posts
- Installing the Overhead Assembly and Safety Shutoff Bar
- Installing the Microswitch
- Completing the Equalizing Cables Installation
- Mounting the Power Unit
- Installing the Safety Lock Cable
- Connecting the Hydraulic Hoses
- Installing the Lift Arms
- Double Threaded Rod Installation
- Leveling
- Contact the Electrician
- Electrical Information
- Wiring the Microswitch
- Connecting the Power Unit
- Installing a Power Disconnect Switch
- Installing a Thermal Disconnect Switch
- Lubricating the Lift
- Review Final Checklist Before Operation
- Leave the Manual with the Owner/Operator
- Perform an Operational Test
- Operation
- Maintenance
- Troubleshooting
- Wiring Diagrams
- Labels
- Parts Drawings
- Automotive Lift Institute (ALI) Store
- Maintenance Log
- Maintenance Log

10AP Series Two-Post Lifts 60 P/N 5900265 — Rev. A10 — September 2023
About Lifting Points, Adapters, and Auxiliary Adapters
An important point to keep in mind when using a frame-engaging Lift is that the raised Vehicle must be
balanced on the four Lift Arms. If the Vehicle is not balanced, it is more likely to become unstable and
slide off the Lift, possibly damaging the Lift, the Vehicle, and anything under the Lift, including injuring
people.
⚠ WARNING You must use all four Lift Arms when raising a Vehicle. Never use just one, two, or
three Lift Arms to raise a Vehicle. The Vehicle will be unstable and could slip off the
Lift, possibly damaging the Lift, damaging the Vehicle, and injuring anyone under it.
To balance a Vehicle on a frame-engaging Lift, you need to have the Lift Pads (Adapters) contact the
Vehicle on the manufacturer’s recommended Lifting Points. When you raise a Vehicle by its Lifting
Points, the Vehicle is balanced.
NOTICE The manufacturer’s recommended Lifting Points do not take into consideration any
major changes that might have been made to the Vehicle. If the motor is removed,
for instance, or there is a 5,000 pound / 2,268 kg weight in the trunk, the Vehicle’s
Lifting Points will not be the best balancing points.
Some Vehicles have indicators on the underside that identify the manufacturer’s Lifting Points; many
do not.
Your best approach is to find the Vehicle in the guide provided with your Lift. Vehicle Lifting Points for
Frame Engaging Lifts or contact the manufacturer of the Vehicle. This guide also includes a page of
safe lifting suggestions, which everyone who uses the Lift should read.
Lifting it Right: A Safety Manual from the Automotive Lift Institute, also provided with your Lift, includes
a wide variety of information about Lifts and how to use them safely.
⚠ DANGER Never place Contact Pads on non-approved, non-load holding Sill Covers or
Side Skirts!
Standard Accessories
The 10AP is supplied with Four Screw Lift Pad Assemblies (5215704)
Best suited for Vehicles with Unibody construction; they are height
adjustable, up to 3-inches.