
Use and Care Manual

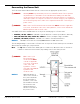

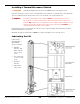


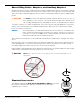
Table Of Contents
- Table of Contents
- Introduction
- Shipping Information
- Safety Considerations
- Components
- Specifications
- Installation Checklist
- Installation
- Reviewing the Safety Rules
- Gathering Your Tools
- Preparing for Electrical Work
- Reviewing the Installation Orientation
- Checking Clearances
- Selecting a Location
- Choosing a Wide or Narrow Configuration
- Installing the Safety Assemblies and Positioning the Safety Lock Cable
- Putting the Equalizing Cables into Position
- About Thread Sealants
- Identifying Hydraulic Fittings
- Routing the Hydraulic Hoses
- Creating Chalk Line Guides
- Anchoring the Posts
- Installing the Overhead Assembly and Safety Shutoff Bar
- Installing the Microswitch
- Completing the Equalizing Cables Installation
- Mounting the Power Unit
- Installing the Safety Lock Cable
- Connecting the Hydraulic Hoses
- Installing the Lift Arms
- Double Threaded Rod Installation
- Leveling
- Contact the Electrician
- Electrical Information
- Wiring the Microswitch
- Connecting the Power Unit
- Installing a Power Disconnect Switch
- Installing a Thermal Disconnect Switch
- Lubricating the Lift
- Review Final Checklist Before Operation
- Leave the Manual with the Owner/Operator
- Perform an Operational Test
- Operation
- Maintenance
- Troubleshooting
- Wiring Diagrams
- Labels
- Parts Drawings
- Automotive Lift Institute (ALI) Store
- Maintenance Log
- Maintenance Log

10AP Series Two-Post Lifts 57 P/N 5900265 — Rev. A10 — September 2023
Review Final Checklist Before Operation
Make sure these things have been done before putting the Lift into normal operation:
• Review the Installation Checklist and verify all steps have been performed.
• Make sure the Power Unit is getting power from the power source.
• Check the Hydraulic Fluid reservoir; it must be full of approved Hydraulic Fluid or automatic
transmission fluid. You can harm the motor by running it without enough fluid.
• Check the Hydraulic System for leaks. Verify all Hydraulic Hose connections, Hydraulic Fittings,
and Auxiliary Port Plugs on the Lift and Power Unit are tight.
• Make sure both Posts are properly plumbed, shimmed, and stable.
• Check to see that all Anchor Bolts are correctly torqued.
• Lubricate all Cable Sheaves and the inside of the Posts where the Slide Blocks move.
• Make sure both Carriage Bolts are in place and tightened near the top of both Posts.
• Make sure all Cables are properly positioned in their Sheaves.
• Make sure all Cable Sheave retaining pins and/or clips are secure.
• Make sure both Safety Assemblies are connected and working normally.
• Make sure the Cylinder Clamps are secured in place above the Hydraulic Cylinders.
• Make sure that all Safety Locks are clear and free.
• Make sure an Operational Test has been performed.
Leave the Manual with the Owner/Operator
Make sure to leave the Installation and Operation Manual with the owner/operator so that it is available
to everyone who is going to use the Lift.
Perform an Operational Test
Before putting your Lift into normal operation, we recommend raising and lowering it several times with
a typical Vehicle on the Lift. This will help you get a feel for how to operate the controls and help get
any residual air out of the Hydraulic System (sometimes called “bleeding” the system).
⚠ DANGER Automotive Lifts are dangerous tools when used by inexperienced or impaired
technicians. When you even hear the words “automotive lift,” your brain should
automatically register the fact that lifting a Vehicle is a serious endeavor with life-
threatening risks if mandatory lifting precautions are ignored.
During the Operational Test, check for proper installation and operation. Do not raise any additional
Vehicles until a thorough Operational Test has been done with a typical Vehicle.
⚠ WARNING Never raise a Vehicle whose weight exceeds the rated capacity of the Lift. Do not
leave the controls until the Lift is engaged on its Safety Locks. Only trained
personnel should raise or lower the Lift.