
Use and Care Manual

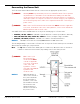

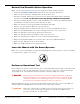


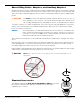
Table Of Contents
- Table of Contents
- Introduction
- Shipping Information
- Safety Considerations
- Components
- Specifications
- Installation Checklist
- Installation
- Reviewing the Safety Rules
- Gathering Your Tools
- Preparing for Electrical Work
- Reviewing the Installation Orientation
- Checking Clearances
- Selecting a Location
- Choosing a Wide or Narrow Configuration
- Installing the Safety Assemblies and Positioning the Safety Lock Cable
- Putting the Equalizing Cables into Position
- About Thread Sealants
- Identifying Hydraulic Fittings
- Routing the Hydraulic Hoses
- Creating Chalk Line Guides
- Anchoring the Posts
- Installing the Overhead Assembly and Safety Shutoff Bar
- Installing the Microswitch
- Completing the Equalizing Cables Installation
- Mounting the Power Unit
- Installing the Safety Lock Cable
- Connecting the Hydraulic Hoses
- Installing the Lift Arms
- Double Threaded Rod Installation
- Leveling
- Contact the Electrician
- Electrical Information
- Wiring the Microswitch
- Connecting the Power Unit
- Installing a Power Disconnect Switch
- Installing a Thermal Disconnect Switch
- Lubricating the Lift
- Review Final Checklist Before Operation
- Leave the Manual with the Owner/Operator
- Perform an Operational Test
- Operation
- Maintenance
- Troubleshooting
- Wiring Diagrams
- Labels
- Parts Drawings
- Automotive Lift Institute (ALI) Store
- Maintenance Log
- Maintenance Log

10AP Series Two-Post Lifts 53 P/N 5900265 — Rev. A10 — September 2023
Connecting the Power Unit
The Power Unit and the Microswitch must be connected to an appropriate power source.
⚠ DANGER All wiring must be performed by a licensed, certified Electrician. Do not perform
any maintenance or installation on the Lift without first making sure that main
electrical power has been disconnected from the Lift and cannot be re-energized
until all procedures are complete. The Lift uses electrical energy; if your organization
has Lockout/Tagout policies, make sure to implement them after connecting to a
power source.
⚠ DANGER Make clear to the Electrician that all electrical work must conform to applicable
local, state, and federal codes, rules, and regulations, such as state and federal
OSHA regulations and electrical codes.
Your 10AP Series Lift is available with one of any of the following types of Power Units:
• 220 VAC, 60 Hz, 1 Phase. 220 VAC, for North American countries (U.S., Mexico, Canada).
• 208-240/380/460 VAC, 50/60 Hz, 3 Phase. 3 Phase, multiple voltages available.
• 220 VAC, 50/60 Hz, 1 Phase. 220 VAC, for countries outside North America.
NOTICE 110 VAC Power Units are currently not available for 10AP Series Lifts.
The following drawing is a front view of a Power Unit. Your specific Power Unit may look somewhat
different based on what type you purchased.
Note: The Up Button shown in the drawing above could be in a different location on the unit or
could be a switch instead of a button, depending on the Power Unit you have.
⚠ DANGER Make clear to your
Electrician that all
electrical work must
conform to applicable
local, state, and federal
codes, rules, and
regulations, such as
state and federal OSHA
regulations and
electrical codes.
NOTICE Wiring information is
either on the outside of
the Power Unit under
the Electrical Box or
inside the cover of the
Electrical Box. Have the
Electrician use that
wiring information to
wire the Power Unit to
the power source.