
Use and Care Manual

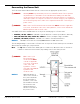


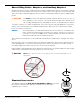
Table Of Contents
- Table of Contents
- Introduction
- Shipping Information
- Safety Considerations
- Components
- Specifications
- Installation Checklist
- Installation
- Reviewing the Safety Rules
- Gathering Your Tools
- Preparing for Electrical Work
- Reviewing the Installation Orientation
- Checking Clearances
- Selecting a Location
- Choosing a Wide or Narrow Configuration
- Installing the Safety Assemblies and Positioning the Safety Lock Cable
- Putting the Equalizing Cables into Position
- About Thread Sealants
- Identifying Hydraulic Fittings
- Routing the Hydraulic Hoses
- Creating Chalk Line Guides
- Anchoring the Posts
- Installing the Overhead Assembly and Safety Shutoff Bar
- Installing the Microswitch
- Completing the Equalizing Cables Installation
- Mounting the Power Unit
- Installing the Safety Lock Cable
- Connecting the Hydraulic Hoses
- Installing the Lift Arms
- Double Threaded Rod Installation
- Leveling
- Contact the Electrician
- Electrical Information
- Wiring the Microswitch
- Connecting the Power Unit
- Installing a Power Disconnect Switch
- Installing a Thermal Disconnect Switch
- Lubricating the Lift
- Review Final Checklist Before Operation
- Leave the Manual with the Owner/Operator
- Perform an Operational Test
- Operation
- Maintenance
- Troubleshooting
- Wiring Diagrams
- Labels
- Parts Drawings
- Automotive Lift Institute (ALI) Store
- Maintenance Log
- Maintenance Log

10AP Series Two-Post Lifts 52 P/N 5900265 — Rev. A10 — September 2023
Wiring the Microswitch
This section describes how to wire the Microswitch; installing the Microswitch was described in
Installing the Microswitch.
The Lift comes with either one or two Microswitches, depending on the Power Unit:
• 1 Ph Power Units. You need only one Microswitch, which must be wired between incoming
power and the Electrical Box on the Power Unit on one of the two “hot” wires.
• 3 Ph Power Units. You need two Microswitches, which must be wired between incoming
power and the Electrical Box on the Power Unit on two of the three hot wires. Both Microswitches
you receive are identical. If wiring two Microswitches, they must be wired on two different hot
wires.
Refer to the diagrams in Wiring Diagrams for detailed Microswitch wiring information.
The following procedure assumes the Microswitch is already in place. If it is not, refer to Installing
the Microswitch to install it.
To wire a Microswitch to the Lift:
Locate the Microswitch Cable (14/4 SJO, UL 62, 300 VAC) supplied with the Lift.
On the Overhead Assembly, connect one end of the Microswitch Cable to the Microswitch (or
two Microswitches, for a 3 Ph Power Unit). Refer to
Wiring Diagrams for wiring information.
Route the Microswitch Cable from the Microswitch on the Overhead Assembly over to the
Powerside Post, down the Powerside Post, out the hole in the Post near the top of the Safety Lock
Release, and to the Electrical Box on the Power Unit.
NOTICE The Microswitch Cable and the Short Hydraulic Hose must go around the Powerside
Safety Cover.
Once the Microswitch Cable is routed from the Microswitch to the Power Unit, clip the Microswitch
Cable using the clips on the Overhead Assembly and the inside of the Powerside Post.
Clipping the Microswitch Cable in place keeps it out of the way of the other components.
On the Power Unit, open the Electrical Box and wire the Microswitch Cable per the instructions
in
Connecting the Power Unit.