
Use and Care Manual
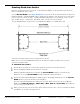

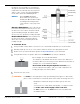
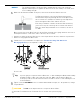
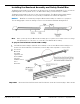
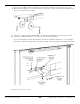
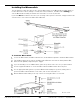
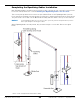
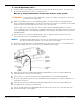
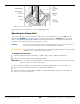
Table Of Contents
- Table of Contents
- Introduction
- Shipping Information
- Safety Considerations
- Components
- Specifications
- Installation Checklist
- Installation
- Reviewing the Safety Rules
- Gathering Your Tools
- Preparing for Electrical Work
- Reviewing the Installation Orientation
- Checking Clearances
- Selecting a Location
- Choosing a Wide or Narrow Configuration
- Installing the Safety Assemblies and Positioning the Safety Lock Cable
- Putting the Equalizing Cables into Position
- About Thread Sealants
- Identifying Hydraulic Fittings
- Routing the Hydraulic Hoses
- Creating Chalk Line Guides
- Anchoring the Posts
- Installing the Overhead Assembly and Safety Shutoff Bar
- Installing the Microswitch
- Completing the Equalizing Cables Installation
- Mounting the Power Unit
- Installing the Safety Lock Cable
- Connecting the Hydraulic Hoses
- Installing the Lift Arms
- Double Threaded Rod Installation
- Leveling
- Contact the Electrician
- Electrical Information
- Wiring the Microswitch
- Connecting the Power Unit
- Installing a Power Disconnect Switch
- Installing a Thermal Disconnect Switch
- Lubricating the Lift
- Review Final Checklist Before Operation
- Leave the Manual with the Owner/Operator
- Perform an Operational Test
- Operation
- Maintenance
- Troubleshooting
- Wiring Diagrams
- Labels
- Parts Drawings
- Automotive Lift Institute (ALI) Store
- Maintenance Log
- Maintenance Log

10AP Series Two-Post Lifts 34 P/N 5900265 — Rev. A10 — September 2023
NOTICE The holding strength of an Anchor Bolt is partially based on the how cleanly the
Expansion Sleeve presses against the Concrete. If the hole is dirty or too wide, there
is less holding strength.
Make sure the Washer and Nut are in place, then insert the Anchor Bolt into the hole.
The Expansion Sleeve of the Anchor Bolt may prevent the
Anchor Bolt from passing through the hole in the Base Plate;
this is normal. Use a hammer or mallet to get the Expansion
Sleeve through the Base Plate and into the hole.
Even using a hammer or mallet, the Anchor Bolt should only
go into the hole part of the way; this is normal. If the Anchor
Bolt goes all the way in with little or no resistance, the hole is
too wide.
Once past the hole in the Base Plate, the Anchor Bolt eventually stops going down into the hole as
the Expansion Sleeve contacts the sides of the hole; this is normal.
Hammer or mallet the Anchor Bolt the rest of the way down into the hole, and then stop when the
Washer is snug against the Base Plate.
Plumb each Post; install Shims as required. See Troubleshooting Lift Arm Lock
Disengagement if you are required to shim ≥ .5 in / 13 mm.
Do not scale.
Tip If you are going to torque the Anchor Bolts later, so that installing the Overhead Assembly
and final leveling is a little easier, skip the next step. Make sure the Anchor Bolts are
securely in position; This will ensure that the Posts will not move too much during the rest
of the installation.
Tighten each Nut clockwise to the recommended installation torque, 85 – 95 pound feet, using a
Torque Wrench.
⚠ CAUTION Do not use an impact wrench to torque the Anchor Bolts.
Install the Foot Guard on the Powerside Post as shown on the previous page.