
Use and Care Manual
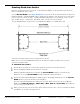

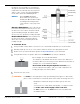
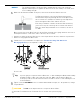
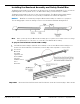
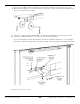
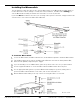
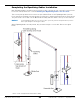
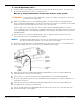
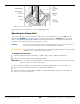
Table Of Contents
- Table of Contents
- Introduction
- Shipping Information
- Safety Considerations
- Components
- Specifications
- Installation Checklist
- Installation
- Reviewing the Safety Rules
- Gathering Your Tools
- Preparing for Electrical Work
- Reviewing the Installation Orientation
- Checking Clearances
- Selecting a Location
- Choosing a Wide or Narrow Configuration
- Installing the Safety Assemblies and Positioning the Safety Lock Cable
- Putting the Equalizing Cables into Position
- About Thread Sealants
- Identifying Hydraulic Fittings
- Routing the Hydraulic Hoses
- Creating Chalk Line Guides
- Anchoring the Posts
- Installing the Overhead Assembly and Safety Shutoff Bar
- Installing the Microswitch
- Completing the Equalizing Cables Installation
- Mounting the Power Unit
- Installing the Safety Lock Cable
- Connecting the Hydraulic Hoses
- Installing the Lift Arms
- Double Threaded Rod Installation
- Leveling
- Contact the Electrician
- Electrical Information
- Wiring the Microswitch
- Connecting the Power Unit
- Installing a Power Disconnect Switch
- Installing a Thermal Disconnect Switch
- Lubricating the Lift
- Review Final Checklist Before Operation
- Leave the Manual with the Owner/Operator
- Perform an Operational Test
- Operation
- Maintenance
- Troubleshooting
- Wiring Diagrams
- Labels
- Parts Drawings
- Automotive Lift Institute (ALI) Store
- Maintenance Log
- Maintenance Log

10AP Series Two-Post Lifts 33 P/N 5900265 — Rev. A10 — September 2023
Lift buyers are responsible for conforming to
all regional, structural, and seismic anchoring
requirements specified by any other agencies
and/or codes, such as the Uniform Building
Code and/or International Building Code.
NOTICE Consider not torquing the
Anchor Bolts into position yet.
Installing the Overhead Assembly
and doing final leveling may be
easier if there is some play in the
Posts.
Effective Embedment is the location in the
Hole where the Expansion Sleeve presses into
the Concrete. This is where the Anchor Bolts
get their holding strength, the further down
into the Hole, the greater the holding strength.
Nominal Embedment is how far down into
the Hole the bottom of the Anchor Bolt is,
which does not tell you anything about the
holding strength.
To install the Posts:
Using a Forklift or Shop Crane, move the Posts to the Chalk Line Guides you created earlier.
Carefully stand up each Post, one at a time, and move them to the appropriate location.
Double check your measurements against the Specifications for your Lift model.
Using the Base Plates as guides, drill each hole 4 inches deep using a carbide bit.
Go in straight; do not let the drill wobble.
The diameter of the drill bit must be the same as the diameter of
the Anchor Bolt. If you are using a ¾ inch diameter Anchor Bolt, for
example, use a ¾ inch diameter drill bit.
Do not drill all the way through the Concrete; if you
punch completely through the slab, you could compromise the
holding strength of the Anchor Bolts.
Vacuum each hole clean.
⚠ WARNING You must use the appropriate safety gear including safety glasses, dust masks,
gloves, steel-toed work boots and heavy work clothes when anchoring the Posts.
BendPak recommends using a vacuum to get the hole very
clean.
You can also use a wire brush, hand pump, or compressed air;
just make sure to thoroughly clean each hole.
Do not ream the hole. Do not make the hole any wider than
the drill bit made it.