
Use and Care Manual
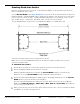

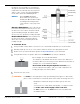
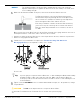
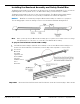
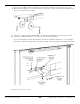
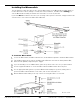
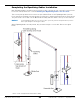
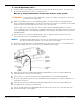
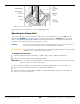
Table Of Contents
- Table of Contents
- Introduction
- Shipping Information
- Safety Considerations
- Components
- Specifications
- Installation Checklist
- Installation
- Reviewing the Safety Rules
- Gathering Your Tools
- Preparing for Electrical Work
- Reviewing the Installation Orientation
- Checking Clearances
- Selecting a Location
- Choosing a Wide or Narrow Configuration
- Installing the Safety Assemblies and Positioning the Safety Lock Cable
- Putting the Equalizing Cables into Position
- About Thread Sealants
- Identifying Hydraulic Fittings
- Routing the Hydraulic Hoses
- Creating Chalk Line Guides
- Anchoring the Posts
- Installing the Overhead Assembly and Safety Shutoff Bar
- Installing the Microswitch
- Completing the Equalizing Cables Installation
- Mounting the Power Unit
- Installing the Safety Lock Cable
- Connecting the Hydraulic Hoses
- Installing the Lift Arms
- Double Threaded Rod Installation
- Leveling
- Contact the Electrician
- Electrical Information
- Wiring the Microswitch
- Connecting the Power Unit
- Installing a Power Disconnect Switch
- Installing a Thermal Disconnect Switch
- Lubricating the Lift
- Review Final Checklist Before Operation
- Leave the Manual with the Owner/Operator
- Perform an Operational Test
- Operation
- Maintenance
- Troubleshooting
- Wiring Diagrams
- Labels
- Parts Drawings
- Automotive Lift Institute (ALI) Store
- Maintenance Log
- Maintenance Log

10AP Series Two-Post Lifts 32 P/N 5900265 — Rev. A10 — September 2023
Anchoring the Posts
⚠ DANGER Pay special attention when installing the Posts. If done incorrectly, the Lift could fall
over, potentially causing damage to the Vehicle, the Lift, and injuring bystanders.
BendPak strongly recommends consulting a Concrete Specialist early in your
planning process for Lift installations. A Concrete Specialist will make adjustments
to account for national, state, and local building codes as well as local weather
conditions, soil composition, base preparation, load bearing, seismic requirements
and any other structural concerns that may arise.
Concrete specifications are:
• Depth: 4.25 inches / 108 mm thick,
minimum, steel reinforced.
• PSI: 3,000 PSI, minimum
• Cured: 28 days, minimum
Anchor Bolt specifications are:
• Length: 6.3 inches / 160 mm
• Diameter: .75 inch / 19 mm
• Anchor torque: 85 – 95 ft. lb.
• Effective embedment: 3.25 inches / 82.5
mm or more
The Concrete floor where you want to install your Lift must meet the following requirements:
• The floor must be a flat, level concrete floor. Do not install the Lift on a surface with more
than three degrees of slope.
• Do not install the Lift on cracked or defective Concrete.
• Check the floor for the possibility of it being a post-tension slab. In this case, contact the building
architect before drilling. Contact a qualified professional to locate the tensioned cables before
drilling.
⚠ WARNING Cutting through a tensioned cable can result in injury or death. Do not drill into a
post-tension slab unless the building architect confirms you are not going to hit a
tensioned cable, or you have located it using ground penetrating radar. If colored
sheath comes up during drilling, stop drilling immediately.
⚠ WARNING Your concrete and Anchor Bolts must meet these specifications. Only install your
Lift on a Concrete surface. If you install a Lift on asphalt or any other surface, or
your Concrete or Anchor Bolts do not meet these specifications, it could lead to
product damage, Vehicle damage, personal injury, or even loss of life.
BendPak Lifts are supplied with installation instructions and concrete fasteners meeting the criteria as
prescribed by the latest version of the American National Standard “Automotive Lifts – Safety
Requirements for Construction, Testing, and Validation”.
⚠ WARNING Use only the ALI-certified Anchor Bolts that came with your 10AP Series Two-Post
Lift. If you use components from a different source, you void your warranty and
compromise the safety of everyone who installs or uses the Lift.