
Use and Care Manual
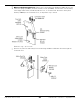
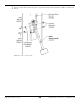
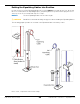
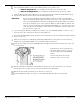
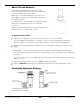
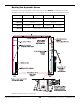
Table Of Contents
- Table of Contents
- Introduction
- Shipping Information
- Safety Considerations
- Components
- Specifications
- Installation Checklist
- Installation
- Reviewing the Safety Rules
- Gathering Your Tools
- Preparing for Electrical Work
- Reviewing the Installation Orientation
- Checking Clearances
- Selecting a Location
- Choosing a Wide or Narrow Configuration
- Installing the Safety Assemblies and Positioning the Safety Lock Cable
- Putting the Equalizing Cables into Position
- About Thread Sealants
- Identifying Hydraulic Fittings
- Routing the Hydraulic Hoses
- Creating Chalk Line Guides
- Anchoring the Posts
- Installing the Overhead Assembly and Safety Shutoff Bar
- Installing the Microswitch
- Completing the Equalizing Cables Installation
- Mounting the Power Unit
- Installing the Safety Lock Cable
- Connecting the Hydraulic Hoses
- Installing the Lift Arms
- Double Threaded Rod Installation
- Leveling
- Contact the Electrician
- Electrical Information
- Wiring the Microswitch
- Connecting the Power Unit
- Installing a Power Disconnect Switch
- Installing a Thermal Disconnect Switch
- Lubricating the Lift
- Review Final Checklist Before Operation
- Leave the Manual with the Owner/Operator
- Perform an Operational Test
- Operation
- Maintenance
- Troubleshooting
- Wiring Diagrams
- Labels
- Parts Drawings
- Automotive Lift Institute (ALI) Store
- Maintenance Log
- Maintenance Log

10AP Series Two-Post Lifts 28 P/N 5900265 — Rev. A10 — September 2023
About Thread Sealants
Liquid Thread Sealant lubricates and fills the gaps
between the Fitting
threads and leaves no residue that
could contaminate the Hydraulic Fluid.
Other types of Th
read Sealants (like Teflon Tape) can
shred during installation or removal and eventually enter
the Hydraulic System.
Thread Sealant can be used with most Hydraulic Fittings,
although you probably only need to use with NPT
connectors.
Apply the thread seala
nt when the ambient temperature is
between +46.5°F to +70°F (+8°C to 21°C)
To apply Thread Sealant:
Make sure the Fittings and connectors you are going to use are clean and dry.
If you are adding Thread Sealant to a Fitting or connector that has already been used with a
different sealant, use a wire brush to thoroughly remove the old sealant before adding more.
Skipping the first thread, apply a small amount of Thread Sealant to the next four threads of the
Fitting.
⚠ WARNING Always wear the proper protective equipment when handling Thread Sealant.
You only need a small amount because the sealant spreads to the other threads as it is tightened
into place.
If you put too much, the excess liquid will be pushed out when the Fitting is tightened; use a rag to
wipe the excess.
Tighten the Fitting into the connector; do not over tighten the Fitting.
Allow the 24-hour manufacturer-recommended curing time before pressurizing the system.
Identifying Hydraulic Fittings
Joint Industry Council (JIC)
National Pipe Thread (NPT)