
Use and Care Manual
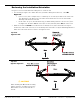
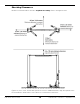
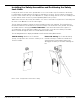
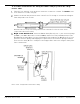

Table Of Contents
- Table of Contents
- Introduction
- Shipping Information
- Safety Considerations
- Components
- Specifications
- Installation Checklist
- Installation
- Reviewing the Safety Rules
- Gathering Your Tools
- Preparing for Electrical Work
- Reviewing the Installation Orientation
- Checking Clearances
- Selecting a Location
- Choosing a Wide or Narrow Configuration
- Installing the Safety Assemblies and Positioning the Safety Lock Cable
- Putting the Equalizing Cables into Position
- About Thread Sealants
- Identifying Hydraulic Fittings
- Routing the Hydraulic Hoses
- Creating Chalk Line Guides
- Anchoring the Posts
- Installing the Overhead Assembly and Safety Shutoff Bar
- Installing the Microswitch
- Completing the Equalizing Cables Installation
- Mounting the Power Unit
- Installing the Safety Lock Cable
- Connecting the Hydraulic Hoses
- Installing the Lift Arms
- Double Threaded Rod Installation
- Leveling
- Contact the Electrician
- Electrical Information
- Wiring the Microswitch
- Connecting the Power Unit
- Installing a Power Disconnect Switch
- Installing a Thermal Disconnect Switch
- Lubricating the Lift
- Review Final Checklist Before Operation
- Leave the Manual with the Owner/Operator
- Perform an Operational Test
- Operation
- Maintenance
- Troubleshooting
- Wiring Diagrams
- Labels
- Parts Drawings
- Automotive Lift Institute (ALI) Store
- Maintenance Log
- Maintenance Log

10AP Series Two-Post Lifts 17 P/N 5900265 — Rev. A10 — September 2023
Choosing a Wide or Narrow Configuration
10AP Series Two-Post Lifts can be installed in a Wide or Narrow Configuration:
• Wide Configuration. The Posts are farther apart, which means you can raise wider Vehicles on
the Lift. This is usually the best choice if your Lift location is wide enough to support it. When
installing the Equalizing Cables, use the Button End at the very end of the cable.
The following drawing shows an Equalizing Cable; the ends are exaggerated for clarity.
• Narrow Configuration. The Posts are closer together. This is usually the best choice for
narrower garages, as it uses less width. When you are installing the Equalizing Cables, use the
Button End away from the end of the cable.
NOTICE 10AP Series Lifts are shipped from the factory with the Overhead Assembly and the
Safety Shutoff Bar already configured in the Narrow Configuration. Refer to Installing
the Overhead Assembly and Safety Shutoff Bar for information about
switching to the Wide Configuration.
You do not need to do anything to the Overhead Assembly at this point, but you must decide on a
Wide or Narrow Configuration now for two reasons:
• Routing the Equalizing Cables. The Equalizing Cables come with two Button ends, one for
the Wide Configuration and one for the Narrow Configuration. You need to know which Button end
to use when you put the Equalizing Cables into position.
• Creating the Chalk Line Guides. You use the Overall Width setting (in Specifications) to
create the Chalk Line Guides, so you know how far apart to put your Posts. There are two Width
Overall settings, one for the Wide Configuration and one for the Narrow Configuration. You need to
know which one to use when you are creating your Chalk Line Guides.
NOTICE If you are installing a Lift and do not yet know if it is going to be a Wide or a Narrow
Configuration, you need to figure it out now, before you go any further in the
installation process.