
Use and Care Manual
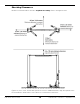
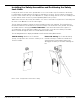

Table Of Contents
- Table of Contents
- Introduction
- Shipping Information
- Safety Considerations
- Components
- Specifications
- Installation Checklist
- Installation
- Reviewing the Safety Rules
- Gathering Your Tools
- Preparing for Electrical Work
- Reviewing the Installation Orientation
- Checking Clearances
- Selecting a Location
- Choosing a Wide or Narrow Configuration
- Installing the Safety Assemblies and Positioning the Safety Lock Cable
- Putting the Equalizing Cables into Position
- About Thread Sealants
- Identifying Hydraulic Fittings
- Routing the Hydraulic Hoses
- Creating Chalk Line Guides
- Anchoring the Posts
- Installing the Overhead Assembly and Safety Shutoff Bar
- Installing the Microswitch
- Completing the Equalizing Cables Installation
- Mounting the Power Unit
- Installing the Safety Lock Cable
- Connecting the Hydraulic Hoses
- Installing the Lift Arms
- Double Threaded Rod Installation
- Leveling
- Contact the Electrician
- Electrical Information
- Wiring the Microswitch
- Connecting the Power Unit
- Installing a Power Disconnect Switch
- Installing a Thermal Disconnect Switch
- Lubricating the Lift
- Review Final Checklist Before Operation
- Leave the Manual with the Owner/Operator
- Perform an Operational Test
- Operation
- Maintenance
- Troubleshooting
- Wiring Diagrams
- Labels
- Parts Drawings
- Automotive Lift Institute (ALI) Store
- Maintenance Log
- Maintenance Log

10AP Series Two-Post Lifts 13 P/N 5900265 — Rev. A10 — September 2023
Preparing for Electrical Work
You will need to have a licensed, certified Electrician available at some point during the installation.
⚠ DANGER All wiring must be performed by a licensed, certified Electrician in accordance with
applicable local, state, and federal electrical codes, rules, and regulations, such as
state and federal OSHA regulations and electrical codes.
NOTICE Notify your Electrician in advance so they come prepared with the items required to
connect to the facility’s power system, or an appropriate power cord with plug to
connect to an appropriate VAC power source, a Power Disconnect Switch, and a
Thermal Disconnect Switch. These items are not supplied with the Lift.
The Electrician needs to:
• Connect to the VAC power source. The Power Unit comes with a pigtail for wiring to a
power source. Have your Electrician connect a power cord with plug to the electrical box on the
Lift for connection to a power outlet or have them wire it directly into the electrical system at the Lift
location. The Lift’s Power Unit must be protected by an appropriate circuit breaker.
• Connect the Microswitch wiring to the Power Unit. The Microswitch must be wired to
the Power Unit. The required wiring is included with the Lift.
• Install a Power Disconnect Switch. A Power Disconnect Switch is used to shut down the
Lift in the event of an electrical circuit fault, emergency, or when the Lift is being serviced. Refer to
Installing a Power Disconnect Switch for more information.
• Install a Thermal Disconnect Switch. A Thermal Disconnect Switch automatically shuts
down the equipment in the event of an overload or an overheated motor. Refer to Installing a
Thermal Disconnect Switch for more information.