
Use and Care Manual
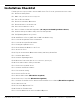
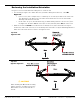
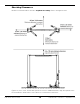
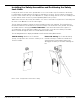

Table Of Contents
- Table of Contents
- Introduction
- Shipping Information
- Safety Considerations
- Components
- Specifications
- Installation Checklist
- Installation
- Reviewing the Safety Rules
- Gathering Your Tools
- Preparing for Electrical Work
- Reviewing the Installation Orientation
- Checking Clearances
- Selecting a Location
- Choosing a Wide or Narrow Configuration
- Installing the Safety Assemblies and Positioning the Safety Lock Cable
- Putting the Equalizing Cables into Position
- About Thread Sealants
- Identifying Hydraulic Fittings
- Routing the Hydraulic Hoses
- Creating Chalk Line Guides
- Anchoring the Posts
- Installing the Overhead Assembly and Safety Shutoff Bar
- Installing the Microswitch
- Completing the Equalizing Cables Installation
- Mounting the Power Unit
- Installing the Safety Lock Cable
- Connecting the Hydraulic Hoses
- Installing the Lift Arms
- Double Threaded Rod Installation
- Leveling
- Contact the Electrician
- Electrical Information
- Wiring the Microswitch
- Connecting the Power Unit
- Installing a Power Disconnect Switch
- Installing a Thermal Disconnect Switch
- Lubricating the Lift
- Review Final Checklist Before Operation
- Leave the Manual with the Owner/Operator
- Perform an Operational Test
- Operation
- Maintenance
- Troubleshooting
- Wiring Diagrams
- Labels
- Parts Drawings
- Automotive Lift Institute (ALI) Store
- Maintenance Log
- Maintenance Log

10AP Series Two-Post Lifts 12 P/N 5900265 — Rev. A10 — September 2023
Installation
The installation process includes multiple steps. Perform them in the order listed.
⚠ WARNING Use only the factory-supplied parts shipped with your Lift. If you use attachments,
accessories, or configuration modifying components that are in the path and/or
affect the operation of the equipment, affect the equipment’s electrical listing, or
affect the intended Vehicle accommodation, and if they are not certified for use with
this Lift, then you void the warranty of the Lift as well as compromising the safety of
everyone who sets up or uses the Lift. If you are missing parts, visit
BendPak.com/Support, email support@bendpak.com or contact BendPak
technical support by phone at (800) 253-2363, option 7 then 4.
Online chat is also available at www.bendpak.com click the chat icon.
Reviewing the Safety Rules
When installing a Lift, your safety depends on proper training and thoughtful operation. BendPak
recommends referring to the ANSI/ALI ALIS Standard Safety Requirements for Installation and Service
for more information about safely installing, using, and servicing your Lift.
⚠ WARNING Do not install this equipment unless you have automotive lift installation training.
Always use proper lifting tools, such as a Forklift or Shop Crane, to raise heavy
components. Do not install this equipment without reading and understanding this
Manual and the Labels on the unit.
Only fully trained personnel should be involved in installing this equipment. Always pay attention. Use
appropriate tools and lifting equipment. Stay clear of moving parts.
⚠ WARNING You must always wear appropriate protective equipment during installation: leather
gloves, steel-toed work boots, eye protection, back belts, and hearing protection.
Gathering Your Tools
You may need some or all of the following tools:
•
Rotary hammer drill (or similar)
•
3/4-inch carbide bit (conforming to ANSI
B212.15)
•
Hammer
•
Four-foot level
•
Open-end wrench set, SAE, and metric
•
Socket and ratchet set, SAE, and metric
•
Hex-key wrench set
•
Crescent and pipe wrenches
• Crowbar
• Chalk line
• Medium-sized flat screwdriver
• Tape measure, 25 feet or more
• Needle-nose pliers
• Forklift or Shop Crane
• Two 12-foot ladders
• Two sawhorses
• Torque wrench