
Installation manual


D
D
0
0
D
0
0
0
0
0
0
0
Q
0
0
0
D
7.
~
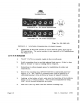
KING
KT
76/78
TH.ANSPONDEH.
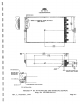
Turn
Allen
wrench
clockwise
until
.
rear
lobe
engages
with
the
tray
slot.
Continue
turning
wrench
clockwise
until
ti
g
ht.
-CAUTION-
Do
Not
Ov
e
rtighten
Locking
Screw
8.
For
removal
turn
3/32"
Allen
wrench
counter-clockwise
until
unit
disengages
from
tray
slot.
Unit
may
then
be
removed.
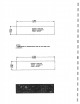
2.6
CONNECTOR
ASSEMBLY
PROCEDURE
The
KT
76/78
uses
a
special
connector
that
mates
directly
with
the
Printed
Circuit
noard
inside
the
unit.
Assembly
of
the
connector
is
as
follows:
A.
Contact
Terminal
Assembly
Using
Molex
Crimper
(Figure
2-2)
B.
1.
Strip
each
wire
5/32"
for
contact
terminal
KP
N
030-1046-XX.
(The
last
two
digits
of
the
contact
terminal
part
number
indicate
the
number
of
terminals
required).
2.
Open
the
Mol
ex
Hand
Crimper
HT1921
with
the
engraved
side
.
toward
the
operator.
Place
the
conductor
tab
section
of
a
contact
terminal
on
Anvil
B
withthe
contact
portion
facin
g
away
from
the
operator.
Close
the
crimper
slightly
until
the
contact
tabs
touch
the
female
jaw.
3.
Insert
th
e
stripped
conductor
until
the
insu
l
ation
is
even
with
the
side
of
the
crimper
facing
the
operator.
Crimp
the
conductor
tabs
by
squeezing
the
handles
together
until
the
jaws
are
fully
closed
or
a
sufficient
crimp
is
obtained.
4.
Move
the
lead
to
Anvil
A.
Place
the
insulating
tab
section
on
Anvil
A.
Crimp
again
Until
the
jaws
are
fully
closed
or
a
sufficient
crimp
is
obtained.
5.
If
necessary,
straighten
the
contact
terminal
while
it
is
held
by
the
crimper.
Contact
Terminal
Assembly
Using
Pliers
1.
Strip
each
wire
5/32"
for
contact
terminal
KPN
030-1046-XX
(the
last
two
digits
of
the
contact
terminal
part
number
indicate
the
number
of
terminals
required).
2.
Tin
the
exposed
conductor.
3.
Using
needle
nose
pliers
fold
over
each
conductor
tab
in
turn,
onto
the
exposed
conductor.
When
both
tabs
have
been
folded,
firmly
press
the
tabs
against
the
conductor.
4.
Repeat
Step
3
for
the
insulator
tabs.
5.
Apply
a
drop
of
solder
(using
minimum
·
heat)
to
the
conducto
r
/tab
connection
to
assure
a good
electromechanical
joint.
Page
2-3