20121211 issue2 Island Range Hood 啊哈 Installation and User manual Content Safety instructions---------------------------------- 2 Product description--------------------------------- 4 Operation mode-------------------------------------- 5 Installation--------------------------------------------- 6 Start using the range hood------------------------ 10 Maintenance and cleaning-------------------------12 Warranty------------------------------------------------ 13 For warranty service call 1300 373 199(Austr
Safety instructions This manual explains the proper installation and use of your range hood, please read it carefully before using even if you are familiar with the product. The manual should be kept in a safe place for future reference.
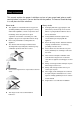
Safety instructions Never to do: Always to do: z This range hood cannot be installed for outdoor use. z z It is prohibited to fit the range hood over a solid fuel applicable regulations concerning discharge stove of exhaust air are fulfilled. z z z z This appliance must not be connected to a chimney z Attention should be given to ensure that any This appliance should be installed and or vent flue which is in use.
Product description Accessories bag Description Component list: Picture QTY User Manual 1 Wood Screw (ST4.5x40mm) 6 Screw (M4x14mm) 36 Nut(M4) 16 Hose clip 1 Technical data: 1. Installation board Power supply: 220 – 240v~, 50Hz 2. Upper decorative chimney (Inner) Motor: 500W 3. Installation post Lights: 4x15W Halogen lamp 4. Flexible exhaust duct Length of power cord: 2m 5. Lower decorative chimney (outer) Air outlet diameter: 150mm 6. Outlet (diameter 150mm) 7. Main body 8.
Operation Mode Your range hood can be operated in two modes, choose the mode suitable for your kitchen before installation. Air Extraction For air extraction mode, a ducting kit is required, the air is drawn in and cleaned by the grease filters and via the ducting must be directed to the outside atmosphere. Ducting must be vented to outside atmosphere Air Recirculation For air recirculation mode, charcoal filter (Optional Accessory) must be installed to eliminate cooking smells.
Installation Dimensions: Installation: Warning: Check that the installation complies with the standards of local building, gas and electrical authorities. Before connecting to the mains supply ensure the mains voltage corresponds to the voltage on the appliance rating plate inside the range hood. The distance from the bottom line of range hood to an electrical cooktop underneath must be minimum of 600mm & 650mm to the gas cook top and a maximum height of 800mm.
Hints for exhaust duct installation The following rules must be strictly followed to obtain optimal air extraction • Keep exhaust duct short and straight • Do not reduce the size or restrict exhaust duct • When using flexible duct always install the duct pulled taut to minimize pressure loss • Failure to observe these basic instructions will reduce the performance and increase noise levels of the range hood • Ensure the exhaust ducting selected for installation complies with relevant standards and
3. Use 16pcs Screw (M4x14mm) to fix installation post onto range hood main body, and 8pcs Screw (M4x14mm) and 8pcs Nut (M4) to fix upper and lower installation post. 4. Carefully slide down inner and outer decorative chimney from top of installation posts. 5. Raising whole unit up and secure upper installation post onto installation board by 8pcs Screw (M4x14mm) and 8pcs Nut (M4), plug in power cord. 6.
7. Install charcoal filter( Air Recirculation mode only) *If the range hood is installed as Air Extraction mode then skip this step. 8. Remove all protective film and the installation is now finished.
Start using your range hood Model BR903IDX and BR903IDX-F Lamp – Turn on or off the 4 lamps. Speed –select speed to suit cooking conditions, increase time setting Low – light frying/boiling Medium – frying/wok cooking/heavy boiling High – grilling, intensive frying and wok cooking Timer – programmed how long time you would like motor keep running, decrease time setting Depress timer button once, “timer” display flash and enter into timer function.
Model BR903ITX and BR903ITX-F Power - Turn on/off motor When motor is running, press once enter into delay-off, your range hood will be turned off after 5 minutes, if you want to turn off instantly, press it again. Lamp – Turn on or off the 4 lamps Speed – Select motor speed. Each key can be used to cancel delay-off function. Low – light frying/boiling. Decrease digit in clock setting. Medium – frying/wok cooking/heavy boiling High – grilling, intensive frying and wok cooking .
Maintenance and cleaning Caution: • Before maintenance or cleaning is carried out, the range hood should be disconnected from the main power supply. Ensure that the range hood is switched off at the wall socket and the plug removed. • External surfaces are susceptible to scratches and abrasions, so please follow the cleaning instructions to ensure the best possible result is achieved without damage.
WARRANTY 1.1 In this warranty: 1.1.1 Australian Consumer Law means the law as set out in Schedule 2 of the Competition and Consumer Act 2010; 1.1.2 Company means GSM Sales Pty Ltd ABN 53 007 682 475 of 142-144 Fullarton Road, Rose Park SA 5067. Telephone 08 8122 2390. Email admin@gsmsales.com.au; 1.1.3 Consumer means a “consumer” as that term is defined in Section 3 of the Australian Consumer Law as the original purchaser of a Bellini product; 1.1.
1.8 You must provide proof of your purchase of the Bellini product and the date of purchase in order to obtain the benefit of this warranty. 1.9 If you live outside the service area of the Company or one of its service agents, this warranty does not cover the cost of transport of the Bellini product for service nor the service agent’s traveling costs to and from your home. 1.