
Installation Guide

24
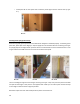
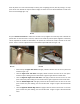
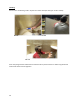
Dry fit the dish, pull out, fill the slots on the panels with the color coordinating silicone and then insert
dish at the back end of the slot and slide forward until it stops at front end of slot (pic. 6.5).
Clean up both sides of dish and then reapply the silicone on the top and bottom of the dish (pic. 6.6).
Pic. 6.6
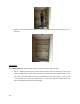
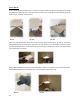
Recessed Dish-
The Bella Core Recessed Dish is designed to be installed in between the studs on the wall, it is
recommended to make the decision on where it is going prior to the backer board being installed on the
wall so that the backer board can be cut out as well.
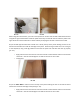
The Recessed Dish requires a cutout of AT LEAST 12 ½” x 13 ½” but does not have to be perfect as there
is a 2” lip around all (4) sides. Depending on the veining of the shower panels will determine which way
the recessed dish should be installed so that the veining is moving in the same direction (pic. 7.1).
Pic 7.1 Pic. 7.2
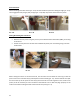
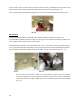
o Dry fit the dish into the hole to make sure it fits properly and that it sets level and then
remove and apply silicone around all (4) lips and insert into the hole and press. Clean off any
excess silicone and then apply a bead of the color coordinating caulk around all (4) edges
(pic. 7.2)