Wireless G Plus MIMO Notebook Card Connect your notebook computer to a wireless network ����� ����� ����� ����� User Manual ������� ����� ������� ���� ��� �� � � ������ ������� ���� F5D9010 �
Table of Contents 1 Introduction . . . . . . . . . . . . . . . . . . . . . . . . . . . . . . . . . . . . . . . . . 1 Advantages of a Wireless Network . . . . . . . . . . . . . . . . . . . . . . . . . .1 Placement of your Wireless Networking Hardware for Optimal Performance . . . . . . . . . . . . . . . . . . . . . . . . . . . . . . . . . .2 2 Overview . . . . . . . . . . . . . . . . . . . . . . . . . . . . . . . . . . . . . . . . . . . 5 Product Features . . . . . . . . . . . . . . . . . . . . . . . . . .
Introduction Using MIMO’s revolutionary, smart-antenna technology, Belkin G Plus MIMO products can boost network speeds by up to four times previous capacities. Its enhanced data rates and range make MIMO a perfect technology for downloading music from the Internet, sharing photos, and gaming online. The easy installation and setup will have you networking in minutes.
Introduction Placement of your Wireless Networking Hardware for Optimal Performance Your wireless connection will be stronger the closer your computer is to your wireless router (or access point). Typical indoor operating range for your wireless devices is between 100 and 200 feet. Conversely, your wireless connection and performance will degrade somewhat as the distance between your wireless router (or access point) and connected devices increases. This may or may not be noticeable to you.
Introduction Avoid placing your wireless router (or access point) near devices that may emit radio “noise”, such as microwave ovens. Other objects that can inhibit wireless communication can include: • Refrigerators • Washers and/or dryers 2 3 4 • Metal cabinets • Large aquariums • Metallic-based UV tinted windows If your wireless signal seems weak in some spots, make sure that objects such as these are not blocking the signal’s path between your computers and wireless router (or access point). 3.
Introduction Experiment with more than one of the available channels in order to find the clearest connection and avoid interference from neighboring cordless phones or other wireless devices. Use the detailed Site Survey and wireless channel information included in your wireless router’s (or access point’s) user guide for more information. 5. Secure Connections, VPNs, and AOL® Secure connections typically require a user name and password, and are used where security is important.
Overview 1 The Card complies with the IEEE 802.11g standard in order to communicate with other 802.11g-compliant wireless devices at 54Mbps. The Card is compatible with all 802.11g devices as well as other 802.11b products at 11Mbps. 802.11g products operate on the same 2.4GHz frequency band as 802.11b Wi-Fi ® products. • 2.
Overview Applications and Advantages • Wireless roaming with a laptop around the home or office Offers the freedom of networking without cables. • Compatibility with 802.11b products 802.11g wireless LAN solutions are backward-compatible with existing Wi-Fi (IEEE 802.11b) products and with other products that display the Wi-Fi mark. • Difficult-to-wire environments Enables networking in buildings with solid or finished walls, or open areas where wiring is difficult to install.
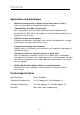
Overview (b) 1 2 3 4 (c) 5 6 (a) Power LED Lights up when the Card receives power (b) Link LED Lights up and flashes when the Card links to a wireless network (c) Card Connector Part of the Card that fits into your computer’s CardBus slot System Requirements • PC-compatible laptop with one available CardBus slot • Windows ® 2000 or XP Package Contents • Wireless G Plus MIMO Notebook Card • Quick Installation Guide • Installation Software CD • User Manual 7 section (a)
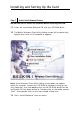
Installing and Setting Up the Card Step 1 Install the Software Drivers IMPORTANT NOTE: Install the software before inserting the Card. 1.1 Insert the Installation Software CD into your CD-ROM drive. 1.2 The Belkin Wireless Client Utility Setup screen will automatically appear (may take 15–20 seconds to appear).
Installing and Setting Up the Card 1.4 The installer will now start. Click “Next” and follow the on-screen instructions. 1 2 1.5 You might see a screen similar to this one. This DOES NOT mean there is a problem. Our software has been fully tested and is compatible with this operating system. Select “Continue Anyway” and follow the on-screen instructions. Step 2 Plug the Card into an Available CardBus Slot on your Laptop 2.1 During the install process, you will be prompted to insert your Card.
Installing and Setting Up the Card Step 3 Install the Wireless Client Utility 3.1 After the network card driver installation is complete, click “Next” to install the Wireless Client Utility. 3.2 The wizard will prompt you to choose an installation location. Click “Next” to accept the default location, or click “Browse” to select a different location before clicking “Next”. 3.3 Click “Finish” to start the Belkin Wireless Client Utility. 3.
Installing and Setting Up the Card 3.6 Select a network to connect to by 1 2 Note: In order to see your available networks, you must be near a working wireless router or access point. 3 3.7 The Profile screen will appear to 5 save the settings to the network selected. Click “Save & Activate” to save the Profile and activate it. 3.8 The Signal Indicator icon should appear green in your system tray (bottom right corner of most screens).
Using the Belkin Wireless Client Utility How to Access the Belkin Wireless Client Utility Double-click the Signal Indicator icon to bring up the Wireless Client Utility. If the icon is not present, click on “Start > Programs > Belkin > Belkin Wireless Client Utility”. The following screen will appear.
Using the Belkin Wireless Client Utility 1 Using the Expanded View (b) (d) (e) (c) 3 (f, g) 4 (h) 5 6 (i) (a) Network List List all available networks; double-click on a network to connect. (b) Show BSSID Select this check box if you wish to see the MAC address of the access point or router. (c) Allow Roaming Select this check box to move from one network to another without changing the active network selection. (d) Scan Click this button to scan the available networks in your area.
Using the Belkin Wireless Client Utility Setting Wireless Network Preferences To create a new Wireless Network Profile, click on the “Create” button, which will open up the “Profile” window. (j) (a) (b) (d) (c) (e) (f) (g) (h) (i) (a) Profile Name Enter a profile name of your choice for the new profile. (b) Service Set Identifier When this option is selected, then the Card will attempt to connect to any available wireless router or access point in the area.
Using the Belkin Wireless Client Utility 1 (d) Start Ad-Hoc Network When this option is selected, the Card will create a new ad-hoc network for any available computer in the area that is configured to be used in ad-hoc mode to connect to this computer. 2 (e) SSID 3 (f) Power Settings 4 Drag the sliding bar to select a power level. Higher settings enable the highest performance, lower settings draw less power from your PC when you want to conserve battery power or when you are within close range.
Using the Belkin Wireless Client Utility Securing your Wi-Fi Network Here are a few different ways to maximize the security of your wireless network and protect your data from unwanted intrusion. This section is intended for the home, home office, and small office user. At the time of publication, three encryption methods are available.
Using the Belkin Wireless Client Utility 1 128-Bit Encryption As a result of 64-bit WEP’s potential security weaknesses, a more secure method of 128-bit encryption was developed. 128-bit encryption includes a key length of 104 bits plus 24 additional bits of system-generated data (128 bits total). Some hardware manufacturers refer to 128-bit as 104-bit encryption.
Using the Belkin Wireless Client Utility WPA (Wi-Fi Protected Access) WPA is a new Wi-Fi standard that improves upon the security features of WEP. To use WPA security, the drivers and software of your wireless equipment must be upgraded to support it. These updates will be found on your wireless vendor’s website. There are two types of WPA security: WPA-PSK (no server) and WPA (with radius server). WPA-PSK (no server) uses what is known as a pre-shared key as the network key.
Using the Belkin Wireless Client Utility The following diagram shows the effect of not having the correct network key throughout your network. 2 3 Network key= MyPassword 4 5 Network key= MyPassword 6 Wireless G USB Network Card Network key= WRONG Password Wireless G Desktop Network Card Setting Up your Belkin Wireless Router or Access Point to Use Security To start using security, you need to first enable WEP or WPA for your wireless router or access point.
Using the Belkin Wireless Client Utility WEP Setup 64-Bit WEP Encryption 1. Select “64-bit WEP” from the drop-down menu. 2. After selecting your WEP encryption mode, you can enter your key by typing in the hex key manually, or you can type in a passphrase in the “Passphrase” field and click “Generate” to create a key. A hexadecimal (hex) key is a mixture of numbers and letters from A–F and 0–9. For 64-bit WEP, you need to enter 10 hex keys. For instance: AF 0F 4B C3 D4 = 64-bit WEP Key 3.
Using the Belkin Wireless Client Utility 1 128-Bit WEP Encryption Select “128-bit WEP” from the drop-down menu. 2. After selecting your WEP encryption mode, you can enter your key manually by typing in the hex key manually, or you can type in a passphrase in the “Passphrase” field and click “Generate” to create a key. A hex key is a mixture of numbers and letters from A–F and 0–9. For 128-bit WEP, you need to enter 26 hex keys. For instance: C3 03 0F AF 0F 4B B2 C3 D4 4B C3 D4 E7 = 128-bit WEP key 3.
Using the Belkin Wireless Client Utility WPA-PSK (no server) Choose this setting if your network does not use a radius server. WPA-PSK (no server) is typically used in home and small office networking. 1. From the “Security Mode” drop-down menu, select “WPA-PSK (no server)”. 2. Enter your network key. This can be from eight to 63 characters and can be letters, numbers, or symbols. This same key must be used on all of the clients (network cards) that you want to include in your wireless network. 3.
Using the Belkin Wireless Client Utility 1 WPA (with server) Settings Choose this setting if your network uses a radius server to distribute keys to the clients (network cards). WPA (with server) is typically used in business networks. From the “Security Mode” drop-down menu, select “WPA (with Radius Server)”. 2. Enter the IP address of the radius server into the “Radius Server” fields. 3. Enter the radius key into the “Radius Key” field. 4. Enter the re-key interval.
Using the Belkin Wireless Client Utility Configuring your Belkin Wireless Notebook or Wireless Desktop Network Card to Use Security At this point, you should already have your wireless router or access point set to use WPA or WEP. In order for you to gain wireless connection, you will need to set your Wireless Notebook and Wireless Desktop Network Cards to use the same security settings. Connecting your Computer to a Wireless Router or Access Point that Requires a 64-Bit or 128-Bit WEP Key 1.
Using the Belkin Wireless Client Utility 5. Select “128-Bit” or “64-Bit” encryption and type your WEP key in the “Key” box. 1 2 3 5 6 IMPORTANT: A WEP key is a mixture of numbers and letters from A–F and 0–9. For 128-bit WEP, you need to enter 26 keys. For 64-bit WEP, you need to enter 10 keys. This network key needs to match the key you assign to your wireless router or access point. 6. Click “Save” to save the settings.
Using the Belkin Wireless Client Utility Setting Up WPA in Windows XP to Connect your Computer to a Wireless Router or Access Point that is Using WPA In order to use WPA, ensure you are using “Windows Wireless Network Utility” instead of the “Belkin Wireless Client Utility” by doing the following: 1. Under Windows XP, click “Start > Control Panel > Network Connections”. 2. Right-click on “Wireless Network Connection”, and select “Properties”. 3.
Using the Belkin Wireless Client Utility 4. Under the “Wireless Networks” tab, click the “Configure” button and you will see the following screen. 1 2 3 5 6 5. For Home or Small Business Users: Select “WPA-PSK” under “Network Authentication”. NOTE: Select WPA if you are using this computer to connect to a corporate network that supports an authentication server such as radius server. Please consult your network administrator for further information. 6.
Using the Belkin Wireless Client Utility Monitoring the Status of your Network Connection (a) (b) (c) (i) (d) (j) (e) (f) (g) (l) (n) (p) (h) (k) (m) (o) (q) (s) (r) (a) Current Profile This is the current profile you are using. (b) Connection Quality Depending on the distance or noise in your area, the quality you receive may be excellent, good, or bad. (c) Access Point The MAC address of the access point. (d) Network Name This is the current network SSID to which you are connected.
Using the Belkin Wireless Client Utility 1 (g) SSID The network name of the router or access point. (h) BSSID This column will display the router or access point’s MAC address. The signal strength of the related router or access point. (j) Encryption 3 4 Will display “None” when encryption is disabled, “WEP” when either 64-bit or 128-bit encryption is enabled. 5 (k) Transmit Data Rate 6 This displays the transmit rate from the router to the Card.
Troubleshooting I can’t connect to the Internet wirelessly If you are unable to connect to the Internet from a wireless computer, please check the following items: 1. Look at the lights on your wireless router. If you’re using a Belkin Wireless Router, the lights should be as follows: • The Power light should be on. • The Connected light should be on, and not blinking. • The WAN light should be either on or blinking.
Troubleshooting If you’re not using a Belkin Router, please consult your router manufacturer’s user manual for the default name. The name of your wireless network appears in “Network List” If the correct network name is listed in the “Network List”, please follow the steps below to connect wirelessly: connect to the network. 2. If the network has security (encryption) enabled, you will need to enter the network key.
Troubleshooting Installation CD-ROM does not start the Wireless Client Utility If the CD-ROM does not start the Wireless Client Utility automatically, it could be that the computer is running other applications that are interfering with the CD drive. If the Wireless Client Utility Setup screen does not appear within 15–20 seconds, open up your CD-ROM drive by double-clicking on the “My Computer” icon.
Troubleshooting For more information about setting up a SSID, please reference your router manufacturer’s user manual. If issues persist even at close range, please contact Belkin Technical Support. Link LED is solid but cannot connect to the Internet 1 2 3 4 Check the WEP key settings to see if they match. The key is case-sensitive and the spelling on each computer and wireless router or access point must be exactly the same in order for the Card to connect to the router.
Troubleshooting when the distance between devices increases. Other factors that can cause signal degradation are obstructions such as walls and metal appliances (metal is generally the worst culprit). As a result, the typical indoor range of your wireless devices will be between 100 to 200 feet. Note also that connection speed may decrease as you move further from the wireless router or access point.
Troubleshooting We offer a Site Survey, detailed link information, and adapter diagnosis, to name a few. It’s essential to know which utility is managing your Card. We recommend using the Belkin Wireless Client Utility. To use the Belkin Wireless Client Utility, follow the steps below: Step 1 Right-click on the network status icon in the system tray and select “View Available Wireless Networks”. Available Wireless Networks window.
Troubleshooting What is the difference between 802.11b, 802.11g, 802.11a, and G Plus MIMO? Currently there are four levels of wireless networking standards, which transmit data at very different maximum speeds. Each is based on the designation 802.11(x), so named by the IEEE, the board that is responsible for certifying networking standards. The most common wireless networking standard, 802.11b, transmits information at 11Mbps; 802.11a and 802.11g work at 54Mbps; and G Plus MIMO works at 54Mbps.
Troubleshooting 1 Wireless Comparison Chart Belkin G Plus MIMO 802.11a Frequency Common household devices such as cordless phones and microwave ovens may interfere with the unlicensed band 2.4GHz Common household devices such as cordless 5GHz phones and uncrowded microwave band ovens may interfere with the unlicensed band 2.4GHz Compatibility Compatible with 802.11g Compatible with 802.11b Incompatible Compatible with 802.11b with 802.11g or 802.11g or 802.
Troubleshooting Technical Support You can find technical support information at www.belkin.com or www.belkin.com/networking. If you want to contact technical support by phone, please call: US: 877-736-5771 310-898-1100 ext.
Information 1 FCC Statement 2 DECLARATION OF CONFORMITY WITH FCC RULES FOR ELECTROMAGNETIC COMPATIBILITY We, Belkin Corporation, of 501 West Walnut Street, Compton, CA 90220, declare under our sole responsibility that the product, F5D9010 Caution: Exposure to Radio Frequency Radiation. The radiated output power of this device is far below the FCC radio frequency exposure limits.
Information This equipment generates, uses, and can radiate radio frequency energy. If this equipment does cause harmful interference to radio or television reception, which can be determined by turning the equipment off and on, the user is encouraged to try and correct the interference by one or more of the following measures: • Reorient or relocate the receiving antenna. • Increase the distance between the equipment and the receiver.
Information Products with the CE marking comply with the EMC Directive (89/336/EEC) and the Low Voltage Directive (72/23/EEC) issued by the Commission of the European Community. Compliance with these directives implies conformity to the following European Norms (in brackets are the equivalent international standards).
Information 42
Wireless G Plus MIMO Notebook Card Belkin Tech Support US: 877-736-5771 310-898-1100 ext. 2263 Europe: 00 800 223 55 460 Australia: 1800 235 546 New Zealand: 0800 235 546 Singapore: 800 616 1790 Belkin Corporation 501 West Walnut Street Compton, CA 90220, USA 310-898-1100 310-898-1111 fax Belkin Ltd. 7 Bowen Crescent, West Gosford NSW 2250, Australia +61 (0) 2 4372 8600 +61 (0) 2 4372 8603 fax Belkin B.V.