
User's Manual

3.Operation
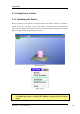
UP Plus 2 User Manual 27
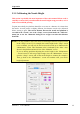
4 - Once you are about 1mm away from the nozzle, start increasing the number in the
text box by 0.1mm increments and click the ―To‖ button. Repeat this until you get
to within 0.2mm of the nozzle.
TIP: An easy way to check the distance between the nozzle and platform is to fold a
piece of paper in two (Which will make it about 0.2mm thick) and use that as a
spacer to gauge the distance between the nozzle and platform.
5 - Once you are within 0.2mm of the nozzle, write down the number you have in the
―To‖ box. This is the correct calibration height! Close the ―Maintain‖ window and
open the ―Setup‖ Window. In the ―Setup‖ window ―Nozzle‖ box, enter the number
you recorded on the ―Maintain‖ Screen. Alternatively, you can click the ―Set to
Nozzle Height‖ button to automatically transfer the value across to the setup screen.
You have now successfully setup the nozzle height.
NOTE: Once you have setup the nozzle height once, you do not need to do it
again as it is automatically recorded in the “Setup” Screen.
TIP: You may need to regularly recalibrate nozzle height after moving the printer, or
if you find the models are not adhering to the platform properly, or are warping.
If you keep adding new green paint on top of the old green paint, you may also
need to recalibrate your nozzle height regularly.
TIP: If you happen to crash the platform into the nozzle while making height
adjustments, it is good practice to re-initialize the printer before undertaking any
other operations.