AS-3104DU/AS-3108DU/AS-3116DU 4 ports/8 ports/16 ports USB&PS/2 User Manual PACKING LIST The complete AS-3104DU/AS-3108DU/AS-3116DU 4 ports/8 ports/16 ports USB&PS/2 package consists of: AS-3104DU/AS-3108DU/AS-3116DU 4 ports/8 ports/16 ports USB&PS/2 switch Power Adapter User Manual Quick Start Guide Check to make sure that all the components are present and that nothing was damaged in shipping. If you encounter a problem, contact your dealer.
©Copyright 2007 LANBE® Co.,Ltd Content OVERVIEW .................................................................................................................................................................................. 3 FEATURES.................................................................................................................................................................................... 3 HARDWARE REQUIREMENTS .....................................................................
OVERVIEW The AS-3104DU/AS-3108DU/AS-3116DU 4 ports/8 ports/16 ports USB&PS/2 KVM (Keyboard, Video, Mouse) Switches are control units that allow access and control of up to 4 (AS-3104DU), 8 (AS-3108DU) or 16 (AS-3116DU) computers from a single USB/PS/2 keyboard, USB/PS/2 mouse, and monitor console.
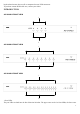
keyboard and mouse data as well as computers that use USB connectors. To purchase custom KVM cable sets, contact your dealer. INTRODUCTION AS-3104DU FRONT VIEW 1 2 AS-3108DU FRONT VIEW 1 2 AS-3116DU FRONT VIEW 1 2 1. Port LEDs The port LEDs are built into the Port Selection Switches.
are the Selected Port LEDs: The On Line LEDs light RED to indicate that the computer attached to the corresponding port is up and running. The Selected LEDs light GREEN to indicate that the computer that attached to the corresponding port is the one that has the KVM focus. 1. Port Selection Switches Press a switch button to access the computer attached to its corresponding port. AS-3104DU REAR VIEW 1 2 3 4 AS-3108DU REAR VIEW 1 2 3 4 AS-3116DU REAR VIEW 1 2 3 4 1.
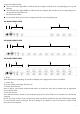
INSTALLATION BEFORE YOU BEGIN 1. Make sure that power to all the devices you will be connecting up have been turned off. 2. To prevent damage to your installation, make sure that all devices on the installation are properly grounded. SINGLE STAGE INSTALLATION To set up your AS-3104DU/AS-3108DU/AS-3116DU installation, do the following: 1. Plug your USB/PS/2 keyboard, USB/PS/2 mouse and monitor into the console port section located on the unit’s rear panel. 2.
OPERATION HOT PLUGGING The AS-3104DU/AS-3108DU/AS-3116DU supports hot plugging. Components can be removed and added back into the installation by unplugging and replugging their cables from their respective ports without the need to shut the switch down. For hot plugging to work properly, the following procedure must be observed: Hot Plugging CPU Ports: When to plug or unplug the cable from the port in powering; 1. The cable must be plugged back into the same port it was removed from.
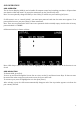
OSD OPERATION OSD OVERVIEW The On Screen Display (OSD) is used to handle all computer control and switching procedures. All procedures start from the OSD main menu. To pop up the main menu, tap the [Scroll Lock] twice. Note: You can optionally change the hotkey to the Ctrl key, in which case you would tap [ctrl] twice. If OSD menu is set as “console locked”, you must input password each time the main menu appears. If no password has been set, just press [Enter] to show main menu.
OSD MAIN SCREEN HEADINGS Heading Explanation PN This column lists the port numbers for all the CPU ports on the installation. The simplest method to access a particular computer is to move the highlight bar to it, then press [Enter]. QV If a port has been selected for Quick View scanning, an arrowhead symbol displays in this column to indicate so. PC The computers that are powered on and are on line have an arrowhead symbol in this column to indicate so.
QVIEW + NAME NAME Lists only the ports that have been selected as Quick View Ports and have name. Lists only the ports that have names. Move the highlight bar to the choice you want, then press [enter]. An icon appears before the choice to indicate that it is the currently selected one. After you make your choice and press [Enter], you return to the OSD main screen with the newly formulated list displayed. F4 QV QV function can select port as Quick View.
OSD ACTIVATING HOTKEY: Select OSD activating hotkey。 [Ctrl] [Ctrl] Set hotkey as [Ctrl] [Ctrl]. [Scroll] [Scroll] Set hotkey as [Scroll] [Scroll]. Move the highlight bar to an option and press [Enter] to select it. SET PASSWORD: Set new password. First enter old password, then enter new password and confirm it. The new password is set. If error occurs, the screen will remind users. CLEAR THE NAME LIST: Clear the names of port list. You need to enter password to clear the names of port list.
LEDs Video 4 x HDB-15 male (blue) On Line 4 Selected Video resolution 4 1600 x 900 Power DC5V, 400mW Operating temperature -10˚C~50˚C Storage temperature -20˚C~60˚C Housing Metal Weight 0.8 Kg Dimensions(L x W x H ) 432 x 155 x 44 mm 8 x HDB-15 (blue) 8 8 male 16 x HDB-15 male (blue) 16 16 SAFE GUIDE Please follow the directions below when installing, using and maintaining it in order to guarantee the device to work well.