PHD User Manual Table of Contents Overview....................................................................................................2 Install PHD Software.................................................................................3 Connect PHD Equipment..........................................................................5 Connect Sensor to the PHD Programmer.................................................6 Run PHD Application..............................................................
PHD User Manual Overview BEI Sensors introduces the Programmable Hall Device (PHD), an easy way to take control of customizing BEI Hall effect sensors output. This compact system interfaces with your PC to BEI Hall effect sensors and provides users with the ability to create output functions that meet specific requirements. The system includes proprietary PHD software (compatible with Windows XP, 7 or Vista), the PHD programming unit, power cord and a USB computer interface cable.
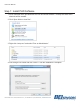
PHD User Manual Step 1: Install PHD Software 1. Insert USB flash drive provided with the PHD and install software. Desktop and start menu shortcuts will be created. 2. Click “Open folder to view files”. 3. Right-click “setup.exe” and select “Run as Administrator”. 4. Run through PHD install and click “Next>>” until the installation is complete. 7230 Hollister Avenue, Goleta, California 93117 | Tel: 805-968-0782 | Fax: 805-968-3154 | www.beisensors.com Specification No.
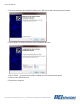
PHD User Manual 5. Once the software has finished installing, the PHD Drivers will automatically be installed. 6. Click “Next>” to finish the Device Driver installation process. 7. Click “Finish”. You have successfully installed the PHD software and drivers. 8. Remove the USB flash drive. 9. Restart the computer. 7230 Hollister Avenue, Goleta, California 93117 | Tel: 805-968-0782 | Fax: 805-968-3154 | www.beisensors.com Specification No.
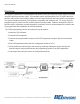
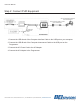
PHD User Manual Step 2: Connect PHD Equipment 1. Connect the USB-A end of the Computer Interface Cable to the USB port on your computer. 2. Connect the USB-B end of the Computer Interconnect Cable to the USB port on the Programmer. 3. Connect the AC Power Cord to the AC Adaptor. 4. Connect the AC Adaptor to the Programmer. 7230 Hollister Avenue, Goleta, California 93117 | Tel: 805-968-0782 | Fax: 805-968-3154 | www.beisensors.com Specification No.
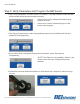
PHD User Manual Step 3: Connect BEI Programmable Sensor to PHD Programmer 1. Connect the 25-pin connector end of the Sensor Interconnect Cable to the Programmer. 2. Connect the 6-pin or 3-pin connector end of the Sensor Interconnect Cable to the BEI Programmable Sensor. 3. Plug the AC Power Cord into an outlet and move the power switch on the Programmer to the “1”or on position. The green and red lights should be lit. • Verify that the Windows Driver Install was successful.
PHD User Manual Step 4: Run PHD Application and create the desired program 1. Run the PHD Application. It will automatically find and connect to the PHD Programmer. 2. If the software cannot find a PHD Programmer a “No PHD Device Found!” message will appear. • *Note: The user can continue without a PHD Device connected to create programming profiles for later use. If there is no Programmer connected, a “Connect to PHD?” dialog will appear.
PHD User Manual 4. Select the Output Type: The output type is selected based on the “Unit Type” chosen in Step #4. • *NOTE: The desired programming will not be achieved if the incorrect Output Type is choosen. • Unit Type 9960–this sensor series has several different versions of programmable types. • 0-5V Ratio – This is a 9960-5A Input/Output version, 0-5V Input for 0-5V Output. • PWM – This is a 9960-5X2 Input/Output version, 5V Input only.
PHD User Manual 7. Define four additional parameters for the part: • Hysteresis– The Hysteresis option allows you to to independently program the amount of hysteresis each output will have. A value of zero degrees will give the minimum amount of hysteresis and 11 degrees will give the maximum amount of hysteresis. This value is most commonly set to zero. • Travel (Deg)– The Travel option allows you to program the rotational angle you want to resolve.
PHD User Manual Step 5: Verify Parameters and Program the BEI Sensor 1. Click “Verify Parameters” for either Sensor 1 or Sensor 2. This step checks to make sure that all the needed values have been entered correctly. • If there is an error the software will indicate what needs to be fixed. • If there is no error the software will grey out the sensor under program. 2. Click “Begin Programming” to start the programming process, this initializes the chip and prepares it for programming. 3.
PHD User Manual 5. Rotate the part in the appropriate direction (In this example Counter Clockwise) as selected in the “Rotation Direction” field to the next programming point, Point B and click “Program B” without moving the part from the desired position. 6. If you have selected something other than a “2 Points” programming option, repeat steps 4 & 5 for the remaining points. Otherwise, you may release the part and click “Finalize Programming” to finish the programming process. 7.
PHD User Manual Step 6: View output and verify configuration 1. If you wish to verify the output of the programmed sensor select the “View Output” button on the lower right hand section of the screen to bring up a real-time graph of the sensor output. 2. Rotate the part to observe how it’s output changes. 7230 Hollister Avenue, Goleta, California 93117 | Tel: 805-968-0782 | Fax: 805-968-3154 | www.beisensors.com Specification No.
PHD User Manual Saving and Loading Programs Once you have selected the parameters to program you can choose to save those settings to use at another time using the File menu in the software. 1. Select “File” in the top menu barand then click “Save” and store the file on your computer for later use. 2. Select “Load” to open a previous saved program. 7230 Hollister Avenue, Goleta, California 93117 | Tel: 805-968-0782 | Fax: 805-968-3154 | www.beisensors.com Specification No.
PHD User Manual PHD Troubleshooting Problem Software Does Not Install Correctly Software Does Not Find the Hardware Solution The most likely cause of an invalid installation relates to computer security. Uninstall the software and re-install being sure to rightclick the setup.exe file and select “Run as Administrator” Make sure that the PHD is properly connected to the computer and is running the software via the supplied USB Computer Interface Cable.