
Manual


DIGITAL PRO MIXER DDM4000
The DDM4000 as MIDI controller 23
Further settings6.
Loading factory settings6.1
Press the LOAD push button 1) [35]. The display switches to
“User Setup”. The LOAD push button lights up.
Select the factory preset by turning and pressing the left 2)
PARAMETER knob [45].
Press the left PARAMETER knob to conrm the selection.3)
Press the LOAD push button 4) [35] or the ESC push button
[52] to exit User Setup.
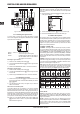
Output Setup6.2
Press the CONSOLE SETUP knob 1) [51] for approximately 2
seconds.
Select “Output Setup” by turning and pressing the CONSOLE 2)
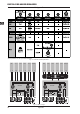
SETUP knob. Output Setup appears on the display:
OUTPUT
SETUP
SUB-OUT S/PDIF
TAPE/
MONO
OFF
ON
MODE
FREQ GAIN GAIN
FULL-FREQ
CROSSOVER
-6.0dB -3.0dB 55Hz
OUT B
In Output Setup, you make the following settings:
Mono:
Use this function to switch the OUT B outputs [74] to mono.
Turn the left PARAMETER knob 1) [45] to select OFF or ON.
Press the left PARAMETER knob to conrm.2)
MODE:
You can use Output A [73] together with the Subwoofer output,
in which case the bass frequencies are separated from the Main
output (crossover function).
FULL-FREQ:
MAIN OUT A [73] emits the entire frequency
spectrum (including the bass signal). The
Subwoofer output gives out the subwoofer
signal.
CROSSOVER: The Subwoofer output gives out the subwoofer
signal. MAIN OUT A emits frequencies that are
above the crossover frequency.
Turn the CONSOLE SETUP knob 1) [51] to select the mode
(FULL-FREQ, CROSSOVER).
Press the CONSOLE SETUP knob to conrm.2)
SUB OUT:
The following are used to adjust the crossover frequency and
output level of the subwoofer output.
FREQ: Crossover frequency between SUB OUT and MAIN
OUT
GAIN: Output level of SUB OUT
TAPE / S/PDIF:
The levels of both Tape and S/PDIF outputs can be adjusted
individually.
Press the right PARAMETER knob to select the parameter 1)
(FREQ, GAIN or TAPE/ S/PDIF GAIN).
Turn the PARAMETER knob to change the value.2)
Press the ESC push button to exit Output Setup.3)
Adjusting display contrast6.3
Press the LOAD push button 1) [35]. User Setup appears on
the display.
Turn the right PARAMETER knob 2) [45] to change the con-
trast.
Press the LOAD push button to exit User Setup.3)
The DDM4000 as MIDI controller7.
The DDM4000 can be used to control DJ or sequencer software
applications by converting individual mixer sections on the mixer to
MIDI controllers and assigning these to dened software functions.
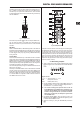
The MIDI interface [76] is used to transmit the data. To connect to
the mixer, the computer requires a MIDI interface, which can be
purchased as USB alternative for a very reasonable price.
USB-MIDI Interface*
MIDI IN/OUT/THRU
* not included
Connecting the DDM4000 to a computerFig. 7.1:
MIDI protocol7.1
The MIDI format is used for the data transmission. Knobs and
faders send Control Change messages (CC), and push buttons
send Note messages (see Table 10.2). Access the software
settings to assign mixer controls to software functions. Most
software applications offer a learn function to make the assigning
even easier.
The MIDI transmission also works in the opposite direction. Ba-
sically, it is conned to controlling the LEDs, so that a switching
status in the software application can also be shown on the
DDM4000. In this case the DDM4000 receives CC messages
from the computer. Each LED of the DDM4000 is assigned to
a CC number (see Table 10.3). Sending the value 0 makes the
LED go out, but sending the value 1 (or any higher value) turns
on the LED.
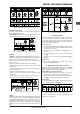
Common MIDI settings7.2
The MIDI settings are made on the MIDI Setup page.
Press the CONSOLE SETUP knob 1) [51] for approximately 2
seconds.
Select “MIDI Settings” by turning and pressing the CONSOLE 2)
SETUP knob. The MIDI Setup page appears on the display:
This page allows you to make the following settings:
Adjusting the MIDI channel (7.2.1) =
Sending a MIDI dump (7.2.2) =
Conguring the Microphone channel, Sampler and crossfader =
as MIDI controller (7.3)
Conguring stereo channels as MIDI controllers (7.4) =
Press the ESC push button 3) [52] to exit MIDI Setup.
Save the settings you made in a user preset (see Chap- +
ter 3.5.2 “Storing user settings”) in case you want the
settings to be active the next time you switch on the
device.