
Manual

DIGITAL PRO MIXER DDM4000
BPM and Effects section 17
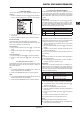
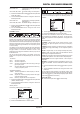
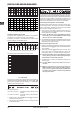
The display switches to the Ultramizer page. Here you can change
settings plus load and edit presets:
Loading presets:
Turn the left PARAMETER knob 1) [45] to select the preset.
Press the PARAMETER knob to load the preset.2)
Ultramizer presets
Gentle Boost Gentle volume boost
Boost Noticeable volume boost
Pump Strong volume boost with pumping effect
Full Maximum volume boost
Full Pump Maximum volume boost with pumping effect
Editing the Ultramizer:
RANGE Describes the adjustable dynamic range. A value of 10
dB results in a maximum level boost of 10 dB.
TIME Changes the adjustable speed of the Ultramizer.
Turn the CONSOLE SETUP knob = [51] to change the TIME
parameter.
Turn the PARAMETER knob = [45] to change the RANGE
parameter.
Exiting the Ultramizer setup:
Press the ESC push button = [52] to exit the Ultramizer setup.
Loading and saving user settings3.5.2
A great advantage of a digital mixer is the possibility to store
entire mixer settings in order to recall them later on at the ick of
a switch. Big studio consoles refer to this function as “Snapshot”
because all settings are captured (as with a snapshot). This lets
you adjust the mixer to your way of working and recall settings
you made at any time.
Just imagine, a club has the DDM4000 which is being used
by several DJs. Each DJ has stored personal EQ settings, kill
frequencies, Ultramizer and Effect settings, so that when it is his
or her turn, the preferred settings can be recalled immediately.
The other way around, a guest DJ, who is not accustomed to the
DDM4000, is able to take off without having to adjust any settings
in advance.
After switching on the device, the last selected preset +
is loaded.
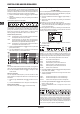
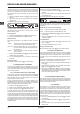
Loading user settings:
Press the LOAD push button 1) [35]. The LOAD push button
ashes.
“User Setup” appears on the screen, displaying the preset list:
Turn the left PARAMETER knob 2) [45] to select a user setting
(or the factory preset).
Press the PARAMETER knob again to load the user setting.3)
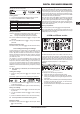
Storing user settings:
Press the LOAD push button 1) [35] to access User Setup with
its preset list.
Turn the CONSOLE SETUP knob 2) [51] to select a memory
location.
Press the CONSOLE SETUP knob to store the user setting.3)
It is not possible to overwrite the factory preset. +
Exiting User Setup:
Press the LOAD push button = [35] or the ESC push button
(52) to exit User Setup.
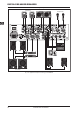
Operating the Phones section3.6
You can use the headphones to listen to two different signals: 1.
The PGM signal (=Program): This is the signal at the MAIN output.
2. The PFL signal (=Pre Fader Listen): This is the signal which
can be routed to the PFL bus by using the PFL push buttons {7}.
The PFL signal is fader-independent, which means it can even be
heard when the faders are pulled down.
When the SPLIT push button [40] is not pressed, both the PGM
and PFL signal are played back in stereo in the headphones.
The mix of both signals is adjusted with the MIX knob [38]. When
the knob is turned completely to the left, the PFL signal is heard,
whereas when turned completely to the right, the PGM signal is
heard in both headphones.
Working in Split Mode:
Press the SPLIT push button = [40] to activate Split Mode.
When using Split Mode, the PFL signal is played back on the
left headphone while the PGM signal is played back on the right
headphone (both mono signals).
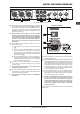
BPM and Effects section4.
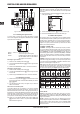
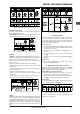
BPM and Effects sectionFig. 4.1:
The BPM and Effects section in the middle of the mixer can eit-
her be used for the stereo channels or the master signal. Both
processors can also be combined to be used as dual effect for
individual channels. What’s more, both Microphone channel and
Sampler feature their own effect processors, which are described
in individual chapters (Chapter 3.3.1 and Chapter 5.4).
Display:
The display shows the following information:
A Shows the effect type and the parameter values.
B Shows the calculated speed in BPM (Beats Per Minute).
It also gives information on the signal assignment and the
Tap function.
C This section shows the BPM-synchronized effect parameters
as beats on the right side. On the left, you see the activity
of the Kill function in the effect path.
D This information refers to the Sampler and/or the MIDI Clock
(see Chapter 5).