
Manual

DIGITAL PRO MIXER DDM4000
Controls and connections10
Sampler2.6
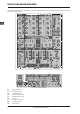
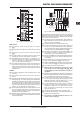
Sampler sectionFig. 2.6:
Press the [54] INSERT push button to add the sampler signal to
the channel (Insert Mode). If the push button is not activated,
the sampler is mixed to the selected channel (Mix Mode).
In both cases, playback is initiated with the REC SOURCE
push buttons. When the sampler is routed to the crossfader,
the LED of the INSERT push button goes out.
The [55] VOLUME/MIX knob controls the volume of the sampler
(in Mix Mode) as well as the volume balance between input
signal and Sampler (in Insert Mode).
The [56] REC SOURCE push buttons let you select the channel
for recording and playing back samples.
Press the [57] PFL push button to listen in on the sampler signal
with the headphones.
SAMPLE LENGTH [58] adjusts the recording time (1 – 16 beats
or endless recording ?).
RECORD/IN [59] lets you record to the Sampler. Select a bank
beforehand. By pressing the push button a second time, the
recording is stopped (only in ? Mode).
BANK ASSIGN[60] is used to select a bank in which the recor-
ded material is stored. The selected bank is indicated by
the relevant MODE push button [61] which signalizes the
readiness to record.
The [61] MODE push buttons (Bank 1 and Bank 2) are used to
select the sampler’s types of playback (Reverse and Loop).
A short tap activates or deactivates the Reverse function;
pressing the push button a little longer activates or deac-
tivates the Loop function.
Press the PLAY/OUT[62] push button to start the playback of the
recorded sample. When the Loop function is deactivated,
the sample is only played back as long as the PLAY push
button is pressed.
Press [63] SMP FX ON push button to activate the Brake ef-
fect.
Press the [64] SELECT push button to determine the length of
the brake (1, 4 or 8 Beat Brake, which is shown in the center
of the display).
The [65] CF ASSIGN push button lets you determine on which
side of the crossfader the sampler signal is to be routed
to.
You can even trigger the sampler with the crossfader when [66]
the sampler is assigned to it. To order to do so, simply press
the CF START push button. But beforehand, use BANK
ASSIGN to select the bank that should be played back when
using the fader.
Rear panel connectors2.7
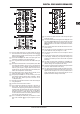
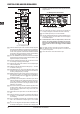
Rear panel connectorsFig. 2.7:
The [67] LINE inputs are used to connect the Line signals (for
example, CD players, soundcards and drum machines).
The [68] PHONO inputs let you connect turntables.
Use the [69] PHONO/LINE switches to set the PHONO inputs to
Line level in order for you to be able to connect a CD player
to the PHONO inputs.
Caution! Devices with Line output levels, such as CD +
players, can cause distortion and destroy the preamp-
lier. Press the PHONO/LINE switch before connecting
devices with Line level to the highly sensitive PHONO
inputs.
The [70] GND connectors are used to ground the turntables.
The balanced XLR connectors provide a connection for [71]
dynamic microphones.
This is the [72] LEVEL control for the MIC 2 input.