
Quick Start Guide


16 CE500D Quick Start Guide 17
(EN)
Step 3: Getting
started
(ES)
Paso 3: Puesta
en marcha
(FR)
Etape 3: Mise
en oeuvre
(DE)
Schritt 3: Erste
Schritte
(PT)
Passo 3: Primeiros
Passos
(IT)
Passo 3: Iniziare
(NL)
Stap 3: Aan de slag
(SE)
Steg 3: Komma
igång
(PL)
Krok 3: Pierwsze
kroki
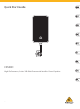
CE500D Getting started
(EN) Mount the speaker(s) in desired
locations, either on a wall or microphone
stand. (See Mounting Instructions section
fordetails.)
(ES) Coloque el altavoz(es) en la ubicación que
quiera, tanto si es instalado en una pared como en
un soporte de micro. (Vea la sección de instrucciones
de montaje para más detalles).
(FR) Installez les enceintes où vous le souhaitez,
sur un mur ou sur un pied de micro (consultez la
section sur les instructions de montage pour de plus
amplesdétails).
(DE) Montieren Sie die Lautsprecher an der
gewünschten Stelle, entweder an der Wand oder
auf einem Mikrofonständer (weitere Einzelheiten im
Abschnitt Montageanleitungen).
(PT) Monte os alto-falantes no locais desejados,
tanto em uma parede quanto em um suporte
de microfone. (Veja as seções de Instruções de
Montagem para maisdetalhes.)
(IT) Montare gli altoparlanti nelle posizioni
desiderate, su una parete o su un supporto
per microfono. (Vedere la sezione Istruzioni
di montaggio per i dettagli.)
(NL) Monteer de luidspreker (s) op de gewenste
locaties, aan de muur of aan een microfoonstandaard.
(Zie het gedeelte Montage-instructies voor details.)
(SE) Montera högtalarna på önskade platser, antingen
på en vägg eller mikrofonstativ. (Se avsnittet om
monteringsinstruktioner för mer information.)
(PL) Zamontuj głośnik (i) w żądanych miejscach, na
ścianie lub stojaku mikrofonowym. (Szczegółowe
informacje można znaleźć w sekcji Instrukcje montażu).
(EN) Connect the included IEC POWER
CABLE to the speaker and to a mains
outlet. DONOT turn the power on yet!
(ES) Conecte el CABLE DE ALIMENTACION IEC incluido
al altavoz y a una salida de corriente alterna.
¡NOENCIENDA el altavoz todavía!
(FR) Connectez les cordons secteur IEC fournis entre
les enceintes et les prises secteur. Veillez À NE PAS
ENCORE placer les enceintes sous tension !
(DE) Verbinden Sie das mitgelieferte IEC-NETZKABEL
mit dem Lautsprecher und einer Netzsteckdose.
SchaltenSie das Gerät noch NICHT ein!
(PT) Conecte o CABO de FORÇA IEC incluso ao
alto-falante e à saída da central de energia.
NÃOligue a força ainda!
(IT) Collegare il CAVO DI ALIMENTAZIONE IEC incluso
all'altoparlante e a una presa di corrente. NON
accendere ancora l'alimentazione!
(NL) Sluit de meegeleverde IEC-STROOMKABEL aan
op de luidspreker en op een stopcontact. Schakel de
stroom nog NIET in!
(SE) Anslut den medföljande IEC POWER CABLE till
högtalaren och ett eluttag. Slå INTE på strömmen ännu!
(PL) Podłącz dołączony KABEL ZASILAJĄCY IEC do
głośnika i do gniazda sieciowego. NIE WŁĄCZAJ
jeszcze zasilania!
(EN) Connect the audio source to the
speaker using either XLR or ⁄" cables.
(ES) Conecte la fuente de audio que vaya
a usar al altavoz por medio de un cable XLR o ⁄".
(FR) Connectez la source audio aux enceintes à l’aide
de câbles XLR ou ⁄".
(DE) Schließen Sie die Audioquelle über XLR- oder
⁄"-Kabel an den Lautsprecher an.
(PT) Conecte a fonte de áudio ao alto-falante usando
tanto cabos XLR quanto ⁄".
(IT) Collega la sorgente audio all'altoparlante
utilizzando cavi XLR o da ⁄".
(NL) Verbind de audiobron met de luidspreker met
behulp van XLR- of ⁄"-kabels.
(SE) Anslut ljudkällan till högtalaren med antingen
XLR- eller ⁄"-kablar.
(PL) Podłącz źródło dźwięku do głośnika za pomocą
kabla XLR lub ⁄".
(EN) If necessary, add extra speakers by
connecting the LINK OUTPUT of one
speaker to the MIC/LINE INPUT of the
additional speaker using an XLR cable.
(ES) Si es necesario, añada altavoces extra
conectando la salida LINK OUTPUT de un altavoz a
la entrada MIC/LINE INPUT del altavoz adicional por
medio de un cable XLR.
(FR) Si nécessaire, ajoutez d’autres enceintes
en reliant la sortie LINK OUTPUT d’une enceinte
à l’entrée MIC/LINE INPUT de l’enceinte
supplémentaire à l’aide d’un câble XLR.
(DE) Fügen Sie nötigenfalls weitere Lautsprecher
hinzu, indem Sie die LINK OUTPUT-Buchse des
Lautsprechers über ein XLR-Kabel mit der MIC/LINE
INPUT-Buchse des Zusatzlautsprechers verbinden.
(PT) Se necessário, adicione alto-falantes extras
conectando o LINK OUTPUT de um alto-falante ao
MIC/LINE INPUT do alto-falante adicional usando um
cabo XLR.
(IT) Se necessario, aggiungere altoparlanti
aggiuntivi collegando l'uscita LINK OUTPUT di
un altoparlante all'ingresso MIC / LINE INPUT
dell'altoparlante aggiuntivo utilizzando un cavo XLR.
(NL) Voeg indien nodig extra luidsprekers toe door
de LINK OUTPUT van een luidspreker aan te sluiten
op de MIC / LINE INPUT van de extra luidspreker met
behulp van een XLR-kabel.
(SE) Om det behövs, lägg till extra högtalare
genom att ansluta LINK OUTPUT för en högtalare
till MIC / LINE INPUT för den extra högtalaren
med en XLR-kabel.
(PL) W razie potrzeby dodaj dodatkowe głośniki,
podłączając LINK OUTPUT jednego głośnika do
wejścia MIC / LINE INPUT dodatkowego głośnika
za pomocą kabla XLR.
(EN) Turn on your audio source
(CD player, mixer).
(ES) Encienda la fuente de señal audio
(reproductor de CD, mesa de mezclas).
(FR) Placez la source en lecture (lecteur de CD,
console de mixage, etc.).
(DE) Schalten Sie Ihre Audioquelle ein
(CD Player, Mischer).
(PT) Ligue sua fonte de áudio (CD player, mixer).
(IT) Accendi la sorgente audio (lettore CD, mixer).
(NL) Schakel uw audiobron in (cd-speler, mixer).
(SE) Slå på din ljudkälla (CD-spelare, mixer).
(PL) Włącz źródło dźwięku
(odtwarzacz CD, mikser).