
User's Manual

M
M
9
9
5
5
5
5
C
C
O
O
p
p
t
t
i
i
c
c
a
a
l
l
M
M
o
o
u
u
s
s
e
e
Q
Q
u
u
i
i
c
c
k
k
I
I
n
n
s
s
t
t
a
a
l
l
l
l
a
a
t
t
i
i
o
o
n
n
G
G
u
u
i
i
d
d
e
e
Congratulations on purchasing this exciting Typhoon Optical Wireless Mouse. This multi-function
optical office mouse is with great features, wheel for quick scrolling and optical sensor for
preventing mechanical interference caused by dust. Designed with human-oriented
characteristics make you feel more comfortable and efficient while surfing on the website or using
applications.
System Requirements
1. Available PS/2 or USB port.
2. Operating system:
USB Model
Windows® 98SE, Windows® ME, Windows® 2000 or Windows® XP
operating system
Combo Model
Microsoft® Windows® 95, Windows® 98SE, Windows® ME, Windows®
2000 or Windows® XP operating system
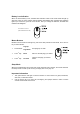
Hardware Installation
Connect the mouse onto Your PC System
USB Model
Just directly plug the USB connector into the USB
port on PC.
Combo Model
(USB Model + USB
to PS/2 adapter)
For PS/2 port system, please use the “Combo
Adapter” (USB to PS/2 adapter). This adapter
helps you a lot on solving the USB to PS/2 port
issue.
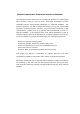
ID Setting
This wireless optical mouse contains 256 sets ID. The ID-recognition function helps to
protect against interference from other RF products in the same environment. Remember to
reset ID when other RF products affect your mouse.
The ID button (with
Typhoon
Logo) locates on the top of the receiver with a LED under
to show the connecting condition.
The mouse should be able to work after you first install it. If it can’t work, please follow
the steps below to process ID setting of this mouse.
1. Firstly, press the ID button on the top of the receiver once.
The LED under the receiver ID button will flash.
2. Then press the ID button on the bottom of the mouse once.
Once the ID is set, the LED under the receiver ID button will
remain steadily lit.
Note: The whole procedure should be completed within 25 seconds.
USB Mouse connector
Combo connector
(USB to PS/2 adaptor)
ID Button of Mouse
ID Button on Receiver