
User's Manual


3
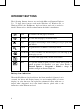
1. Setting a same ID Number for both keyboard and receiver.
The pin 1 & pin 2 on the DIP switch are used for ID settings. (The
other two pins, pin 3 and pin 4, are useless. You may ignore them.)
The table below indicates ID settings for four keyboards.
DIP Switch
ID Number
1 2
0 ON ON
1 OFF ON
2 ON OFF
3 OFF OFF
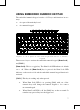
Figure 2: The DIP switch is located on the back cover of
the receiver and keyboard.
2. On the rear of the keyboard, remove the battery cover and insert three
batteries of AA (UM-3) type only. Make sure the polarities are
correct.