9116IR INFRARED KEYBOARD User’s Guide Version 1.
The information in this document is subject to change without notice and does not represent a commitment on the part of the vendor. No warranty of representation, either expressed or implied, is made with respect to the quality, accuracy or fitness for any particular purpose of this document. The manufacturer reserves the right to make changes to the content of this document and/or the products associated with it at any time without obligation to notify any person or organisation of such changes.
INTRODUCTION This product is not only an infrared wireless keyboard but also an Internet keyboard. This infrared keyboard is designed to make your life easier. It is just the right size and weight thus makes it easy to hold in hand or put on your laps, anywhere in the room. It's easy to touch and is quiet to the ears. In addition, with sleep mode power saving and “book-on-keyboard protection”, it's even easier on the battery and the environment.
INSTALLATION System Requirement ? IBM AT, PS/2 PC and its compatibles ? Microsoft® Windows® 95, Windows® 98, Windows NT® 4.0, Windows® 2000 or Windows® ME operating system ? Microsoft Internet Explorer 5.
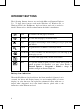
1. Setting a same ID Number for both keyboard and receiver. The pin 1 & pin 2 on the DIP switch are used for ID settings. (The other two pins, pin 3 and pin 4, are useless. You may ignore them.) The table below indicates ID settings for four keyboards. ID Number 0 1 2 3 DIP Switch 1 ON OFF ON OFF 2 ON ON OFF OFF Figure 2: The DIP switch is located on the back cover of the receiver and keyboard. 2. On the rear of the keyboard, remove the battery cover and insert three batteries of AA (UM-3) type only.
Figure 3: Back cover of the keyboard is equipped with DIP switch & dry cell . ? Make sure to set an identity code for each keyboard on both the keyboard and the receiver. You may change the ID number at any time, but make sure that the keyboard has power. ? 3. Interference might occur if four keyboards are placed too close to each other and the angles between them are critical. Check the two connectors of the receiver.
signal can be correctly sent. The effective angle is ± 45? (horizontal), +60?/-30? (vertical). 6. Power on your system and see if it works fine. The input method, whether keystrokes or click the button mouse, must be applied separately to avoid data reception loss and mistakes. ? 7. If your keyboard isn't working or it's working incorrectly, it could be that the keyboard isn't connected properly or a key is pressed during starting up. Repeat the steps above.
INTERNET BUTTONS The following Internet buttons are used with Microsoft Internet Explorer 5.0. To have these buttons work under Windows 95, Windows 98, or Windows NT4.0, the KeyMaestro keyboard driver enclosed is needed to install. Please refer to the file readme.htm in the disk for installation. Back To return to the last page you viewed. Forward To view the next page you viewed before. Stop If a page you are trying to view is taking too long to open, click this button.
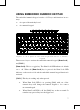
USING EMBEDDED NUMERIC KEYPAD The embedded numeric keypad consists of 15 keys and functions in two ways: ? As a part of the main keyboard. ? As a numeric keypad. Num Lock Figure 5: as a part of the main keyboard and as a numeric keypad There are two keys to activate the embedded numeric keypad: [Num Lock] and [Shif t ]. [Num Lock]: This is a toggle key. The Num Lock LED indicator is default set to off.
TECHNICAL SPECIFICATIONS Electrical Data Input power: Switch activation mechanism: Transmission: 4.5 VDC (three AA batteries) Membrane Infrared Physical & Mechanical Data Key numbers: Total travel: Peak force (normal key): Keyboard dimension: 86 keys for U.S. version 87 keys for European version 88 keys for Japanese version 3.0 ? 0.5 mm 55 ? 20 grams 380 mm (L) ? 187 mm (W) ? 35 mm (H) Keyboard weight: Effective operating distance: 1.2 kg (including battery & receiver) 5 meters (16 ft.
3100504930 Version 1.