9019URF Wireless Kits USB RF Keyboard With Build-in Mouse & Joystick Manual Version 1.
封面內頁 FCC GUIDELINES This equipment has been tested and found to comply with the limits for a Class B digital device, pursuant to Part 15 of the FCC Rules. These limits are designed to provide reasonable protection against harmful interference in a residential installation. This equipment generates, uses and can radiate radio frequency energy and, if not installed and used in accordance with the instructions may cause harmful interference to radio communications.
Table of Contents Important Information.................................................................................................. 1 Battery Installation ................................................................................................... 1 Receiver cable positioning...................................................................................... 2 1 Introduction .......................................................................................................
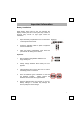
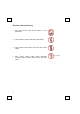
Important Information Battery Installation When battery power gets too low, the computer will display a battery low icon on the system tray or flash 10 seconds every minute on right upper screen as notification. 1. Open the battery compartment cover on the bottom of the keyboard and mouse. 2. Follow the indication inside to place in keyboard and mouse batteries. 3. Place the battery compartment cover back and proceed with ID setting of the devices. Important: 1.
Receiver cable positioning 1. Don't warp receiver cable around monitor or LCD panel base. 2. Don't intertwine receiver cable with power cables. 3. Don't bundle or bind receiver cable with other signal cables. 4. Don't extend receiver cable unless absolutely necessary, and let receiver cable run free from other cables.
1 Introduction Congratulations on your purchase of this wireless USB RF keyboard with marvelous build-in mouse & joystick. This keyboard kit will finally free you of the constraints of your desktop by providing a wireless connection between your keyboard and your PC.
2 System Requirements Microsoft Windows 98, Windows ME, Windows 2000 or Windows XP operating system Microsoft Internet Explorer 5.0 or later version (for the Internet keys) CD-ROM drive (for CD and Video operation) Standard sound card (for CD and Video operation) The system supporting ACPI or APM II (for power management buttons) ATX mother board and ATX power supply (for power management buttons) USB Spec 1.
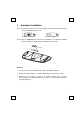
3 Hardware Installation Step 1: Connect the receiver to your PC by plugging in the receiver’s USB connector into your available USB port on PC. Front View of USB Connector Back View of USB Connector Step 2: Take the keyboard and make sure the batteries on the back are installed correctly. (Follow the polarity signs in the battery compartment.) (-) 1.5V 2pcs (+ ) Remarks: 1. The keyboard uses 2pcs standard UM-3 (AA) 1.5V alkaline batteries. 2.
ID Setting This wireless RF keyboard kit contains 255 sets ID. This extra ID-recognition function helps to protect against interference from other RF keyboards in the same environment. The word CONNECT labels the ID button on each unit. The LED under ID button of receiver shows connecting condition. Step 1: Press the ID button on the top of the receiver once. ID Button(LED) ID Button of Receiver Step 2: Press the ID button on the front side of keyboard (upper-left side) once.
Remarks: 1. You must follow the procedure above to set the ID of receiver, and then keyboard. Once the receiver ID button is pressed, you have 30 seconds to complete the entire process, or you will need to begin again. 2. If the keybaord does not work after ID setting procedure, or the signal transmission between receiver and keybaord is interupted, please do proceed ID setting procedure again. 3. Once the keyboard and receiver are plugged in, the yellow receiver light will flash.
4 Software Installation After finishing the hardware installation as described in this manual and starting up your PC, you should be able to immediately take advantage of the wireless function of the wireless keyboard. If the keyboard does not work properly, see Chapter 6: Troubleshooting for tips on how to solve your problem.
5 Using the Keyboard, Mouse, and Joystick 5.1 Using the Keyboard Hot Key Functions There is a row of hot keys on the top of keyboard. The functions are described as below: Web/Home To start your Microsoft Internet Explorer 5.0 (or above) and bring up the homepage you set. Note: You can select “Tools → Internet Options → Programs” to change the default settings of Internet Browser. Favorites To select a web page from your list of favorites. Search To gain access to a number of search providers.
Previous / Skip backward to the previous file / track or plays backward fast when keep pressing this button. Note: The Fast Backward function only supports Microsoft CD Player Windows 98 and Microsoft CD Player Version 5.0 (under Windows 2000). Play / Pause Play file in the current track. Press again to pause. Stop Stop the playing. Next / Fast Forward Eject / Close 10 Skip forward to the next file / track or plays forward fast when keep pressing this button.
ACPI Keys: Your keyboard has the power management “Sleep” key. It also can be called ACPI (Advanced Configuration and Power Interface) keys. As the ACPI key is performed not completely under Windows 98; the KeyMaestro driver provides an option to enable the ACPI keys. When the option is enabled, the driver will take Windows place to process this key.
Using Embedded Numeric Keypad The embedded numeric keypad consists of 15 keys and functions in three ways: As a part of the main keyboard. * As a numeric keypad. As a cursor movement keypad.
There are three keys to activate the embedded numeric keypad: 1. NumLock: This is a toggle key. The NumLock LED indicator is default set to “Off”. When the NumLock key is pressed, the NumLock LED indicator on the system tray is lit and the embedded numeric keypad function is activated. 2. Fn / Shift: These two keys are used in conjunction with the NumLock key and work only when pressed. For accessing the embedded numeric keypad, please refer to the following table: 1.
5.2 Using the Mouse After installing the KeyMaestro Input Device Driver as described in Chapter 4, you can not only enjoy the extra functions of wireless keyboard, but can also enjoy the marvelous function of build-in mouse. Note: The default function of joystick is “Mouse Function”. If the functions can’t be worked properly, please press “Fn + F11 ” to check the function. 5.2.
5.2.2 Mouse Function The Mouse Control Panel (KeyMaestro Mouse Properties) window consist of the following folders: Buttons folder: Allow you to change Button Configuration and Double Click Speed. Pointers folder: Allow you to change your favorite cursor shape. Wheel folder: Allow you to change the speed of scroll wheel. Mouse folder: Allow you to change the scroll wheel function. The default of the scroll ) is “Jump”.
Jump Function Introduction After installing the KeyMaestro Input Device Driver, you can access 3 different operation menus for Internet, Office, and Multimedia by press the mouse middle . button Internet Menu 16 Web / Home To start your Microsoft Internet Explorer 5.0 and bring up the home page you set. Favorites To select a web page from your list of favorites. Search To gain access to a number of search providers. Mail To open the default program you use for mail.
Multimedia Menu Volume Down Control the volume to down or up of your audio output of the speakers. Volume Up Mute Mute or resume sound output Previous Track Skip backward to the previous track. Next Track Skip backward to the next track. Play / Pause Play file in the current track. Press again to pause. Stop Stop the playing. Eject / Close Eject the CD tray. Press again to close the tray cover.
Office Menu Word Opens Microsoft Word. Excel Opens Microsoft Excel. Power Point Opens Microsoft PowerPoint. Calendar Opens "Calendar" function of Microsoft Outlook Express. Shortcut 1 ~ Shortcut 4 18 This can provide you to create easy accesses to the documents and programs you use most often.
5.3 Using the Joystick 5.3.1 Joystick Buttons Default Setting: Button 1 Button 2 Button 3 Button 4 Joy Stick Button 5 Button 6 ** Note: Besides those buttons, there will be numbers from 1~6 to show each button.
5.3.2 Joystick Functions Specially Important: 1. “Joystick Function” can only be used when playing computer games. ” to switch to “Joystick Function” Press “Fn + F12 2. Before starting to use the joystick, please go first to “Start → Settings → Control Panel → Game Controllers → General → Properties → Test” to check the axes direction and buttons are functioned well. 3.
6 Troubleshooting If you are experiencing problems with your keyboard, please check the following: 1. Take out the receiver’s connector and check both the receiver’s keyboard plug for possible broken pins. If the plugs appear normal then reinsert the plugs into their respective connectors on your PC. 2. Check to see if the batteries in the keyboard are installed correctly. Make sure the polarity of the batteries corresponds with the polarity signs in the battery compartment. 3.
11. If you can’t aim an object in a game easily, please calibrate the joystick. Go to “Start → Settings → Control Panel → Game Controllers → General → Properties → Settings → Calibrate” 12. When the game can’t recognize the joystick and or the joystick can’t be used in the game, please check the following: - Press “Fn + F12 ” again to see if the function is switched to joystick. - Go to “Start → Settings → Control Panel → Game Controllers → Advanced” to check if the joystick is assigned to ID 1.