MX5500RF Wireless Keyboard & Mouse Bundle User’s Guide Version 1.
The information in this document is subject to change without notice and does not represent a commitment on the part of the vendor. No warranty of representation, either expressed or implied, is made with respect to the quality, accuracy or fitness for any particular purpose of this document. The manufacturer reserves the right to make changes to the content of this document and/or the products associated with it at any time without obligation to notify any person or organization of such changes.
Table of Contents 1 Introduction.................................................................................................1 What's in this package ...............................................................................1 2 System Requirements ................................................................................2 3 Hardware Installation..................................................................................3 4 Software Installation ...................................
1 Introduction Congratulations on your purchase of a Memorex RF5700 series wireless RF keyboard and mouse! This keyboard and mouse will finally free you of the constraints of your desktop by providing a wireless connection between your keyboard/mouse and your PC.
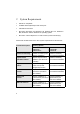
2 System Requirements IBM PC or compatible Available PS/2 keyboard port and mouse port. CD-ROM or DVD drive Microsoft Windows 95, Windows 98, Windows NT 4.0, Windows ME, Windows 2000 or Windows XP operating system Microsoft Internet Explorer 5.0 or later version (for the Internet keys) Please refer to table below for the other system requirements for the features. Function Description Operating System Windows 95 / Windows 98 / Windows NT 4.
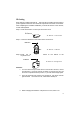
3 Hardware Installation Slide Switch Setting Step 1: Make sure your PC is switched off. Step 2: Take the receiver and select channel CH1 or CH2 by using the slide switch on the back of the receiver. (Remember your selection.) Bottom View of Receiver Slide Switch Setting Step 3: Connect the receiver to your PC by plugging in the receiver’s PS/2 mouse connector into the mouse port of your PC and the PS/2 keyboard connector into the keyboard port.
channel as the one selected in step 2 on the receiver. Slide Switch Setting Step 6: Take the mouse and make sure the batteries on the back are installed correctly. (Follow the polarity signs in the battery compartment.) Bottom View of Mouse Step 7: Use the slide switch in the battery compartment of the mouse to select the same channel as the one selected in step 2 and 5. (Open the battery cover to find the switch channel setting) Slide Switch Setting Remarks: 1.
ID Setting Each channel contains 256 sets ID. This extra ID-recognition function helps to protect against interference from other RF keyboards in the same environment. After completing the hardware installation you must set the ID’s of the receiver, mouse and keyboard. Step 1: Press the ID button on the top of the receiver once. ID Button ID Button of Receiver Step 2: Press the ID button on the bottom of the mouse once. ID Button ID Button of Mouse Step 3: Press the ID keyboard once.
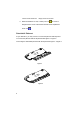
need to reset all the ID’s. Simply reset one of them. 4. When the batteries are low, a battery low icon will show on theright-bottom corner of the taskbar instead of the KeyMaestro driver icon . Detachable Palmrest At your discretion, you may choose to connect the palmrest with keyboard. To connect the palmrest with the keyboard follow figure 1 & figure 2. Connecting the detachable palmrest with the keyboard as figure 1 & figure 2.
4 Software Installation After finishing the hardware installation as described in this manual and starting up your PC, you should be able to immediately take advantage of the wireless function of the wireless keyboard and mouse. If the keyboard and mouse are not working properly, see Chapter 6 Troubleshooting for tips on how to solve your problem. 4.
5 Using the Keyboard and Mouse 5.1 Using the Keyboard Besides the usual keyboard keys the RF5700 keyboard also has extra dedicated keys, which provide the following multimedia functionality: Please note: In order to use these keys under Windows 95, Windows 98 or Windows NT 4.0 it is necessary to have the keyboard driver installed. Please refer to Chapter 4 for more information.
Mute Mutes the sound Next/Fast Forward Advances to the next audio track Play/Pause Begins audio tracks, pause will temporarily stop the track from playing Previous/Fast Backward Advances to the previous audio track 5.2 Using the Mouse Driver After installing the mouse driver as described in Chapter 4 you will be able to startup the Mouse Control Panel by right clicking on the Mouse in the Windows task bar. This should appear after restarting your machine.
6 Troubleshooting If you are experiencing problems with your keyboard or mouse please check the following: 1. Take out the receiver’s connector and check both the receiver’s mouse and keyboard plug for possible broken pins. If the plugs appear normal then reinsert the plugs into their respective connectors on your PC. 2. Make sure the mouse plug is inserted in the mouse connector on your PC and the keyboard plug is inserted into the keyboard connector on your PC.
11. Keep all items away from direct sunlight, moisture, dirt, extreme heat and abrasive chemical (cleaning) solutions. 12. Should the receiver, the keyboard or mouse become accidentally immersed or splashed by liquids, switch off your PC immediately, unplug all items and refer to your dealer for further assistance.
封底內頁 FCC GUIDELINES This equipment has been tested and found to comply with the limits for a Class B digital device, pursuant to Part 15 of the FCC Rules. These limits are designed to provide reasonable protection against harmful interference in a residential installation. This equipment generates, uses and can radiate radio frequency energy and, if not installed and used in accordance with the instructions may cause harmful interference to radio communications.