hp pavilion home pc 5219URF 2+ Installing the Wireless Keyboard and Mouse Set Filename: 5219urf 2+ users guide US_ Title: hp pavilion home pc Template: normal.
Filename: 5219urf 2+ users guide US_ Title: hp pavilion home pc Template: normal.
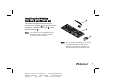
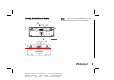
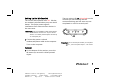
Installing the Wireless Keyboard and Mouse Set A The wireless keyboard and mouse set consists of a receiver (A) that plugs into the computer, a wireless keyboard (B), and a wireless mouse (C). B Note: This wireless set is compatible with your HP Pavilion home PC and not intended for use with other computers. C Note: You can replace the batteries in the mouse and keyboard without turning off the computer. The computer must be on to change the ID setting on the three units.
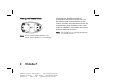
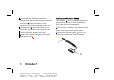
Getting the Mouse Ready Install the two AA alkaline batteries (provided) in the wireless mouse: Turn on the battery cover from the bottom of the mouse, and then insert the batteries into the compartment. Note the battery icons, and make sure batteries are placed in the correct direction. Replace the cover. Note: The red LED turns on indicating the batteries Note: Do not use rechargeable batteries in the mouse. Alkaline batteries are recommended.
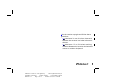
Getting the Keyboard Ready G Note: Do not use rechargeable batteries in the keyboard. Alkaline batteries are recommended. H I I G H J HP Pavilion home PC Filename: 5219urf 2+ users guide US_ Title: hp pavilion home pc Template: normal.
1Install the two AA alkaline batteries Getting the Receiver Ready (provided) in the wireless keyboard: Remove keyboard, and insert the batteries into the The receiver (A) must be placed upright and positioned properly to avoid interference from other electrical equipment. compartment (H). Note the battery icons, 1Turn off your computer, and disconnect the the cover (G) from the bottom of the and make sure batteries are placed in the correct direction. Replace the cover.
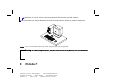
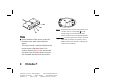
3Set the receiver upright and follow these guidelines. nA: Minimum 20 cm (8 inches) clearance between the receiver and other electronic devices. nB: Maximum 1.5 m (59 inches) working distance between the receiver and wireless mouse or wireless keyboard. HP Pavilion home PC Filename: 5219urf 2+ users guide US_ Title: hp pavilion home pc Template: normal.
nC: Minimum 20 cm (8 inches) clearance between the receiver and the monitor. nPlace no electronic device between the receiver and wireless mouse or wireless keyboard. Note: This is one example of the setup. Other setup positions are also possible. Warning: To avoid causing interference, keep the receiver at least 20 cm (8 inches) away from the monitor. 6 HP Pavilion home PC Filename: 5219urf 2+ users guide US_ Title: hp pavilion home pc Template: normal.
Setting Up the Wireless Set The top activity LED (N, a blue light) on the receiver will start flashing and will continue flashing until the next step are completed or until 30 seconds pass. The mouse and keyboard have 255 IDs that are randomly selected when you press the ID button. This helps protect against interference from other wireless devices in the same area. Important: The word CONNECT labels the ID button on the bottom of each unit.
K N O Note: At this time, when you move the mouse across P a surface, the blue activity LED (N) on the receiver will go on and off indicating the mouse and the receiver are working together. Q Mouse 3 On the bottom of the mouse, press the Important: The mouse goes into a sleep or suspend ID button once with a blunt pointed object. The mouse sends a new ID and flashes the mouse sensor LED three times.
Receiver Keyboard 4 On the bottom of the receiver, press the 4 5 On the bottom of the keyboard, press ID button (D) once with a blunt pointed the ID button (J) once with a blunt pointed object. object. The keyboard sends a new ID. The receiver flashes the top activity LED (N, a blue light) three times and then stops to show it has accepted the new ID for the keyboard.
order to comply with emission limits. This device complies with Part 15 of the FCC Rules. Operation is FCC GUIDELINES subjection to the following two conditions: (1) This device may not cause This equipment has been tested and found to comply with the limits for a Class B digital device, pursuant to Part 15 of the FCC Rules. These limits are designed to provide reasonable protection against harmful interference in a residential installation.