
User's Manual


3 0 0 9 ARF I I I Re m o t e Con t r ol
3
I D Pair in g I nform a t ion
The r em ot e con t rol is re a dy f or use a s soon a s you tak e it ou t of t h e box an d plug
t he r e ce ive r USB con ne ctor in t o a USB por t on you r com put e r . I f it does not work ,
you m ust configure t he I D set t in g of the r em ote cont rol, as described below.
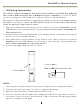
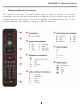
The posit ion of I D/ connect but t on is respect ively locat ed on the t op of t he dongle receiver
an d back of t he r em ote cont r ol. An LED indicat or under t he receiver I D/ connect button
shows t he pair ing or dat a reception st at us.
1. Press and hold t he I D/ connect butt on on t he receiver for at least 2 se co n d s, unt il t he
LED indicator on the receiv er flashes. (
I f y ou release the bu tton w ithin 2 se con ds, t he
I D pair ing will fail.)
2. Hold the r em ote cont rol wit hin 3 0 cm of the dongle receiv er . ( Hold t he rem ot e cont rol
close t o t he receiv er wit hin 3 0 cm . )
3. Press and hold t he connect but t on on t he bot t om of t he rem ote contr ol for at least 2
se co n ds, unt il t he LED indicator on the receiv er st ops flash ing.
( I f y ou release t he
but ton wit hin 2 se con d s, t he I D pairing will fail.)
4. You can now begin using t he rem ote cont r ol.
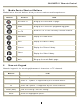
Co nne c t Butto n
Co nne c t Butto n
(With a n LED ind ic ato r unde rne a th)
N OTES:
1. Your com put er m ust be turned on before you can per form this pair ing procedur e.
2. You m ust follow th is procedure in order t o com plet e I D pair ing.
3. Each pr ocedure should be com plet ed with in 60 seconds.
4. You do not need t o pair I Ds again aft er changing the bat t eries in t he rem ote con trol. I f
the rem ote cont rol does not work properly, please follow the I D pair ing procedure
above t o configure t he I D again.