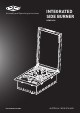
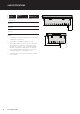
Assembly and Operating Instructions INTEGRATED SIDE BURNER BSW316SA FOR OUTDOOR USE ONLY AUSTRALIA / NEW ZEALAND
CONGRATULATIONS CONTENTS Dear customer, General warnings ��������������������������������������������������������������������������3 Congratulations and thank you for choosing our barbecue. We are sure you will find it a pleasure to use. Before you use the barbecue, we recommend that you read through the relevant sections of this manual, which provide a description of your appliance and its functions.
IMPORTANT SAFETY INSTRUCTIONS Please read the user manual carefully and store in a handy place for later reference. WARNING WARNING • Do not lean over barbecue when lighting. TIPS & INFORMATION IMPORTANT Important – check for any damages or marks If you find the barbecue is damaged or marked, you must report it within 7 days if you wish to claim for damage/ marks under the manufacturer’s warranty. This does not affect your statutory rights.
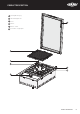
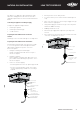
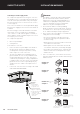
PRODUCT DESCRIPTION Integrated burner 1 Slimline lid 2 Gas connection point 1 2 4 PRODUCT DESCRIPTION
PRODUCT DESCRIPTION 3 Pivoting lid safety leg 4 Lid mounting bracket 5 Trivet 6 Burner 7 Burner control 8 Reversible cast grill plate 3 8 4 5 4 6 7 PRODUCT DESCRIPTION 5
GAS SPECIFICATIONS NATURAL GAS UNIVERSAL LPG Maximum gas consumption 22 MJ/h 23 MJ/h Injector office diameter 2.10mm 1.25mm Number of injectors 1 1 Regulator pressure 1.00 kPa 2.75 kPa GAS TYPE 78 • This appliance MUST be installed and serviced only by a qualified licensed person. 170 NOTES: • This product is intended for outdoor use only. • This product must be installed as per the instructions which requires the installation of venting to enable the barbecue to operate correctly.
NATURAL GAS INSTALLATION This barbecue is supplied set up for Natural gas and is labelled accordingly. A Universal LPG conversion kit is supplied if required. Refer to Universal LPG installation for details. Connecting the appliance to an NG gas supply Natural gas regulator • Natural gas installation pipe • 2 x fibre washers • Ensure gas valve is in the ‘OFF’ position. • In a small container, mix a solution of water and detergent or soap.
UNIVERSAL LPG INSTALLATION NOTE: Conversion of this unit to Universal LPG must be carried out by a qualified licensed person and a Certificate of Compliance must be issued to the owner on completion of the installation and conversion. 2. Remove two screws fastening burner. Screw Converting the Unit to Universal LPG This barbecue is supplied set up for Natural gas and is labelled accordingly. A Universal LPG conversion Kit is supplied with the product.
UNIVERSAL LPG INSTALLATION GAS BOTTLE SAFETY 5. Replace burner and cover panel. Gas bottle safety information 6. Remove Natural Gas sticker on the base panel and replace with Universal LPG sticker provided. • This appliance is designed to use a 9kg (20 lbs) gas cylinder. The final step in the conversion of the barbecue to Universal LPG is the adjustment of the turndown setting. This can only be completed after the barbecue has been connected to a supply of Universal LPG.
GAS BOTTLE SAFETY INSTALLATION WARNINGS WARNING WARNING Connecting to a remote supply of LPG The components required to make this type of connection are available as an accessory and can be purchased either on the Electrolux spare parts website or by contacting the Electrolux Customer Service Centre. Refer to Accessories section on page 17. Never connect the barbecue to an unregulated LPG supply. Ensure that the supply pressure at the inlet of the barbecue is 2.75kPa.
INSTALLATION INSTRUCTIONS Installation warnings When planning the location and preparing the installation structure for this appliance note the following: • This appliance must be installed in accordance with Australian Standard AS 5601 and in accordance with local authority. • Requirements in these instructions for clearances to combustible materials also apply to combustible materials that have non-combustible materials attached to their surface.
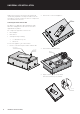
INSTALLATION INSTRUCTIONS DIMENSIONS 350 mm mm 540 Side view - lid up 549mm 350 mm mm 540 80m mm in 325 mm 71mm min. in mm 71m mm 480 ch Ben in. mm 00m 6 th wid From cutout Side view - lid down Bench width 600mm min. 540mm 136mm 42mm Vent 250mm x 25mm ( required when installed separately to barbecue) WARNING! • This appliance requires venting. This vent is to allow air into the enclosure for the correct combustion of gases and for the correct exhausting of the products of combustion.
GAS REQUIREMENTS POSITIONING OF BURNER Installation warnings Natural Gas requirements • The enclosure must be constructed so that access can be gained to the Natural Gas regulator at all times. • For pipe sizing requirements for supply pipe refer to AS5601. Universal LPG requirements • If an LPG bottle is to be stored in the enclosure under the burner unit, it must be isolated from the burner unit with a non-combustible panel. The enclosure must comply with the requirements of AS5601.
CONNECTING TO THE INTEGRATED BARBECUE If the integrated burner is located adjacent to the built in barbecue and the units are to be connected to the same outlet or cylinder, the gas line must branch off prior to the regulator. Each appliance must have its own regulator. For Natural Gas This can be achieved with hard plumbing to each of the regulators. From the regulator to the appliance the connection method remains unchanged.
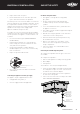
BURNER OPERATION PIVOTING SAFETY LEG Installation warnings Control functions Before lighting the burner: • Check that all hoses and gas fittings are tight. • Remove or pivot lid to open. To ensure that the user remembers to turn off the gas before closing the lid, a pivoting safety leg has been fitted. NOTE: The lid is designed as a cover for weather protection. The lid is not designed to be used as a cooking hood. Pivoting Safety Leg • Check control knob is in the ‘OFF’ position.
CLEANING AND CARE The Beefeater integrated burner has been constructed from select grade stainless steel which, if not cared for, may discolour over time. To keep your appliance looking its best we recommend that the cooking surfaces are cleaned after every use. Burner Cleaning Maintenance • Always ensure the appliance is turned off before cleaning. • This appliance contains brass and aluminium fittings. Do not use caustic based cleaners.
TROUBLESHOOTING ACCESSORIES Installation warnings PROBLEM POSSIBLE CAUSE REMEDY Barbecue won’t light No gas Check isolation valve is ON Gas bottle empty - refill or change gas bottle Ignition system not working Ignition electrode wet or dirty Manually light the burner Excess smoke being emitted from the cooking area Smell of gas DO NOT ATTEMPT TO LIGHT THE APPLIANCE Gas valve set too high Gas leak Turn gas valves down or turn off the burner Turn off gas at the isolation valves To order any o
NOTES 18 NOTES
NOTES 19
NOTES 20 NOTES
Warranty FOR SALES IN AUSTRALIA AND NEW ZEALAND APPLIANCE: BEEFEATER SIGNATURE BARBECUE This document sets out the terms and conditions of the product warranties for Electrolux Appliances. It is an important document. Please keep it with your proof of purchase documents in a safe place for future reference should there be a manufacturing defect in your Appliance. This warranty is in addition to other rights you may have under the Australian Consumer Law. 1.
For more information on all Beefeater products, or for dimension and installation information, call into your retailer, phone or email our customer care team or visit our website: AUSTRALIA phone: 1300 307 939 fax: 1800 356 669 email: customercare@electrolux.com.au web: beefeaterbbq.com NEW ZEALAND phone: 0800 436 245 fax: 0800 225 088 email: customercare@electrolux.co.nz web: beefeaterbbq.com Beefeater. We are part of the Electrolux Family.