Assembly and Operating Instructions INTEGRATED SERIES BSHI56SA, BSLI56SA FOR OUTDOOR USE ONLY AUSTRALIA / NEW ZEALAND
CONGRATULATIONS CONTENTS Dear customer, General warnings ��������������������������������������������������������������������������3 Congratulations and thank you for choosing our barbecue. We are sure you will find it a pleasure to use. Before you use the barbecue, we recommend that you read through the relevant sections of this manual, which provide a description of your appliance and its functions.
IMPORTANT SAFETY INSTRUCTIONS Please read the user manual carefully and store in a handy place for later reference. WARNING WARNING • Do not lean over barbecue when lighting. TIPS & INFORMATION IMPORTANT • Do not leave the barbecue unattended when alight. Important – check for any damages or marks. • Do not delay lighting once the gas has been turned on.
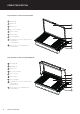
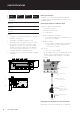
PRODUCT DESCRIPTION Integrated barbecue with slimline lid BSL156SA 1 Pivotting leg 2 Slimline lid 3 Battery cover 4 Gas connection point 5 Burner controls 6 Cast Iron Grill 7 Cast Iron Hotplate 8 Removable oil reservoir located at front of cooking surface (not illustrated) 9 Flame tamers x 2 located under grills (not illustrated) 2 1 7 6 3 4 5 Integrated barbecue with roasting hood BSHI56SA 10 Roasting hood 11 Warming racks 12 Battery cover 13 Gas connection point 14 Burner contro
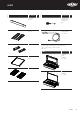
PARTS DESCRIPTION QTY DESCRIPTION Rear heat shield 1 1 Natural gas regulator and installation pipe Flame tamers 2 1 LPG hose and regulator assembly Oil reservoirs 2 QTY 1 Plastic bag, containing this instruction book, labels, 1 fibre washer, match holder and chain EITHER Cast Iron plate 1 Roasting hood and base assembly 1 Slimline lid and base assembly 1 Cast iron grill 2 PARTS 5
GAS SPECIFICATIONS NATURAL GAS UNIVERSAL LPG PROPANE Maximum gas consumption 67.2 MJ/h 64.0 MJ/h 71.0 MJ/h Injector office diameter 1.75mm 0.90mm 0.95mm Number of injectors 6 6 6 Regulator pressure 1.00 kPa 2.75 kPa 2.75 kPa GAS TYPE Natural gas installation This barbecue is set up for Natural Gas and is labelled accordingly. A Universal LPG and Propane conversion kit is included if required.
LEAK TEST PROCEDURE Leak test procedure • Ensure all gas valves are in the ‘OFF’ position. • In a small container, mix a solution of water and detergent or soap. • After connection of the hose, turn on the gas supply at the gas bottle or mains as appropriate. • Using a brush apply the solution to the gas connection points and look for bubbles forming. • Bubbling will indicate a leak. • Turn off the gas supply and re-tighten the joint. Repeat the leak test.
UNIVERSAL LPG AND PROPANE INSTALLATION Remove burner to access injector NOTE: Conversion of this unit to LPG or Propane must be carried out by a qualified licensed person and a Certificate of Compliance must be issued to the owner on completion of the installation and conversion. Converting the unit to LPG or Propane gas This barbecue is set up for Natural gas and is labelled accordingly. A LPG and Propane conversion Kit is supplied with the product.
UNIVERSAL LPG AND PROPANE INSTALLATION This barbecue is set up for Natural Gas and is labelled accordingly. A Universal LPG or Propane Gas conversion Kit is supplied if required. Gas bottle safety information Connecting the appliance to an Universal LPG or Propane gas supply • The gas cylinder must be made and marked in accordance with specifications for LPG or Propane cylinders.
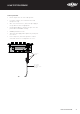
UNIVERSAL LPG AND PROPANE INSTALLATION INSTALLATION WARNINGS WARNING WARNING Barbecue gas inlet Sealing washer Supply hose with 1/2” tapered thread – sealed with thread tape or compound suitable for gas connection. Test point adaptor – ensure arrow is pointing correct direction After connecting the barbecue to an LPG gas supply, test the operation of the appliance: • Check that all burners ignite (refer OPERATING INSTRUCTIONS). • Check the operation of the burners at both maximum and turndown.
INSTALLATION INSTRUCTIONS Installation warnings Choosing a location The mounting enclosure hen planning the location and preparing the installation W structure for this appliance note the following: • The barbecue requires a non-combustible barrier under the barbecue to prevent excessive temperatures being accessed. The barrier panel is to be placed at least 30mm under the base of unit.
DIMENSIONS This side wall can be combustible material 549mm Benchtop must be noncombustible material 100 min This side wall can be combustible material This front wall can be combustible material 100 min Non-combustible barrier – at least 30mm between barrier and base of the appliance 71mm minimum from cutout Benchtop must be non-combustible 600 min benchtop width Bench width 600mm minimum Rear panel must be non-combustible 177mm 42mm 540mm 30 min 10 min 40 min Non-combustible barrier – at lea
DIMENSIONS 615mm 485mm WARNING! This appliance requires venting. An open area as indicated must be allowed for. A suitable grille can be fitted if desired. This vent area is to allow air into the enclosure for the correct combustion of gases and for the correct exhausting of the products of combustion. The vent must be no less than 700mm x 25mm. Installing in a bench with a splashback • The splashback must be made from a non-combustible material unless it is at least 450mm from the appliance.
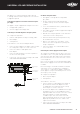
GAS REQUIREMENTS ASSEMBLING THE BARBECUE Natural Gas requirements 1. Remove all components from box. • The enclosure must be constructed so that access can be gained to the Natural Gas regulator at all times. 2. Attach heat shield to rear of unit by inserting the three top tabs into the rear holes and sliding the shield down. • For pipe sizing requirements for supply pipe refer to AS5601.
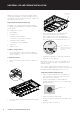
HOTPLATE CONFIGURATION 5. Install hotplates and grills as shown, ensuring that the flame tamers are located under the grills. NOTE: ensure that grill assemblies are orientated correctly so that the surface of the grill is sloping forward to allow oil to drain into oil reservoirs. Recommended configuration: Hotplate in centre. Recommended for roasting and grilling and offer the optimal heat distribution across the cooking surface. Non-recommended configuration: two Hotplates.
OPERATING INSTRUCTIONS Control functions Preheating Before lighting the barbecue: For best cooking results it is recommended to preheat the barbecue prior to cooking. • Check that all hoses and gas fittings are tight. • Open the slimline lid or the roasting hood. OTE: The slimline lid is designed as a cover for weather N protection. The lid is not designed to be used as a cooking hood. • Check all control knobs are in the ‘OFF’ position. • Ensure that the cooking surfaces are clean.
LID SAFETY – SLIMLINE ONLY CLEANING AND CARE o ensure that the user remembers to turn off the gas before T closing the lid, a pivoting safety leg has been fitted. The Electrolux Integrated barbecue has been constructed from select grade stainless steel which, if not cared for, may discolour over time. To keep your barbecue looking its best we recommend that the cooking surfaces are cleaned after every use.
CLEANING AND CARE Other stainless steel surfaces Ensure all oil and food particles are removed. After cleaning complete, re-assemble ensuring the burner is correctly located over the injector. CAUTION! Cleaning the oil reservoirs Do not use abrasive or caustic cleaners, scourers or metal scrapers on these stainless steel surfaces as they may permanently scratch and damage your barbecue.
MAINTENANCE The ignition system o change the battery rotate the cover anti-clockwise T to release. Lift off the cover to access spring and battery. Lift out the spring and battery. Replace with a new AA battery and replace the cover. Test by depressing the knob and an audible ‘clicking’ sound should be heard. NOTE: Ensure that the battery has been placed in the correct orientation.
TROUBLESHOOTING PROBLEM POSSIBLE CAUSE REMEDY Barbecue won’t light No gas Check isolation valve is ON. Gas bottle empty refill or change gas bottle. Ignition system not working Check battery - should hear a clicking noise when the knob is depressed. Replace battery. Manually light the barbecue. Ignition Gently clean and dry electrode electrode ensuring wet or dirty position is correct.
NOTES NOTES 21
NOTES 22 NOTES
Warranty FOR SALES IN AUSTRALIA AND NEW ZEALAND APPLIANCE: BEEFEATER SIGNATURE BARBECUE This document sets out the terms and conditions of the product warranties for Electrolux Appliances. It is an important document. Please keep it with your proof of purchase documents in a safe place for future reference should there be a manufacturing defect in your Appliance. This warranty is in addition to other rights you may have under the Australian Consumer Law. 1.
For more information on all Beefeater products, or for dimension and installation information, call into your retailer, phone or email our customer care team or visit our website: AUSTRALIA phone: 1300 307 939 fax: 1800 356 669 email: customercare@electrolux.com.au web: beefeaterbbq.com NEW ZEALAND phone: 0800 436 245 fax: 0800 225 088 email: customercare@electrolux.co.nz web: beefeaterbbq.com Beefeater. We are part of the Electrolux Family.