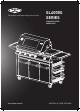
Assembly and Operating Instructions SL4000S SERIES STAINLESS STEEL BARBECUES FOR OUTDOOR USE ONLY AUSTRALIA / NEW ZEALAND
CONGRATULATIONS CONTENTS Dear customer, Important safety instructions ��������������������������������������������������������3 Congratulations and thank you for choosing our barbecue. We are sure you will find it a pleasure to use. Before you use the barbecue, we recommend that you read through the relevant sections of this manual, which provide a description of your appliance and its functions.
IMPORTANT SAFETY INSTRUCTIONS WARNING WARNING WARNING WARNING We want you to enjoy your barbecuing experience - Failure to follow the instructions and observe the warnings provided in this operating manual could result in serious bodily injury or damage to property. Contact your local municipality for any building codes regulating the installation of outdoor barbecue appliances.
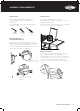
FOR BUILT-IN UNITS ONLY The SL4000 comes in both trolley-mounted and built-in models. These two pages contain information relating to setting up built-in model only.This appliance is designed to be used with a gas cylinder not exceeding 9KG (20lbs) capacity. About The Cylinder Enclosure Warning: Contact your local municipality for any building codes regulating the installation of outdoor barbecue appliances.
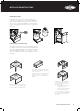
ASSEMBLY OF MAIN BARBECUE Before You Start Side Burner Parts Note the tools you will need before you begin. Assemble the side burner parts as shown. Remove any protective plastic from stainless steel components. The first burner disk should locate onto two notches on the side burner (inside arrows). Check for damaged or missing parts, and consult your retailer if necessary. Also, the two notches on the bottom of the trivet line up with the holes on the side burner (outside arrows).
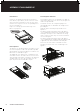
ASSEMBLY OF MAIN BARBECUE Fit The Burners Fit Cooking Plates And Grates Remove the ‘R’-shaped retaining clips from the burners. You should fit the plate to the left-hand side of the barbecue frame (with the drain hole to the extreme left). The grates are fitted to the right hand side Fit the burners, open end first, over the stem of the control valves at the front of the barbecue. Lower the other end of the burner so the lug locates into the corresponding hole at the rear of the barbecue.
ASSEMBLY OF MAIN BARBECUE ASSEMBLY OF OPTIONAL ROTISSERIE Fit The Warming Rack Assemble The Main Shaft The warming rack needs no screws. It sits on two notches on the insides of the hood. Assemble the shaft in the order shown. Fit The Motor First attach the motor mounting bracket to the roasting hood. Then slide the motor onto the bracket. The Grease Tray (Built-In Models Only) The grease tray of the inbuilt model slides along rails located near the base of the barbecue frame.
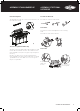
ASSEMBLY OF ACCESSORIES A number of accessories are available for Trolley-Mount models. Fit The Drawer Accessories Fit The Baskets The storage racks and condiment baskets can be fitted directly, without the use of screws. Ensure they locate properly into their respective holes. Waste Bin Fit The Towel Rack First, unscrew and remove the plastic end caps from the towel rack. Then, using 2 flathead screws, washers and nuts, attach the towel rack to the side panel.
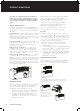
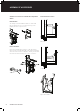
INSTALLATION INSTRUCTIONS LPG/Propane Cylinder If your barbecue is to be connected to a portable LPG cylinder, you should position it in the far right drawer. Place the prefitted mat down first, then position the cylinder on top. Secure the cylinder by wrapping the strap around the cylinder and clipping it to the bracket slots as shown in the illustration.
INSTALLATION INSTRUCTIONS Before You Begin Fixed Installation - Portable LP Gas/Propane. Check that the gas type is correct for your type of gas. You will find the gas type label on the side of your barbecue. If your barbecue is of the incorrect gas type, or if you are unsure, consult your dealer before going any further. BeefEater LPG/propane barbecues are designed to operate at 2.75Kpa (11”WC).
INSTALLATION INSTRUCTIONS Converting the unit to natural gas 9. 1. Turn off the gas supply valve on the gas cylinder. Ensure that all gas controls on the BBQ are in the OFF position. Replace all parts into position in the BBQ. Aeration Screw Adjustment 2. Disconnect the hose and regulator from the gas cylinder and disconnect the gas hose from the barbecue gas inlet using a 19mm open-ended spanner/wrench. 3. Open hood and remove all cooking plates, grills and vaporisers from the BBQ. 4.
INSTALLATION INSTRUCTIONS Secure All Joints And Leak Test the fixed gas supply outlet. Turn down adjustment • When converting to natural gas the turndown setting will need to be adjusted to give a satisfactory flame on low setting on each burner. • Remove knob from valve shafts. For ignition valve the low flame adjustment screw is located on the lower right hand cornerHigh of the front of the valve body. Low Off Never use a naked flame to check for gas leaks.
USING YOUR BARBECUE Before You Light The Barbecue Perform the following checks • Make sure all gas connections are tight and leak tested. • Ensure the cooking surfaces are clean and hygienic. • Check the control knobs are in the off position. • Check that the gas supply is turned on. Low Low Off - Knob points to right. Off Off Off • Ensure the hood of the barbecue and the lid of the side burner are up. If you do not, gases can build up inside the hood and create a dangerous situation.
USING YOUR BARBECUE How Long Will The Gas In My Cylinder Last? If you have a full cylinder of propane, just look at the table below to see how many hours of gas you have, depending on how many burners you have alight. These figures are approximate only. You may notice that if you have several burners alight and your cylinder becomes low on gas, the liquid may freeze up. If this occurs, turn the cylinder and all burners off and wait till the liquid thaws. You may then reignite the burners.
GETTING THE MOST FROM YOUR BARBECUE Preheating Your Barbecue Like an oven, preheating your barbecue before cooking produces better results. Because your hood retains heat so efficiently, preheating your barbecue is quicker with the hood down. Turn the outside two burners to high. Close the hood, and allow to preheat for about 8 minutes. Then reduce the burner settings to achieve and maintain the required temperature, by following these guidelines.
GETTING THE MOST FROM YOUR BARBECUE Direct Cooking Method Using The Rotisserie Commonly used for traditional barbecuing. Place food directly over the lit grill section. Excess flaring may occur and so care must be taken while cooking. Check inside the roasting hood regularly. We do not recommended this method for roasts unless you place a baking dish under the roast, to allow flammable fats and juices to be isolated away from the flame.
CLEANING YOUR BARBECUE Stainless Steel Grills Discoloration of Stainless Steel Many food acids, marinades, juices and sauces contain highly acidic elements that will slowly attack the surface of the stainless steel if not removed immediately after cooking. Discoloration of stainless steel, caused by high heat is known as ‘Chromium Oxide’ and sometimes appears as a light brown colouring over the surface of the steel. In most cases, this discoloration can be removed with a suitable stainless steel polish.
CLEANING YOUR BARBECUE To Remove The Grease Tray For Cleaning The grease tray slides in and out on two runners at each side. The tray is locked to the runners at four points located at each corner of the tray. First release the front of the tray. To do this, pull the tray up and over the front tabs on each side. You may find it easier to use a flat blade screwdriver to help the tray to disengage. Next, release the rear of the tray, by pushing each of the rear tabs in a rearward direction.
CARE AND MAINTENANCE This appliance should be checked and serviced by an authorised service person every 2 years to ensure the appliance remains in a safe operating condition. (These services are not covered by warranty). Spare parts are available from your retailer or the manufacturer.
HELP GUIDE Installation warnings PROBLEM CAUSE CHECK Barbecue will not light Ignition system not working Check to see visible spark at starter probe - if no spark is present when control knob is turned then the unit may need to be serviced or replaced. Contact your BeefEater dealer. Check that there is a visible flame coming from the pilot ignition tube. Check that the pilot ignition tube is not blocked by spider webs or insect nests. Clear obstruction as required.
TECHNICAL SPECIFICATIONS GAS SPECIFICATIONS Gas Injector size Input/burner Gas Pressure LPG/Propane 1.27 mm 19 MJ/hr 2.75 kPa / 11” WC Natural Gas 2.1 mm 19 MJ/hr 1 kPa / 4”WC Trolley-Mount Model Dimensions 1808/1964 1226 585 165.50 X Gas 87 1212/1372 connection point 920 856/1013 503 All dimensions are in millimetres. Width dimensions are shown for both 5 burner model or 6 burner models.
NOTES 22 NOTE
Warranty FOR SALES IN AUSTRALIA AND NEW ZEALAND APPLIANCE: BEEFEATER SIGNATURE BARBECUE This document sets out the terms and conditions of the product warranties for Electrolux Appliances. It is an important document. Please keep it with your proof of purchase documents in a safe place for future reference should there be a manufacturing defect in your Appliance. This warranty is in addition to other rights you may have under the Australian Consumer Law. 1.
For more information on all Beefeater products, or for dimension and installation information, call into your retailer, phone or email our customer care team or visit our website: AUSTRALIA phone: 1300 307 939 fax: 1800 356 669 email: customercare@electrolux.com.au web: beefeaterbbq.com NEW ZEALAND phone: 0800 436 245 fax: 0800 225 088 email: customercare@electrolux.co.nz web: beefeaterbbq.com Beefeater. We are part of the Electrolux Family.