Assembly and Operating Instructions CLUBMAN FOR MODELS: 16440, 16540, 16640, 16740 FOR OUTDOOR USE ONLY AUSTRALIA / NEW ZEALAND
CONGRATULATIONS CONTENTS Dear customer, Important safety instructions........................................................3 Congratulations and thank you for choosing our barbecue. We are sure you will find it a pleasure to use. Before you use the barbecue, we recommend that you read through the relevant sections of this manual, which provide a description of your appliance and its functions. Gas specifications..........................................................................
IMPORTANT SAFETY INSTRUCTIONS Please read the user manual carefully and store in a handy place for later reference. TIPS & INFORMATION IMPORTANT Important – check for any damages or marks If you find the barbecue is damaged or marked, you must report it within 7 days if you wish to claim for damage/marks under the manufacturer’s warranty. This does not affect your statutory rights. ENVIRONMENT TIPS ENVIRONMENTAL Information on disposal for users • Most of the packing materials are recyclable.
GAS SPECIFICATIONS FIG 1 WARNING WARNING Standard POL regulator (AU/NZ regulator) Gas shutoff valve • Gas cylinders must be stored outdoors, out of reach of children and must not be stored in a building, garage or any other enclosed area. Tighten in this direction Bleeder valve screw • This appliance is designed to be used with a gas cylinder not exceeding 9KG (20lbs) capacity.
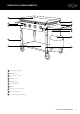
KNOW YOUR CLUBMAN BARBECUE 5 4 7 2 6 9 10 5 3 8 1 1 RH Side wheels Frame 2 Folding shelves 3 LH Side Wheels Frame 4 Thumb screws 5 Cooking Plate 6 Operating Knobs 7 Handle 8 Bottom Shelf or Cross Brace 9 Fat Collecting Cup 10 Cylinder Hook (under RH shelf) KNOW YOUR CLUBMAN BARBECUE 5
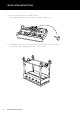
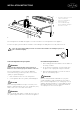
INSTALLATION INSTRUCTIONS The legs are folded on the underside of the BBQ. To unfold: 1. Place the BBQ upside down, and release legs by unscrewing the 2 Hand Screws. 2. Pull both Wheels Frames to a vertical position. Place the bottom shelf (or cross-brace) in between the horizontal members, and tighten with a hand-screw on each side.
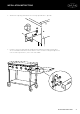
INSTALLATION INSTRUCTIONS 3. Turn back the right way, and install the fat collecting cup holder. Place cup inside. 2 1 4. Install the shelf on the right hand side. (Clubman Only. Clubmate has handles on both sides): The shelf should be installed such that the bottom screw in each bracket will go through the hole in the shelf. The top remain free, so the shelf can be folded.
INSTALLATION INSTRUCTIONS 5. Install cylinder hook over the 2 studs under the right-hand side shelf. 6.
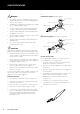
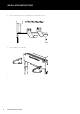
INSTALLATION INSTRUCTIONS 1. Assemble the black spacers to the ends of the handle tube. 2. Insert the assembled tube in between the brackets. 1 2 3. Insert threaded rod through brackets and handle, and tighten with a nut on each side. 1 3 b The Cooking Plate of this BBQ is designed so it can be removed for easier transportation of the appliance. To remove the plate, you must undo the 5 thumb screws holding it to the body. Two at each side, and one at rear.
USING YOUR BARBECUE Ignition: F. Model 16440 and 16640 does not require a battery and has a QuartzStart ignition system built into every valve. G. Light each burner by following this procedure (16540 and 16740): • Read all instructions before lighting. For 16540 and 16740 models, A battery must be inserted into the ignition module in order for it to work. • Before lighting ensure plate is secured.
PARTIAL ENCLOSURES This appliance shall only be operated in an above ground, open air situation with natural ventilation, without stagnant areas, where gas leakage and products of combustion are rapidly dispersed by wind and natural convection. Failure to adhere to these installation instructions may cause injury or property damage and affect your ability to make a claim under the manufacturer’s warranty.
MAINTENANCE 1. Use only soft cloth or sponge to clean the surfaces of barbecue and then carefully dry. 2. Avoid leaving acidic or alkaline substances on the plate. It may cause discolouration and corrosion. 3. Keep the igniters probes clean. Wipe away any apparent water or dirt. 4. Clean the unit after each use to maintain the appearance and prolong the appliance’s life. Do not use corrosive materials or harsh detergents to clean the BBQ.
TROUBLESHOOTING CONDITION Flame goes out while in use Ignition failure POSSIBLE CAUSE SOLUTION Empty gas cylinder Replace cylinder Air mixed in hoses Re-ignite and allow operating for a short while, till clears out Blockage Seek professional assistance Gas cylinder valve close Turn off knob button, then open the cylinder valve Air mixed in the hoses Re-ignite and allow operating for a short while, till clears out.
NOTES 14 NOTES
Warranty FOR SALES IN AUSTRALIA AND NEW ZEALAND APPLIANCE: BEEFEATER DISCOVERY BBQ This document sets out the terms and conditions of the product warranties for BeefEater Appliances. It is an important document. Please keep it with your proof of purchase documents in a safe place for future reference should there be a manufacturing defect in your Appliance. This warranty is in addition to other rights you may have under the Australian Consumer Law.
For more information on all BeefEater products, or for dimension and installation information, call into your retailer, phone or email our customer care team or visit our website: AUSTRALIA phone: 1300 307 939 fax: 1800 356 669 email: customercare@electrolux.com.au web: beefeaterbbq.com NEW ZEALAND phone: 0800 436 245 fax: 0800 225 088 email: customercare@electrolux.co.nz web: beefeaterbbq.com BeefEater. We are part of the Electrolux Family.