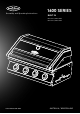
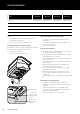
Assembly and Operating Instructions 1600 SERIES BUILT IN BBG1640SA, BBG1640DA BBG1650SA, BBG1650DA FOR OUTDOOR USE ONLY AUSTRALIA / NEW ZEALAND
CONGRATULATIONS CONTENTS Dear Customer, Important safety instructions.........................................................................3 Congratulations and thank you for choosing our barbecue. We are sure you will find it a pleasure to use. Before you use the barbecue, we recommend that you read through the relevant sections of this manual, as well as the built-in manual to get a full understanding of your appliance and its functions. Product description.........................................
IMPORTANT SAFETY INSTRUCTIONS Please read the user manuals carefully and store in a handy place for later reference. WARNING IMPORTANT Important – check for any damages or marks If you find the barbecue is damaged or marked, you must report it within 7 days if you wish to claim for damage/marks under the manufacturer’s warranty. This does not affect your statutory rights. ENVIRONMENT TIPS ENVIRONMENTAL Information on disposal for users • Most of the packing materials are recyclable.
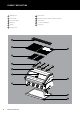
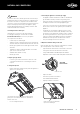
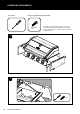
PRODUCT DESCRIPTION 1 Warming rack 7 Thermometer 2 Cast iron grill 8 Burner box (4 burner barbecue BBG1640 shown) 3 Cast iron hotplate 9 Control panel 4 Vaporisers 10 LPG hose and regulator 5 Burners 11 Grease tray 6 Roasting hood 1 2 3 4 5 6 7 8 9 10 11 4 PRODUCT DESCRIPTION
PRODUCT DIMENSIONS 246mm 271mm 804.
GAS SPECIFICATIONS MODEL BBG1640SA BBG1640DA BBG1650SA BBG1650DA Universal LPG Universal LPG Universal LPG Universal LPG Maximum gas consumption 60 MJ/h 68 MJ/h 75 MJ/h 85 MJ/h Injector orifice diameter (barbecue burners) ø1.10 mm ø1.15 mm ø1.10 mm ø1.15 mm 4 4 5 5 2.75 kPa 2.75 kPa 2.75 kPa 2.
NATURAL GAS CONVERSION 3. Connecting the appliance to a natural gas supply WARNING WARNING Conversion of this unit to natural gas must be carried out by a qualified licensed person and a Certificate of Compliance must be issued to the owner on completion of the installation and conversion. Conversion of this barbecue by unlicensed persons may result in improper functioning of the appliance, injury, property damage and may affect your ability to make a claim under the manufacturer’s warranty.
INSTALLATION WARNINGS WARNING WARNING Choosing a location • This appliance shall only be used in an above ground, open air situation with natural ventilation without stagnant areas, where gas leakage and products of combustion are rapidly dispersed by wind or natural convection. This barbecue has been designed for outdoor use only. Failure to adhere to these installation instructions may cause injury or property damage and affect your ability to make a claim under the manufacturer’s warranty.
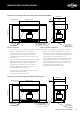
MOUNTING ENCLOSURE GUIDELINES Mounting enclosure dimensions when installed with Beefeater hanging bracket BA70HS 650mm min. 880mm 4 burner 1050mm 5 burner 40mm gap min. 604mm 930mm min. 250mm Separation panel Gas bottle venting slots Rear wall/splashback to be non-combustible material Gas bottle venting slots Enclosure construction Enclosure ventilation requirements • All materials used for the construction of the enclosure and gas bottle compartment must be non-combustible.
ASSEMBLING THE BARBECUE Tools required: Fasteners supplied (with hanging bracket kit) M6 x 25MM 8 OFF The barbecue can be mounted into the enclosure by using the BeefEater hanging bracket kit BA70HS or by resting the barbecue directly on its base. See step 1-4 for mounting of the hanging bracket kit.
3 x2 4 x2 ASSEMBLING THE BARBECUE 11
ASSEMBLING THE BARBECUE 5 x 3, 4 or 5 6 12 ASSEMBLING THE BARBECUE
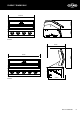
7 Install the flame tamers above the burners that will be under a grill plate. See below for configuration.
ASSEMBLING THE BARBECUE 8 Install the solid plate and grill/s in one of the below configuration options, in order to keep the fat drainage hole from being placed directly above a burner. For easier installation, place the solid plate first, followed by the grill plates.
8 For 5 burner models: Option 2 ASSEMBLING THE BARBECUE 15
ASSEMBLING THE BARBECUE 9 Plate and grill removal The plate and grill may be removed for cleaning following below steps: First lift up the grill from the centre edge as pictured, then remove the solid plate (and 2nd grill if fitted) for cleaning.
10 11 ASSEMBLING THE BARBECUE 17
BURNER REMOVAL, FITTING AND LEAK TEST PROCEDURE WARNING IMPORTANT After completing the gas hose connections, conduct a leak test following the leak test procedure before using the appliance. WARNING WARNING To ensure gas tight connections, complete the gas leak test procedure before and after gas hose connection and after every reconnection of the gas cylinder. Failure to do so may result in a fire or explosion. Leak test procedure • • Ensure all gas valves are in the ‘OFF’ position.
OPERATING INSTRUCTIONS Control functions Lighting instructions Before lighting the barbecue: • Do not attempt to light burners with the cooking surfaces covered • Read instructions before lighting • To light a burner, depress the knob and rotate to The starter mechanism will click and the burner will light • If burner did not light, depress knob and turn back to the ‘OFF’ position • Allow several minutes for gas to disperse then repeat lighting procedure • Once ignited, the knob can then be t
COOKING METHODS Direct cooking method Indirect cooking method This method of cooking can be done with the hood either closed or open. This method of cooking requires the hood to be closed. Commonly used for traditional barbecuing. Place food over the lit grill section. Excess flaring may occur, so care must be taken while cooking. If direct cooking with the lid closed, always check inside the roasting hood regularly. The direct cooking method is recommended for steaks, chops, sausages, and hamburgers.
INDIRECT COOKING / ROASTING Reposition the grill plates To achieve the best heat circulation around the food, it is best to remove the hotplate from the barbecue and position the two grill plates in the centre. Reposition the vaporisers from above the 2 outside burners to above the inside burners. This will give unrestricted heat circulation from the 2 outside burners. Preheating your Barbecue Like an oven, preheating your barbecue before cooking produces better results.
CLEANING AND CARE The cleaning and care instructions are essential for the proper functioning and operation of your appliance over time. Failure to adhere to these care instructions may affect your ability to make a claim under the manufacturer’s warranty. Cleaning the Burners Cleaning Enamel burner box • Remove burners periodically and scrub clean with soapy water and a wire brush making sure that the ports are free of obstructions.
TROUBLESHOOTING PROBLEM CAUSE CHECK Barbecue will not light Ignition system not working Check to see visible spark at starter probe - if no spark is present when control knob is turned then the unit may need to be serviced or replaced. Contact your BeefEater dealer. Check that there is a visible flame coming from the pilot ignition tube. Check that the pilot ignition tube is not blocked by spider webs or insect nests.
GAS CONSUMPTION Gas Consumption LPG Model Barbecue Burners BBG1640SA 4 BBG1650SA 5 BBG1640DA 4 BBG1650DA 5 Side Burners BTU/hr MJ/hr kW g/hr 0 56,869 60 16.7 1191 1 72,034 76 21.1 1509 0 71,086 75 20.8 1489 1 86,251 91 25.3 1806 0 64,452 68 18.9 1350 1 79,617 84 23.3 1667 0 80,564 85 23.6 1867 1 95,730 101 28.
GAS SPECIFICATIONS Gas Type Injector orifice diameter barbecue burner Natural Gas Universal LPG BMG1641SA 1.80 1.10 BMG1651SA 1.80 1.10 BMG1641DA 1.90 1.15 BMG1651DA 1.90 1.15 1.80 1.
NOTES NOTES 26 NOTES
WARRANTY Warranty FOR SALES IN AUSTRALIA AND NEW ZEALAND APPLIANCE: BEEFEATER 1600 SERIES BBQ This document sets out the terms and conditions of the product warranties for BeefEater 1600 series BBQ. It is an important document. Please keep it with your proof of purchase documents in a safe place for future reference should there be a manufacturing defect in your Appliance. This warranty is in addition to other rights you may have under the Australian Consumer Law. 1.
For more information on all Beefeater products, or for dimension and installation information, call into your retailer, phone or email our customer care team or visit our website: AUSTRALIA phone: 1300 307 939 fax: 1800 356 669 email: customercare@electrolux.com.au web: beefeaterbbq.com NEW ZEALAND phone: 0800 436 245 fax: 0800 225 088 email: customercare@electrolux.co.nz web: beefeaterbbq.com BeefEater. We are part of the Electrolux Family.