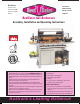
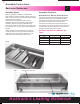
BeefEater AUSTRALIA Signature Plus Signature S-3000E Signature S-3000S Balcony NEW ZEALAND UNITED STATES CANADA BeefEater Gas Barbecues Assembly, Installation and Operating Instructions Certified ISO 9001 : 2000 by 9800958 IMPORTANT: • • • • • • • • • BeefEater Barbecues are approved for OUTDOOR USE ONLY and must not be used in a building, garage or any other enclosed area. BeefEater Barbecues must not be used in recreational vehicles or boats.
Table of Contents Beefeater Barbecues Safety Warnings 3 Assembly & Installation Instructions 6-9 Help Guide 14 Dimensions and Specifications 19 1 Operation Instructions 10 -13 Cleaning and Maintenance 15 - 17 Tech Support 24 2 Spare Parts 20 - 21 BBQ Accessories 24 Outdoor Installation 18 Gas Cylinder Information 4-5 WARNING: We want you to enjoy your barbecuing experience - Failure to follow the instructions and observe the warnings provided in this operating manual could result in
Precautions and Warnings BeefEater Barbecues DO NOT DO • Lean over barbecue when lighting. • Spanner tighten all gas fittings as per instructions. • Leave cooking food unattended. • • Delay lighting burners after turning gas on. Check all gas hoses and line connections for damage, cuts or cracks each time the appliance is to be used. • Spray or store aerosols in vicinity of barbecue whilst in operation. • Always leak test with a solution of soapy water.
Gas Cylinder Information Beefeater Barbecues Gas Cylinder Safety Information This appliance is designed to be used with a gas cylinder not exceeding 9KG (20lbs) capacity. The Gas cylinder must be constructed and marked in accordance with specifications for LP Gas Cylinders of the:(USA) U.S. Dept. of Transportation (DOT) or the National Standard of Canada, CAN/CSA - B339, Cylinders, Spheres or Tubes for the transportation of dangerous goods.
Gas Cylinder Information BeefEater Barbecues Tools Required You will need the following tools to assemble your barbecue. 10mm 19mm 19mm Spanner (wrench) for Gas Inlet Connection 10mm Spanner (wrench) All body nuts Phillips Head Screwdriver Note: Always use the correct size spanner (wrench) to tighten gas fittings. Ensure that all gas fittings are spanner tightened and then leak tested before continuing with operation of the appliance.
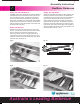
Assembly Instructions Beefeater Barbecues Assembly Notes Assembly Procedure Before any assembly or installation is attempted it is important that you check for damage or missing parts. Your dealer or the manufacturer must be notified of any problems immediately before proceeding. The main frame of the barbecue has been factory assembled requiring only the following simple steps for completion.
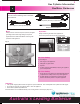
Assembly Instructions BeefEater Barbecues Fitting The Heat Reflectors Fitting The Vaporizers Completely remove all of the plastic film from the reflectors. The tabbed ends of the heat reflectors face forward to the front of the barbecue frame. The tabs fit into the slots in the front end of the barbecue (behind the control fascia). Key the tabs of the Vaporizers into the lower slots (between the burners). Key the tabs of each reflector into the slots.
Assembly Instructions Beefeater Barbecues Assembly Procedure (Continued) Fitting The Cooking Plates And Grills We recommend fitting the plate to the left-hand side of the barbecue frame (with the drain hole to the extreme left). The grill or grills can be fitted to the right hand side of the barbecue frame. Grills must always be positioned over the Vaporizer grids. See Fig 13.
Installation Instructions BeefEater Barbecues Important This appliance must be installed in accordance with the installation requirements of the LOCAL GAS and ELECTRICITY supply authority, or the appropriate installation code issued by the A.G.A. and the A.L.P.G.A. Servicing should only be carried out by an authorised person. This appliance: • Must have a minimum clearance from combustible materials of all sides of the barbecue of 450 mm (18”).
Operating Instructions Beefeater Barbecues Before Lighting After Use 1. Check that all gas hose fittings and connections are spanner tight. Gas regulators that are fitted with a hand tightening wheel should be checked to ensure that the connection is secure. 1. Be sure to turn off all control knobs and cylinder valve (for Propane - LPG) or shut-off valve (for Natural Gas). 2. Check that control knobs are in the Off position.
Operating Instructions BeefEater Barbecues Manual Lighting 1. Press and turn the left hand control knob counterclockwise to the “High” position, then light the left hand burner immediately through the gap between the front of the drip tray and the barbecue body. Note: If the burner does not light immediately, keep the control knob pushed in and turn the control knob to the Off position. Wait 5 minutes for the gas to disperse and then repeat the lighting procedure. 2.
Operating Instructions Beefeater Barbecues Cooking With The BeefEater Roasting Hood cont. If you are cooking a roast, it is always a good idea to use a roast holder and baking dish. This will keep the meat away from the direct heat source but allow the meat to cook by convection. (This is essential in the case of the 2 burner barbecue where the meat tray will be sitting over direct heat). Note: Do not use a baking dish/tray with a depth less than 35mm.
Operating Instructions BeefEater Barbecues Operation Of The Optional Side Burner Warning Lighting When using the side burner ensure that any handle fitted to a wok, pot or pan is positioned so that it is out of reach of children. 1. Check the control knob is in the Off position and ensure the gas line is properly connected. 2. Raise the lid and check that the burner and burner cap are in the correct position. Warning - Safety With Woks And Pots And Pans 3.
Help Guide Beefeater Barbecues Your BeefEater barbecue has undergone a series of quality checking points prior to leaving the factory. Should you have a problem with your appliance please refer to the help guide below before calling your dealer or service person. Important - Shut off the gas supply before performing any checks.
Care and Maintenance BeefEater Barbecues Care And Maintenance Instructions Cooking Surface Preparation Before Using Your BeefEater Barbecue Your BeefEater barbecue will feature either of the following cooking surfaces. 1. Standard Cast Iron Grills 2. ‘RF Technology’ - Porcelain Coated Grills or 3. Stainless Steel Grills Each system has different care and maintenance requirements so it is important to read the correct instructions for the system supplied with your barbecue.
Care and Maintenance Beefeater Barbecues • Coat the grills with a layer of cooking oil. This will protect the grills between barbecuing sessions. . Do not clean the cooking grills in a dishwashing machine. • Do not use highly caustic, harsh or abrasive chemical cleaners to clean the cooking grills. (Always check the manufacturer’s specifications and recommendations prior to use). • Before each subsequent use, preheat your BeefEater for 10 minutes before cooking.
Care and Maintenance BeefEater Barbecues avoid unwanted marks. Near the ocean or salt-water environment, wash regularly, rinse and then dry before covering. Covering a salt sprayed stainless steel product while still wet will allow salt deposits to form, causing rust to form even on very high grade stainless.
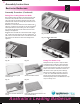
Outdoor Installation Instructions Beefeater Barbecues 1 WARNING: Contact your local municipality for any 2 We recommend that this installation be done in a masonry structure and carried out by a professional tradesperson. Other non-combustible material such as Hardiplank, Villaboard with metal studs may also be used. building codes regulating the installation of outdoor barbecue appliances. Outdoor installations must conform to local codes or, in the absence of local codes, with the following.
Specifications 1 2 BeefEater Barbecues Australia’s Leading Barbecue
Signature Series Spare Parts Beefeater Barbecues 2 Burner Balcony 3 Burner Signature S3000 S/E 21 21 3 3 8 8 * * 4 9 3 9 * 9 * 4 * 4 7 7 5 5 5 5 6 6 11 10 17 6 11 1 6 20 12 13 5 6 1 Ba lco ny 17 16 13 14 11 10 2 16 11 13 11 14 2 14 20 14 16 15 Sign atur e S3 00 0 14 12 16 13 16 15 4 Burner Signature S3000 S/E 5 Burner Signature S3000 S/E 21 21 * 8 8 3 9 3 * 3 * 3 3 4 4 7 7 4 4 4 4 5 5 4 5 5 6 6 5 5 6 6 5 5 6 6 6
Signature Series Spare Parts BeefEater Barbecues Signature S3000E Series (Porcelain Enamel) Ref # 1 2 3 4 5 6 7 8* 9* 10 11 12 13 14 15 16 17 18 19 20 21 Description 2 BNR Barbecue Barbecue Frame Grease tray - Stainless Steel Vaporizer grid Reflector Burner Mixture screw ‘R’ Clip - (Burner retainer clip) Plate (Grill Plate) Grate (Grill) Manifold - C/W gas controls Gas control valve C/W Ignition Fascia Fascia Screw Bezel - (Knob surround) Bezel screw Knob BeefEater badge and circlips Gas Injector -
Warranty Terms and Conditions Beefeater Barbecues WARRANTY BeefEater Barbecues Warranty Terms Signature S3000E & S3000S Series Signature S-3000S Stainless Steel Signature S-3000E Porcelain Enamel Barbecue Frame Lifetime 10 Years Cast Iron Burners 5 Years 5 Years Valves 5 Years 5 Years ‘Quartz Start’ Ignition System 2 Years 2 Years Vaporizer Grids and Reflectors 2 Years 2 Years All Other Parts 2 Years 2 Years Cast Iron Grills 5 Years 5 Years RF Technology - Porcelain Enamel Coati
Warranty Terms and Conditions BeefEater Barbecues WARRANTY Should any part fail due to defective workmanship or faulty materials within the specified period from the date of purchase, BeefEater or its distributor will repair or, (at distributors option), replace the defective part free of charge.
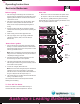
Accessories Beefeater Barbecues See your retailer for the full range of BeefEater barbecue accessories 3 in 1 Scrub Brush Meat Thermometer Baking Dish Roast Rack Barbecue Cover Roasting Hood Apron & Mitt Set Tool Set Kebab Set Tech Support BeefEater Sales International 3-5 Birmingham Avenue P.O. Box 450 Chester Hill N.S.W. Australia 2162 PH: +61 2 9755 7912 FAX: +61 2 9755 7913 USA: Toll Free 1 866 550 2333 E-mail: mail@beefeaterbbq.com Website: www.beefeaterbbq.com Document Ref. Code: 4.