
Installation Manual

Bed Liner Installation Instructions
Procedure
GBRINST Rev. 1 7/14/2017 Page 2 of 6
This document covers such items as:
Vehicle Preparation (use of cleaners, adhesive promoters, etc.).
Bed liner installation.
Safety (rechecking torque procedure, etc.).
1. Check Kit Content.
(a) Verify that the kit contains all the parts listed in the
Kit Contents.
2. Vehicle Preparation.
(a) Wash and Dry the Bed and Tailgate areas thoroughly.
(b) IMPORTANT: Review all instructions before
beginning installation. Truck bed should be at least
68°F (20°C) for maximum adhesion. Clean all areas
with an approved cleaner before applying tape. Do not
remove backing from any tape until ready to adhere to
the truck bed. When removing backing, do not touch
adhesive. Extra adhesive strips have been provided in
the kit for future use or if the installer deems more
fasteners are necessary for better fit/appearance.
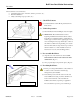
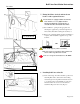
3. Pre-assemble Bed Liner.
(a) Align the sides of the bed liner as shown. NOTE:
BED LINER FLOOR IS FACE DOWN FOR THIS
OPERATION. (Fig 3-1)
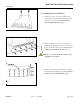
(b) Once properly aligned, zip sides into place. (Fig 3-2)
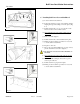
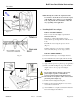
4. Pre-fitting Bed Liner.
(a) Before proceeding with installation, verify whether or
not the bed of the vehicle has a bedrail cargo
management system installed.
(b) If a bedrail is present, trim off sections of the sides
and/or bulkhead area. (Fig. 4-1) These trim lines are
located on the back side of the side walls and
bulkhead, and will vary depending on application.
If not a bedrail is not present, proceed with Step 5.
Fig. 3-1
Fig. 3-2
Fig. 4-1
Utilit
y
Knife
07+ Tundra Shown