
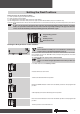
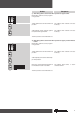
Operating instructions


16
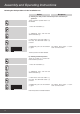
Assembly and Operating Instructions
2010 300 326 0c 08/09
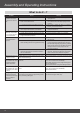
3. Setting the upper nal position
a: To upper buffer
Travel the shutter upwards against the upper buffer until
the tubular drive automatically switches off.
b: To upper position (only possible with installation set in
case of anti-lifting devices)
Travel the shutter to the desired upper position and move
the respective switch from to .
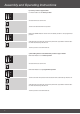
Setting the nal positions via the switches Setting the nal positions via the installation
set
1. Setting the lower nal position
Connect the wires of the tubular drive to the same coloured
wires of the installation set. Slide both switches to the pro-
gramming position (I).
a: To lower position
Travel the shutter to the desired position and press the
programming button on the installation set until the drive
makes a “clack” sound.
2. Setting the lower nal position
a: To lower position
Travel the shutter to the desired position and move the re-
spective switch from
to .
Deleting the nal position(s)
Move the respective switch from to .
2. Setting the upper nal positions
a: To upper buffer
Travel the shutter upwards against the upper buffer until
the tubular drive automatically switches off.
b: To upper position
Travel the shutter to the desired upper position and press
the programming button on the installation set until the
drive makes a “clack” sound.
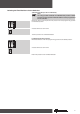
Deleting the nal position(s)
To delete the nal positions, execute the following “deleting
sequence”:
1. Deleting both nal positions
Set both switches to
.
Actuate a brief start command.
b: To lower buffer
Set both switches to
.
When using anti-lifting devices (permanent suspension
device), travel the shutter downwards until the tubular
drive automatically switches off.
b: To lower buffer
When using anti-lifting devices (permanent suspension
device), travel the shutter downwards direction until the
tubular drive automatically switches off.
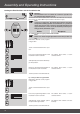
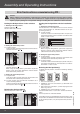
Brief instructions commissioning PR+
clack
1. Press the reset button (1).
2. Additionally press the travel button (2) downwards and
keep it pressed.
3. Now release the reset button (1) while keeping the travel
button (2) pressed.
4. Additionally press the reset button (1) again.
The tubular drive makes a “clack-clack” sound to conrm de-
letion.
The nal position has now been deleted.
If the tubular drive is located between the nal positions, both
nal positions are deleted. If the tubular drive is located at one
of the two nal positions, only the respective nal position is
deleted.
Caution
Always adhere to the information contained in the assembly and operating instructions during commis-
sioning, operation and repair work. The manufacturer or supplier shall not accept liability for personal
injuries, property damage or consequential damages resulting from non-adherence to the instructions.
1.
2. 3. 4.