
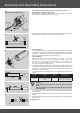
Operating instructions


10
Assembly and Operating Instructions
Action Response
clack
clack
clack
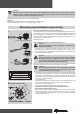
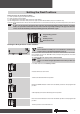
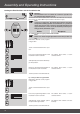
Setting the Final Positions via the Installation Set
Attention
The installation set is not suitable for continuous operation and
has only been designed for set-up.
Connect the wires of the tubular drive to the same coloured wires of the installa-
tion set (Art. No. 4935 200 011 0) and switch on the mains supply.
Note
If, due to an obstruction, the tubular drive switches off prema-
turely while travelling upwards and downwards, it is possible to
relieve the obstacle and to remove it by briey travelling in the
opposite direction, and to set the desired nal position by trav-
elling upwards/downwards again.
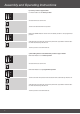
Travel to the desired lower nal posi-
tion.
Move both switches to the program-
ming position.
Press the programming button of the
installation set for 3 seconds.
The tubular drive makes a “clack”
sound to conrm.
Subsequently travel to the desired up-
per nal position.
Now press the programming button of
the installation set for 3 seconds.
The tubular drive makes a “clack”
sound to conrm.
The nal positions have now been set.
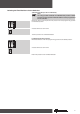
b) Lower position to upper buffer
Move both switches to the program-
ming position.
Travel to the desired lower nal posi-
tion.
Press the programming button of the
installation set for 3 seconds.
a) Lower position to upper position without buffer
Note
There is no shutter length adjustment for this nal position set-
ting.
The tubular drive makes a “clack”
sound to conrm.
Subsequently travel upwards against
the permanent upper buffer.
The tubular drive switches off auto-
matically.
The nal positions have now been set.