
Operating instructions

8
Assembly and Operating Instructions
2b)
4)
1) + 2a)
Action Response
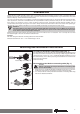
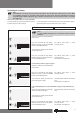
1) Connecting the tubular drive
Connect the tubular drive to the power
supply and open the battery compart-
ment of the hand-held transmitter.
2) Activating tubular drive learn mode
2a) Activating the tubular drive learn mode by switching on the power sup-
ply
Switch on the power supply. The tubular drive goes into learn mode for
3 minutes.
Note
If several tubular drives are to be connected in parallel, one of the
tubular drives can be deactivated from the learn mode by sliding
the radio switch into the outer position after having switched on
the power supply.
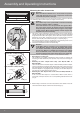
2b) Activating the tubular drive learn mode with the radio switch
Slide the radio switch into the inner
position. If the switch is already in this
position, move the button into the outer
position and back to the inner position
again.
The tubular drive goes into learn mode
for 3 minutes.
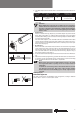
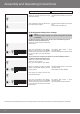
3) Learning the master transmitter
When the drive is in learn mode, press
the learn button and hold for 3 seconds.
The tubular drive makes a “clack-clack”
sound to conrm.
The learn process is complete.
Note
If a transmitter had already been programmed in the receiver,
press and hold the learn button for 10 seconds.
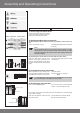
4) Checking the axle direction
Press the UP or DOWN button. If the shutter moves in the desired di-
rection => the axle direction is OK.
If the shutter moves in the wrong direction, the axle direction has to be changed.
This is done as follows:
Slide the axle direction switch into the
opposite position.
The axle direction has been altered.
Re-check the axle direction.
Axle direction switch
Radio switch
Axle direction switch
Radio switch
3)
Clack
Clack
Mains connection
Motor cable
blue
black
brown
black
blue
green/
yellow
green/
yellow