
Operating instructions

10
Assembly and Operating Instructions
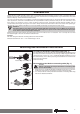
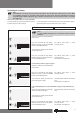
5d)
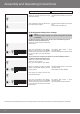
6a)
6b)
Action Response
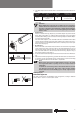
6b) Increasing the shutter travel distance (the desired limit position is
outwith the existing travel distance)
Adjust the shutters to the limit position
which you wish to extend.
First press and hold the learn button.
The tubular drive makes a “clack-clack”
sound to conrm.
The end limit has been deleted.
Now adjust the shutters into the new
desired limit position.
Within 3 seconds also press the STOP
button and hold both buttons pressed
for 10 seconds.
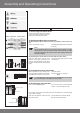
First press and hold the learn button.
Within 3 seconds also press the DOWN
button for the lower limit or the UP but-
ton for the upper limit position and hold
both buttons.
The tubular drive makes a “clack”
sound to conrm.
The new end limit has been stored.
6) Changing the limit position settings
Note
The limit position settings can only be changed via the master
transmitter.
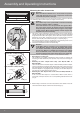
First press and hold the learn button.
Within 3 seconds also press the DOWN
button for the lower limit or the UP but-
ton for the upper limit and hold both
buttons.
The tubular drive makes a “clack”
sound to conrm.
The new limit position has been stored.
6a) Decreasing the shutter travel distance (the desired limit position is
within the existing travel distance)
Adjust the shutters into the new desired
limit position.
to 5d) Anti-lifting device at the lower limit to upper stopper
Adjust the shutters until they are in the
lower limit position.
The tubular drive switches off automati-
cally.
Then adjust the shutters up towards the
permanent upper stopper.
The tubular drive switches off automati-
cally.
The end limits have been set.
The nal limit position becomes xed, after the tubular drive has turned off automatically, in the desired position, three times.
Clack
Clack
Clack
Clack